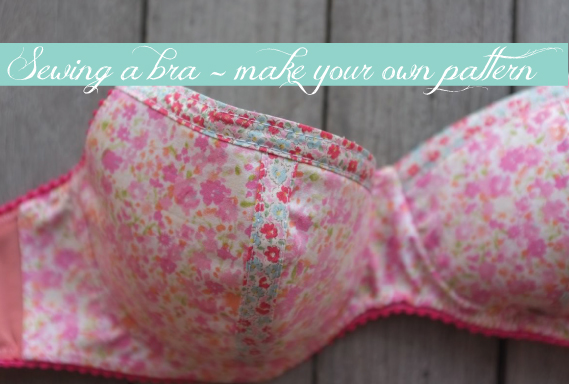

It seems that bra making is capturing everyone’s interest so I thought I would do a few more technical posts on how I create my own patterns for bras. This way you can see how to create a pattern from a favorite bra you already own. Today is part 1 and I’ll be following up with more posts covering the steps. I do hope that this is useful for you, I know it was the information I was looking for when I wanted to make bras and I couldn’t find it so did it my own way instead.
First up grab a bra you like the fit of but is looking a little worse for wear. In my last bra post I referred to these as zombie bras, as in not quite dead. You want one that still retains the majority of shape and stretch as the more warped it is the more fit tests you are going to have to do to refine the pattern. You could of course use a brand new bra but sometimes we can’t always afford to do that. If you can though, go for it. Using a brand new one means it hasn’t had time to warp or stretch so you should end up with less faffing about to get your fit perfect.
Photograph it.

Include detail shots, like how the band/cups are constructed. Interior shots are good too.

What the back looks like.

Then unpick it

As you unpick, it’s a good idea to keep notes on the construction methods used. Like was it straight stitch or zig zag, was there a bar tack at the very top or a few millimeters away from the very edge. Was the elastic sandwiched in between the underwire casing and the outer fabric. I tend to take photos as well as notes to help jog my memory.
Once you have it fully unpicked then grab your iron and get pressing. You want all the wrinkles out and your pieces as flat as possible. Be careful though. What you are looking for here is to press the pieces to their original shape. In the photo above you can see the back of the bra is a floppity looking. It’s quite stretched and in all honesty not perfect for this project. So I press it flat with some of the wrinkles in it. I don’t want to press it out to the newly warped shape. Press but be mindful of not distorting the original shape.
Now that I have all the pieces and they are more or less the correct shape I’m going to scan them. That way I can create a digital pattern for myself. If you don’t want a digital pattern you can create a traditional paper pattern also.
 I’m going to leave it there for now so you can get unpicking. The next post will be covering how to make the pattern and then we will continue on from there. If you need anything clarified or just have more questions, ask away in the comments.
 After scanning my pressed pieces, I am going to set about tracing them using Adobe Illustrator. Now as I said in part 1 you don’t need to make a digital pattern. I’m doing it because it’s going to make visuals easier for me to show on the blog and because I have a cat who likes to nest in lots of pretty patterns. Invariably I lose pattern pieces. This way I am ensuring that none get lost and I don’t have to unpick another bra and start the whole process over again.
Start by tracing any pieces that are asymmetrical in shape. If you are using Illustrator the pen tool is your best option for this. Double check to make sure your scans are at actual size. Do not resize them from the original size or you will run into sizing problems when you make your actual bra.

If you are creating a traditional manual pattern use pattern weights to hold the pieces in place while you trace around. If your pieces are too small for that, try taping them in place using some magic tape or washi tape (basically any tape that is easy to remove. Now is not the time to be using super sticky tape that may damage your pattern). Use a sharp pencil, ruler and french curve to help you get the most accurate tracing possible. Be sure to mark seam allowances, grainlines, stretch direction and if needed add notes. The shapes are odd and very small so it can be easy to mix them up. A well placed this side up, this seam joins to that seam marking or note can make your life a whole lot easier. This pattern is for YOU so make all the notes and markings you need to.

Once you have all the asymmetrical pieces traced now it’s time to work on the symmetrical pieces. Mark the centre point of each of the pattern pieces. Take a sheet of paper and fold it in half. Placing the fold line under the original fabric piece. Lining it up on the centre line you just marked. Once it is correctly aligned then you can trace out one side of your shape. Creating them on the fold is more accurate. Do this for all symmetrical shapes. If using illustrator, trace half and then copy the piece and flip it. Re join it to create one pattern piece.

As you go through tracing your pieces be critical in the assessment of them. Is there an odd bump going upwards on what seems to be a straight line? Does one corner pull down in an almost arrow like way? Pattern lines should be smooth. If it’s a curve, a straight line or an angle. The line is to be smooth and free from bumps or ridges. When you are tracing from a garment that has been worn you will find more bumps and ridges as the fabric has distorted. You can see in the above photo that the fabric piece has been distorted. See how warped the gingham checks are. I’ve drawn the piece to help compensate for those factors. So take your time now to be aware of this and adjust if needed?
It all comes down to the accuracy of your pattern. Take your time, trace carefully but also measure. Ensure that pieces that are to be joined are the same length, mark your notches, grainlines. Use your notes and photos to give yourself as much information as you need to get a really good pattern created.

Next time I’ll be talking fabrics, trims and notions. Until then if you need anything clarified or just have more questions, ask away in the comments.

By now you have taken your bra apart and spent your time making an accurate pattern. So now it’s all about collecting everything you need to start sewing your bra.
Based on the bra I took apart here is what I need

- Foam – I chose one that is about 4mm thick, the same as the bra I took apart
- Decorative lace trim
- Exterior fabric
- Underwire casing
- Underwires
- Contrast fabric – this could also be the same as the exterior fabric
- Bra strap elastic
- Rings – I find metal ones last longer and if you are putting your bras into the washing machine/dryer then I’ve found metal ones last much longer
- Bra sliders – again I prefer metal but then can also be plastic
- Powermesh – on this bra it’s powermesh but I have other bras that have a soft mesh, polyester spandex. If you can’t get exactly like the bra you took apart then be aware of the amount of stretch (or lack thereof) that you are adding to your bra.
- Decorative bow
- Decorative ribbon
- At the bridge on this bra there is an exterior fabric and then the inner fabric is a non stretch fabric
- Hook and Eyes
- Mesh cover on internal cup seams. This one has a line of mesh but other styles I have use an incredibly soft satin ribbon. I’m thinking of going with the ribbon just because I already have some and it’s one less item to buy.
- Lingerie elastic
In addition you will need thread, machine needles, a machine that can do straight stitch and zig zag and a large cup of tea or coffee to help you out during the assembly.
Now I know this looks like a huge amount of stuff but if your original bra is in pretty good condition there is a whole bunch of stuff you can recycle from the original bra. The underwires, even the underwire casing if you were careful during the unpicking stage. Hook and eyes can be reused (and dyed if necessary), sliders and rings can be re used multiple times (another good reason to go metal and not plastic). Even the decorative bow can be re used.
This covers what I need to recreate my bra, be sure to check your own bra and see what is needed to recreate it. There is a great list on Bra makers Supply that is super helpful and I find the information that Norma from Orange Lingerie to not only be amazing but also inspiring.
The next step is going to be the assembly of my bra and I hope to get to that as soon as I can. Apologies for the big gap in time from Part 2 to Part 3 but life stuff happened and I just didn’t have time to get to this post, sorry if it interfered with anyone’s plans.
Am excited to be up to the assembly stage, it’s going to be fun recreating one of my favourite bras.

I’ve had my pattern and supplies ready to go for weeks and have been so busy it’s had to just sit there taunting me to hurry up and make it. So today I set aside some time to sew up my bra.
Before I got started I
- made sure I had all my pattern pieces
- got out all my supplies
- looked at the photos I took before unpicking my bra
- looked at another bra that is virtually identical to the one I unpicked
- placed a notebook and a pen by my machine
Then I started cutting and assembling the bra. Along the way I made sure to note when seams didn’t quite match up. Seam allowance sizes and could I make adjustments. I took copious amounts of notes on how I sewed it together and what I needed to change.
All this note taking and referencing is really important if you want to make multiple bras and it helps when it comes to fitting. If you’ve adjusted a seam allowance and then it’s tight you can figure out where the issue occurred.
Overall I felt I was going really well. Then my machine which is normally an absolute angel decided it was not going to sew any mesh fabric without skipping all over the place. Cue 4 hours of me cleaning and testing the machine over and over to try and get a decent result. Nope it looks like a dogs breakfast. It’s quite possibly the worst stitching I have ever done (and now there are photos of it on the internet).

A half done bra, only the right side (when wearing) of the bra has an underwire in it, no straps, no closures but plenty of dodgy stitching. Want a close up of the stitching? Sure why not?

So very very bad. It’s skipping, puckering and just horrible.

On this style the shape of the cup looks very very odd until the underwire casing and then the underwire is inserted. It then magically pops up to the correct shape. It really shows just how much of the shape of a bra is down to every individual component working together.

The inside of the cup with the underwire. Next time I’m going to cover the inside of the foam. It’s nice and soft as is I just think the extra finishing detail might be nice?

Here you can see the odd shape the cup is before the casing and underwire is put into place. It’s also pretty cool in that the casing actually hides all those raw edges. Over in the side of the photo you can see where I need to adjust the pattern as it was too wide on the back mesh. Looking back on my notes I had added a double lot of seam allowance by accident. It really is so handy to take notes when you are attempting a DIY of this sort.

On the outside I used a floral bias binding to cover a dart on the cup and across the tops of each cup. On the original bra instead of bias it was lace. I did try a lace but felt that it got lost on the floral so tried the bias and I really like the look of it. Would love to try it with a high contrast like navy blue satin bias on a cream satin base.
For this stage it’s going well. The only thing holding me back is not wanting to utterly break my machine when it’s clearly having problems. The one big fit problem with bras is that you have to finish one to try it on and see if it fits. Obviously this isn’t at that stage yet but I already have a list of things to improve the construction and look of future bras
- cover internal of cups
- use of alternative trims like Bias works
- back mesh panels need to be adjusted to correct height
- foam cup panels are slightly too large for fabric pattern size. Re check measurements and adjust
- add more notches to help line things up more accuraetly
- regular woven cotton works well as a foam cup covering with no wrinkles or tension
For me this sample looks pretty but has bad stitching. It is just a toile and I’m going to have to make some dodgy ones in order to get the pattern perfect and I’m not defeated yet.
So if you are working away on your own DIY bra pattern, keep at it. Take your notes and keep trying.

A finished bra, a properly finished bra.

For this version I’ve gone with a plain woven cotton fabric for the cups, cradle and bridge. Seams are covered with some pretty bias tape and white mesh used for the back. I used some teal coloured underwear elastic from the stash for the edges. Underwires, foam lining and bra strapping were purchased but the O ring, sliders and back fastener were all salvaged from a worn out bra.

A few people have asked how the plain cotton wears, I find it great to wear and I like the fact I can use up scraps. It’s also a nice stable fabric to sew which can be handy when you are going through a process it’s easier to put some known variables into the mix. So instead of having to deal with a super slinky slippery fabric on top of sorting out tension and fit, it’s easier to use a cotton and perfect the techniques before moving onto harder to deal with fabrics.
After the disaster sewing of the last one I played around with the zig zag stitch on my machine until I perfected the settings. I’ve now got the instructions on how to recreate those settings written in my process notes so I can replicate perfect stitching every time.
I’ve made a few minor alterations notes but want to do some wash and wear tests before I make another one to ensure I’ve got my pattern perfect before I make ALL the bras. For ease of sewing I already know I want to increase one of the seam allowances as it’s so small and fiddly now. Will increase it and trim it to make the sewing easier.
Like all sewing, bra making is not difficult to do but takes time to perfect and I’ve thoroughly enjoyed the process of making my own pattern and creating bras from it, I hope you have enjoyed it too!