
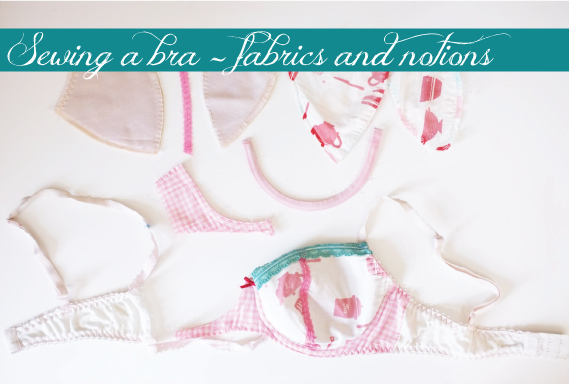

By now you have taken your bra apart and spent your time making an accurate pattern. So now it’s all about collecting everything you need to start sewing your bra.
Based on the bra I took apart here is what I need

- Foam – I chose one that is about 4mm thick, the same as the bra I took apart
- Decorative lace trim
- Exterior fabric
- Underwire casing
- Underwires
- Contrast fabric – this could also be the same as the exterior fabric
- Bra strap elastic
- Rings – I find metal ones last longer and if you are putting your bras into the washing machine/dryer then I’ve found metal ones last much longer
- Bra sliders – again I prefer metal but then can also be plastic
- Powermesh – on this bra it’s powermesh but I have other bras that have a soft mesh, polyester spandex. If you can’t get exactly like the bra you took apart then be aware of the amount of stretch (or lack thereof) that you are adding to your bra.
- Decorative bow
- Decorative ribbon
- At the bridge on this bra there is an exterior fabric and then the inner fabric is a non stretch fabric
- Hook and Eyes
- Mesh cover on internal cup seams. This one has a line of mesh but other styles I have use an incredibly soft satin ribbon. I’m thinking of going with the ribbon just because I already have some and it’s one less item to buy.
- Lingerie elastic
In addition you will need thread, machine needles, a machine that can do straight stitch and zig zag and a large cup of tea or coffee to help you out during the assembly.
Now I know this looks like a huge amount of stuff but if your original bra is in pretty good condition there is a whole bunch of stuff you can recycle from the original bra. The underwires, even the underwire casing if you were careful during the unpicking stage. Hook and eyes can be reused (and dyed if necessary), sliders and rings can be re used multiple times (another good reason to go metal and not plastic). Even the decorative bow can be re used.
This covers what I need to recreate my bra, be sure to check your own bra and see what is needed to recreate it. There is a great list on Bra makers Supply that is super helpful and I find the information that Norma from Orange Lingerie to not only be amazing but also inspiring.
The next step is going to be the assembly of my bra and I hope to get to that as soon as I can. Apologies for the big gap in time from Part 2 to Part 3 but life stuff happened and I just didn’t have time to get to this post, sorry if it interfered with anyone’s plans.
Am excited to be up to the assembly stage, it’s going to be fun recreating one of my favourite bras.


I’m really enjoying these posts Susan. Thank you for sharing. I think one of the things stopping me from diving in to make bras is the supplies needed, but there are kits out there so really I have not excuse. 🙂
There does seem to be a lot of “stuff”. I’ve been collecting bits and when the pricing isn’t too bad I grab enough for a few at a time. I figure that’s cheaper than having to travel back to pick up just enough for 1 bra each time. I also had to let go of some of my crazy colour matching tendencies and accept that for some bras not all my accessories are going to match.
Thanks for reminding me that I can reuse some of the notions on my RTW bras if they start to sag…
Reusing the components is such a great way to build up a little stash. Even if you only use them for test bras and getting the fit right it’s such an easy way to find all the pieces.