Posted on 1 Comment

Everyone deserves Pretty Lingerie – Esme Pants and Rosie Bra

I spotted this set on instagram and thought it would be so sweet made up in the Tumeric lace kit I had in the shop. I sort of forgot about it till Evie La Luve had a birthday sale and they I grabbed both pieces so I could give them a try.

set

When cutting out the pattern I noticed it had a few small errors (not lining up in certain areas) nothing major just something I noted.

rosie bra

I’ve made the Rosie Bra with no lining just the lace and the mesh. I think next time I might try going down a size in the Rosie Bra as it could afford to be a little more snug.

bra detail

The instructions weren’t super clear. There are written instructions and then photos underneath but I found many of the photos were too close up for me to see clearly what is happening. I found it easier to look at the finished photos and figure it out from there. My advice would just be to go slow and keep another bra on hand to follow along with if necessary?

esme

The Esme pants are cute, I’m not sure if I got my size right but I’ll check after wearing them as it’s always hard to tell with just a quick try on. I had a little bit of trouble getting the gusset and crotch right, a few lines of extra stitching and it’s all fine just not as neat as I’d like. I couldn’t find my fold over elastic so I just used regular picot elastic for the waistband and it seems to have worked fine.

lace

I really like the way the lace crosses from the front to the back it’s a really cute detail.

lace sides

Fabric: Tumeric lace and trims from Measure Twice Cut Once store black spot mesh and black viscose jersey purchased at Pitt Trading.

Pattern: Esme pants and Rosie Bra from Evie la Luve

Alterations: Try a size down on the bra next time.

Posted on 2 Comments

Everyone deserves Pretty Lingerie – Jersey slip

For ages I’ve wanted to make some pretty nightwear as I realised I kind of hated my pyjamas. So I’ve been working on a slip pattern.

racerback-slip-bw

I wanted a nice soft stretchy slip that could be made in a jersey or a stretch lace and a racer back. Here are the first few samples, hot off the machine wrinkles and all.

IMG_8754

I’ve been wearing them to see how they feel and what changes need to made to the pattern. First up they are super comfortable and quite flattering. A few small adjustments need to be made.

IMG_9008

Reduce the height on the racer back slightly (comes up too close to the back of the neck). Add a little bit more coverage to the cup area and work on the elastic underbust construction so it sits nice and flat. It sits flat on the black knit but on the printed knit it got a bit wavy.

IMG_9009

Once I get the pattern sorted I can’t wait to make them up in some super pretty laces and knits.

Fabric: Black Viscose jersey, pink folder over elastic purchased at Pitt Trading. White jersey with printed hearts from the stash but purchased forever ago at The Remnant Warehouse. Other trims from the stash.

Pattern: Measure Twice Cut Once pattern  (available soon for sale)

Alterations: Fix pattern and retest before achieving optimum fit and assembly.

Posted on Leave a comment

Everyone deserves Pretty Lingerie – eye mask

I never knew the value of an eye mask until I was traveling regularly. They save you on flights, giving you a way to black out the world and just have some peace.

When I spotted the super cute masks at Evie la Luve I knew they would be perfect for flights and even better to make as gifts. I mean who doesn’t want a pretty mask?

pinned mask

Using a capelet I had leftover from another project I cut some out.

capelet

The fabric on the capelet was so gorgeous it was perfect for upcycling.

fabric closeup

I could even use the lining. All I needed to add was some decorative bra strapping for the head band. To ensure a good block out I interfaced the lining with some 3mm iron on wadding (purchased at Pitt Trading).

The result is super cute and very fast, I can foresee many of these making it into my handmade Christmas packs this year (sorry if that spoils the surprise for anyone!).

mask

back

Fabric: upcycled from a capelet, originally a designer offcut. Iron on wadding purchased at Pitt Trading.

Pattern: Cat eye mask from Evie la Luve

Alterations:  used decorative bra strapping instead of foldover elastic for head band. Next time make the elastic short by 2cm,


Posted on 2 Comments

Everyone Deserves Pretty Knickers week – round up

2015-knickersweek_header

So Everyone Deserves Pretty Knickers week has been and gone and I didn’t get to even a fraction of the things I had planned. Life stuff got in the way and ever since I’ve been so busy I haven’t had a chance to get back to the blog.

Thanks so much to everyone who joined in, I sincerely hope you’ve added a few more pretty knickers to your lingerie drawer.

Despite all the life dramas of the week I did manage to squeeze in a tiny amount of sewing time and got 3 new pairs finished. These were all part of my stash busting efforts so I was using fabrics and trims I had on hand.

apple knickers

fluro knickers

stripe knickers

Next year I’ll be looking forward to lots of fun stuff when we have our next Everyone Deserves Pretty Knickers Week!

Posted on 12 Comments

2nd Annual Everyone Deserves Pretty Knickers Week

2015-knickersweek_header

The first Everyone Deserves Pretty Knickers week was a resounding success and so we are having a 2nd one! Running from May 31st through to the 6th of June. So grab a badge and be ready to make yourself some pretty knickers because #everyonedeservesprettyknickers

During the week long event I’ll be showcasing a number of tutorials on the blog so you can add some variations to your patterns and never have to spend money on designer lingerie again because you can make your own.

2015-knickers-website-button

<img src=”http://www.measuretwicecutonce.com.au/wp-content/uploads/2015/05/2015-knickers-website-button-190.jpg”/>

Posted on 7 Comments

Kits and Supplies Now Available

brakitsandsupplies_header

Exciting news!

The Measure Twice Cut Once webstore is now carrying bra kits and accessories in a wonderful array of fashionable colours!

celeste bra kit

pink bra kit

purple bra kit

I’ve been receiving so many emails asking about where to find good hardware, people trying to find suppliers of plush back elastic and the general struggle to find anything suitable. So I thought I’d make it easy for everyone and make them available on the website.

I’m offering both kits and accessories as I know you might just need to source one or 2 pieces and already have the rest in the stash? This way is much more flexible and you can tailor it to your needs.

The sliders and O rings are metal with a beautiful finish and available in either gold or nickel (silver).

gold bra sliders

nickel bra rings

Bra strapping are available in different widths and colours. Great for bra straps, headbands, cami top straps and anywhere you need a firm elastic with a controlled amount of stretch.

Picot or plush back elastic is available in 3m lengths perfect for knickers, boxer shorts, bras and even waistbands of skirts and slips.

I hope this makes your bra and knicker making a whole lot easier and don’t be afraid to ask if there is something you need and can’t find. It’s a pretty good chance I can source it for you.

Kits and accessories can be posted worldwide and are sent out using Australia Post.

Posted on 7 Comments

Bra Making – how to DIY your own pattern part 5

diy_bra_header-5

A finished bra, a properly finished bra.

bra 1

For this version I’ve gone with a plain woven cotton fabric for the cups, cradle and bridge. Seams are covered with some pretty bias tape and white mesh used for the back. I used some teal coloured underwear elastic from the stash for the edges. Underwires, foam lining and bra strapping were purchased but the O ring, sliders and back fastener were all salvaged from a worn out bra.

bra unfolded

A few people have asked how the plain cotton wears, I find it great to wear and I like the fact I can use up scraps. It’s also a nice stable fabric to sew which can be handy when you are going through a process it’s easier to put some known variables into the mix. So instead of having to deal with a super slinky slippery fabric on top of sorting out tension and fit, it’s easier to use a cotton and perfect the techniques before moving onto harder to deal with fabrics.

After the disaster sewing of the last one I played around with the zig zag stitch on my machine until I perfected the settings. I’ve now got the instructions on how to recreate those settings written in my process notes so I can replicate perfect stitching every time.

I’ve made a few minor alterations notes but want to do some wash and wear tests before I make another one to ensure I’ve got my pattern perfect before I make ALL the bras. For ease of sewing I already know I want to increase one of the seam allowances as it’s so small and fiddly now. Will increase it and trim it to make the sewing easier.

Like all sewing, bra making is not difficult to do but takes time to perfect and I’ve thoroughly enjoyed the process of making my own pattern and creating bras from it.

Seems like more than a few of you have been interested in DIYing your own bra pattern as I’ve had many requests to teach classes on the process. So I’m in the midst of working out the logistics am happy to announce that…

DIY bra classes will be coming soon to Sydney!

Be sure to sign up to the newsletter or follow on instagram to ensure you get first notice about it.


Posted on 5 Comments

Bra making – how to DIY your own pattern part 4

diy_bra_header-4

I’ve had my pattern and supplies ready to go for weeks and have been so busy it’s had to just sit there taunting me to hurry up and make it. So today I set aside some time to sew up my bra.
Before I got started I

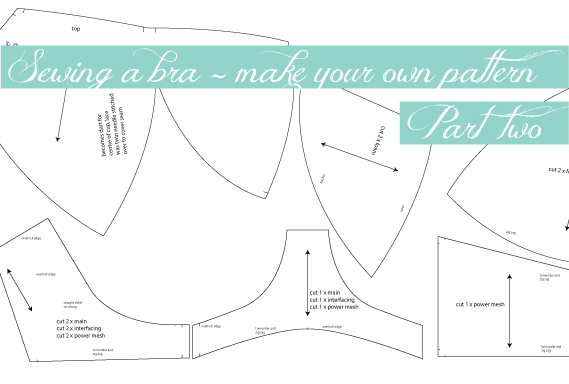
  • made sure I had all my pattern pieces
  • got out all my supplies
  • looked at the photos I took before unpicking my bra
  • looked at another bra that is virtually identical to the one I unpicked
  • placed a notebook and a pen by my machine

Then I started cutting and assembling the bra. Along the way I made sure to note when seams didn’t quite match up. Seam allowance sizes and could I make adjustments. I took copious amounts of notes on how I sewed it together and what I needed to change.

All this note taking and referencing is really important if you want to make multiple bras and it helps when it comes to fitting. If you’ve adjusted a seam allowance and then it’s tight you can figure out where the issue occurred.

Overall I felt I was going really well. Then my machine which is normally an absolute angel decided it was not going to sew any mesh fabric without skipping all over the place. Cue 4 hours of me cleaning and testing the machine over and over to try and get a decent result. Nope it looks like a dogs breakfast. It’s quite possibly the worst stitching I have ever done (and now there are photos of it on the internet).

half done bra

A half done bra, only the right side (when wearing) of the bra has an underwire in it, no straps, no closures but plenty of dodgy stitching. Want a close up of the stitching? Sure why not?

bad stitching

So very very bad. It’s skipping, puckering and just horrible.

underwire v non wire

On this style the shape of the cup looks very very odd until the underwire casing and then the underwire is inserted. It then magically pops up to the correct shape. It really shows just how much of the shape of a bra is down to every individual component working together.

inside cup with underwire

The inside of the cup with the underwire. Next time I’m going to cover the inside of the foam. It’s nice and soft as is I just think the extra finishing detail might be nice?

inside cup without underwire

Here you can see the odd shape the cup is before the casing and underwire is put into place. It’s also pretty cool in that the casing actually hides all those raw edges. Over in the side of the photo you can see where I need to adjust the pattern as it was too wide on the back mesh. Looking back on my notes I had added a double lot of seam allowance by accident. It really is so handy to take notes when you are attempting a DIY of this sort.

trim

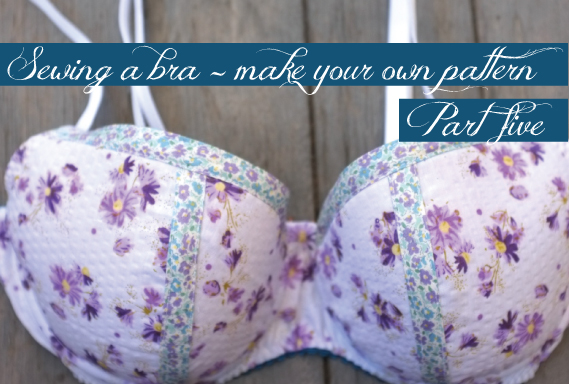
On the outside I used a floral bias binding to cover a dart on the cup and across the tops of each cup. On the original bra instead of bias it was lace. I did try a lace but felt that it got lost on the floral so tried the bias and I really like the look of it. Would love to try it with a high contrast like navy blue satin bias on a cream satin base.

For this stage it’s going well. The only thing holding me back is not wanting to utterly break my machine when it’s clearly having problems. The one big fit problem with bras is that you have to finish one to try it on and see if it fits. Obviously this isn’t at that stage yet but I already have a list of things to improve the construction and look of future bras

  • cover internal of cups
  • use of alternative trims like Bias works
  • back mesh panels need to be adjusted to correct height
  • foam cup panels are slightly too large for fabric pattern size. Re check measurements and adjust
  • add more notches to help line things up more accuraetly
  • regular woven cotton works well as a foam cup covering with no wrinkles or tension

For me this sample looks pretty but has bad stitching. It is just a toile and I’m going to have to make some dodgy ones in order to get the pattern perfect and I’m not defeated yet.

So if you are working away on your own DIY bra pattern, keep at it. Take your notes and keep trying.

Posted on 8 Comments

Bra making – how to DIY your pattern part 2

diy_bra_header2After scanning my pressed pieces, I am going to set about tracing them using Adobe Illustrator. Now as I said in part 1 you don’t need to make a digital pattern. I’m doing it because it’s going to make visuals easier for me to show on the blog and because I have a cat who likes to nest in lots of pretty patterns. Invariably I lose pattern pieces. This way I am ensuring that none get lost and I don’t have to unpick another bra and start the whole process over again.

Start by tracing any pieces that are asymmetrical in shape. If you are using Illustrator the pen tool is your best option for this. Double check to make sure your scans are at actual size. Do not resize them from the original size or you will run into sizing problems when you make your actual bra.

tracing your bra pattern

If you are creating a traditional manual pattern use pattern weights to hold the pieces in place while you trace around. If your pieces are too small for that, try taping them in place using some magic tape or washi tape (basically any tape that is easy to remove. Now is not the time to be using super sticky tape that may damage your pattern). Use a sharp pencil, ruler and french curve to help you get the most accurate tracing possible. Be sure to mark seam allowances, grainlines, stretch direction and if needed add notes. The shapes are odd and very small so it can be easy to mix them up. A well placed this side up, this seam joins to that seam marking or note can make your life a whole lot easier. This pattern is for YOU so make all the notes and markings you need to.

Screen Shot 2014-10-09 at 2.34.28 pm

Once you have all the asymmetrical pieces traced now it’s time to work on the symmetrical pieces. Mark the centre point of each of the pattern pieces. Take a sheet of paper and fold it in half. Placing the fold line under the original fabric piece. Lining it up on the centre line you just marked. Once it is correctly aligned then you can trace out one side of your shape. Creating them on the fold is more accurate. Do this for all symmetrical shapes. If using illustrator, trace half and then copy the piece and flip it. Re join it to create one pattern piece.

Screen Shot 2014-10-09 at 2.40.56 pm

As you go through tracing your pieces be critical in the assessment of them. Is there an odd bump going upwards on what seems to be a straight line? Does one corner pull down in an almost arrow like way? Pattern lines should be smooth. If it’s a curve, a straight line or an angle. The line is to be smooth and free from bumps or ridges. When you are tracing from a garment that has been worn you will find more bumps and ridges as the fabric has distorted. You can see in the above photo that the fabric piece has been distorted. See how warped the gingham checks are. I’ve drawn the piece to help compensate for those factors. So take your time now to be aware of this and adjust if needed?

It all comes down to the accuracy of your pattern. Take your time, trace carefully but also measure. Ensure that pieces that are to be joined are the same length, mark your notches, grainlines. Use your notes and photos to give yourself as much information as you need to get a really good pattern created.

Screen Shot 2014-10-09 at 5.13.58 pm

Next time I’ll be talking fabrics, trims and notions. Until then if you need anything clarified or just have more questions, ask away in the comments.