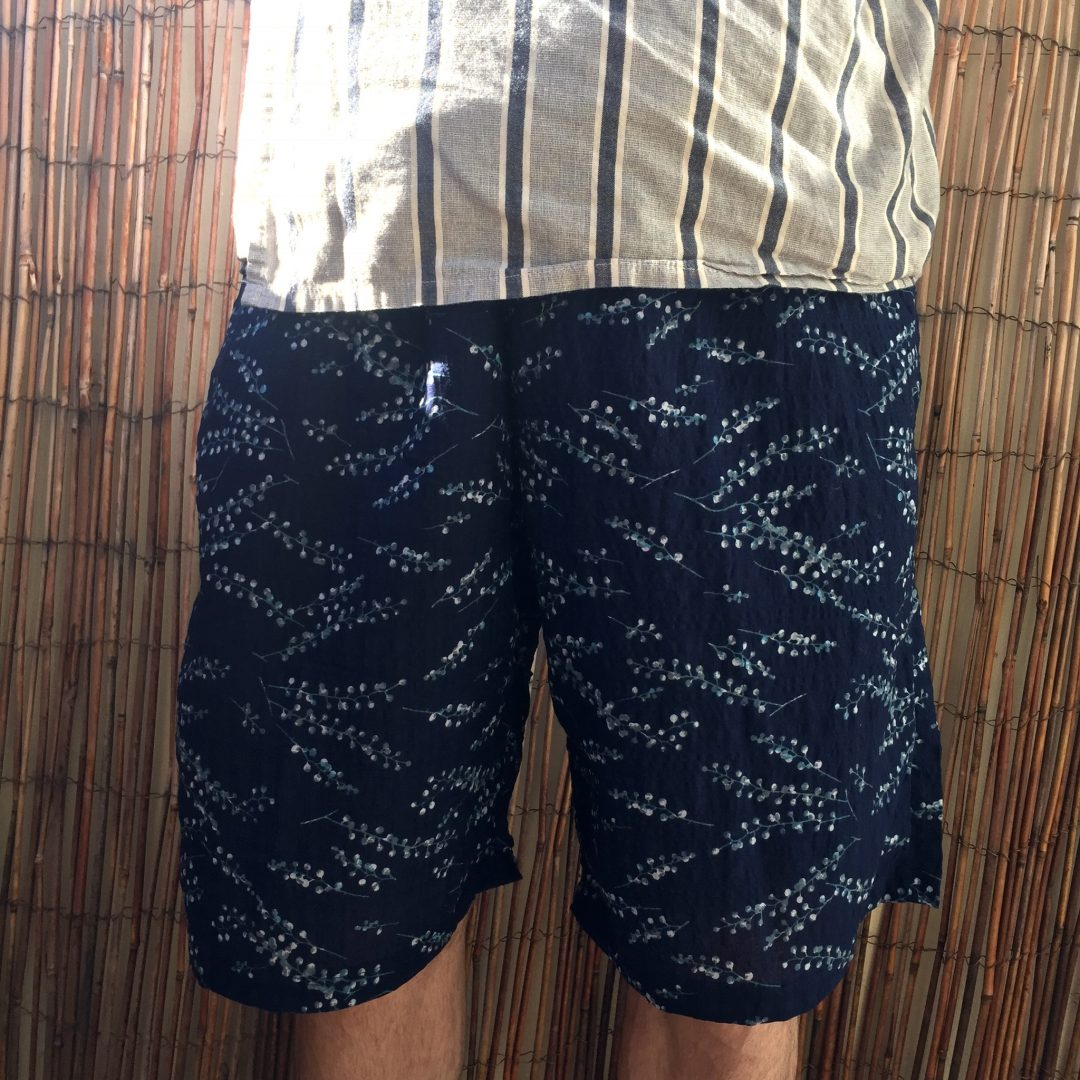
These shorts have been made many times over the years and am sure will be made many times more. Other variations can be seen here, here and here.
I’ve used the same pattern after rescuing the pattern from the fire we suffered December last year. The plastic sleeve the pattern was in, had gone black and bubbled but the pattern inside was ok after a good airing. Though somewhat dusty with ash.
The fabric was another survivor of the fire. Originally purchased at Pitt Trading and I think they have some more in stock?
It’s lovely, light and has the slightest of seersucker like wrinkles and yet the fabric is dense and not see through. A perfect summer fabric.
Apart from the usual construction I took the opportunity to keep practising with my coverstitch machine with the hems and the elastic all sewn in using it. I find it quite easy to use and the tips from Lauren at lladybird on how to tie off the ends to prevent the threads unraveling has been invaluable.
One happy Englishman, even if he had to be bribed with biscuits to get his photo taken.
Pattern: Jinbei
Fabric: from stash but purchased at Pitt Trading
Alterations: changed construction methods to use coverstitch more
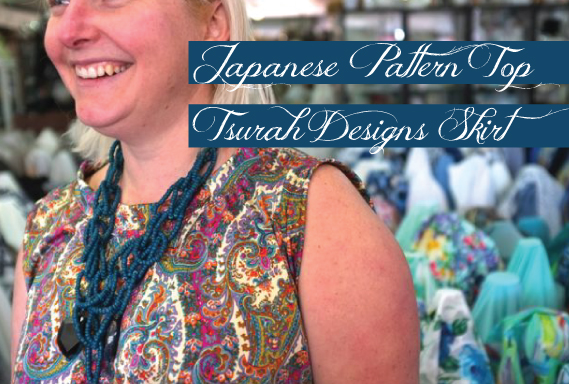
This past weekend there was a Sydney Spoolettes meet up with everyone invited to come to Pitt Trading for some Spring Fabric Shopping and indulge in some Cupcake Dolly cakes (just up the street from Pitt Trading).
I work Saturdays at Pitt Trading so it was fun to see the Spoolettes on work time and I grabbed the opportunity to get some photos taken of my new work top while at work. Huge thank you for Maria for taking the photos for me.
This is one of the first times I’ve had problems understanding a Japanese pattern. Mostly because there was no way my neck or arms were ever going to work with the tiny pieces allowed for the neck and arm bands. So I calculated out my own bands and used them instead. I also cut the front neckline down a little lower as I don’t like things pressing against the bottom of my neck it makes me feel gaggy. I also twin needled down the neck and armbands. Fist Pump for twin needle stitching like an absolute dream and making the finish look so pro. I love my twin needle.
My fabric is a poly/lycra I bought from Pitt Trading. I like to wear their fabrics when I work there as I find it can be a good icebreaker with customers to talk about the fabrics and sometimes you see a fabric made up and it sparks a whole bunch of ideas you may not have thought about earlier? This is the same quality I’ve used for the Burda Swimsuit and the Nookie Bikini. It’s soft handfeel yet super stable to sew with and has a lovely drape. It really does work for so many patterns and styles.
Talking always talking..
Overall I like the top it feels lovely and swishy on and is a great loose fit through the torso which I so like to wear as it’s so comfortable. Some people find the boxiness of some of the Japanese styles a bit overwhelming. I like the odd shapes as it gives me a chance to experiment with drape and proportion. At times like now when I’m feeling less than svelte I find it nice to still be able to wear an interesting piece that isn’t super fitted or super clingy. It gives me a chance to approach dressing on a different level than just trying to cover up what isn’t currently working for me.
The skirt I’m wearing is the Tsurah Designs straight skirt, which I pretty much live in at work (I now have 4 of them, you can see another one here) for me it’s the perfect ponte skirt. It takes about 30 minutes from cutting to hemming and BAM! new skirt. Love it.
Top Pattern: View G from rectangles and circles with head holes.
Alterations: dropped front neck, increased length of neck and arm bands, bands were attached and then twin needled down. Also no hem, the lycra doesn’t fray so I just cut super straight and left it raw.
Fabric: Printed Polyester/lycra purchased at Pitt Trading.
I made a traffic cone! or at least a top that makes a pretty good impersonation of one.
The top is Sleeveless Flare Blouse (view O) from I Love Tops (Japanese pattern book by Yuko Takada) and made without any modifications with the exception of eliminating the back neck slit (the scuba has a slight stretch so I didn’t need the slit to get it on over my head. Yoke fabric is a laser cut Scuba Knit and lower is a cotton burnout and lined with cotton voile. Only the lower portion is lined, the scuba knit is unlined and features raw cut edges on neck and armhole.
The sizing is great around the neckline and armholes and I’m hoping the fabrics all soften down after a few washes as it’s currently very voluminous feeling and looking.
It’s kind of big and I’m still not sure if it’s in the kind of big this is awesome type way or in the wow this top gets in the way it’s got so much fabric type of way?
So far we’ve decided it would be a good traffic cone, smuggling space to carry the cat on cold days so she could act like a hot water bottle or perfect should I ever want to eat my bodyweight in Mexican food and still be comfy.
Only time will tell if it becomes a favourite or a dud, the skirt however is already a firm favourite and possibly one of my go to TNT or Tried N True patterns.
I’ve made the Tsurah Designsstraight skirt a few times all of which are currently not yet blogged, so while this is only the 2nd one I made in terms of timeline it’s the first up in the blogging queue.
When cutting I added the smallest extra bit extra over the hips as I felt my first one was a little too tight over my bottom and had the tendency to work it’s way up my body. I also cut the foldover waistband down in size as in the heat of summer I found the extra height or weight a bit hot.
While I love the colour of this skirt I don’t think I should’ve added the extra over the hips as this is a much softer double knit. Am leaving it as is for the moment but am interested to see how it goes after a few wears. I might take it in a fraction if it does stretch out. Good news is it hasn’t stretched out but I have lost a fraction of weight and now it’s a tad too big. So I may well run it back in over the hip only.
Top Pattern: Sleeveless Flare Blouse (view O) from I Love Tops.
Alterations: eliminated back neck slit
Fabric: Laser cut scuba, burn out cotton both purchased at Pitt Trading.
Thank you all so much to everyone who entered the giveaways for “She Wears the Pants” I got lots of great suggestions of books and places to go take a look at in Japan.
Huge Thank You goes out to Tuttle Publishing for providing the books for the giveaway and for publishing the books in English too.
I’ve put all the names from the blog and instagram into the kitty cups, then chose the winner at random…..and the winners are
From the blog
I had a post written on this dress and all that was waiting was some nice photos to go with it. My first attempt at getting The Englishman to take photos on our walk to the train station led to some very derp faced awkward arm style posing. So I thought, no worries will try again another time.
Then disaster struck. The dress got accidentally put into the washing machine the right way out not in a wash bag. It got mangled against the agitator of the machine and the entire wash ended up with super fine velvet particles all over it and my dress lost quite a lot of spots and was quite ruined … Sad. So now in addition to a ruined dress I get to delight you all with with some wonderfully derpy photos of me from the original attempt at photos! So onto the story of the dress.
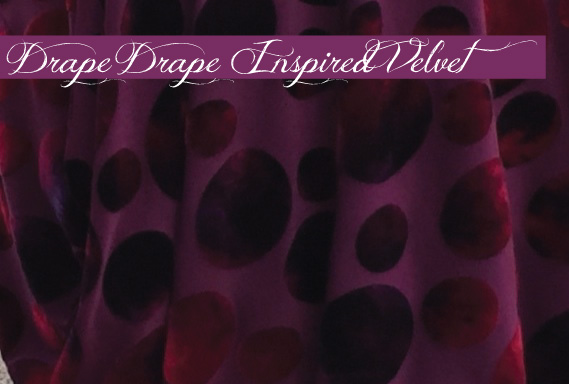
Sometimes a fabric inspires the dress. That was certainly the case with this dress. I saw the fabric and just had to have it.
A knit featuring multisized velvet spots that have an ombre effect. Really that’s pretty much a perfect fabric in my books. It reminded me of the phases of the moon or planets with the way the colour shimmered across the velvet.
Thing is, I didn’t have a pattern that would do this justice. So I dove into the stash and come up with some lackluster options. I wanted it to fold and move and ripple to show the amazing fabric off. So I started scouring my Japanese Pattern books and settled on the front cover from Drape Drape (book 1). **
It however requires over 3 metres of fabric. I had just 2 metres. I started searching blogs looking for reviews of the Drape Drape series. I’d always admired the simplicity of the drape tank which I knew Lizzy was a big fan of. She even had a photo of what the pattern piece looked like on her blog.
To start I cut a piece of interfacing to match the folded width of my fabric, I didn’t have any pattern card wide enough to use so that’s why I used the interfacing. I used the fold line as the grainline and with some measuring worked out that the centre front needed to be at a 40 degree angle. Using a protractor app on my iPhone I managed to get it all lined up. I traced the top half of the Baseball Singlet, angled out one side to become an aline skirt as I just extended it to the length I need. The other side I drew the shape to mimic the drape drape pattern. I then cut the interfacing along what would be the fold line to slash and spread the pattern to add even more volume into the drape area. The front and back of the pattern are identical.
I quickly ran up a toile using some slightly heavier knit fabric and realised I need to alter the draped side armhole to avoid flashing quite alot of side boob. I reshaped the armhole and went straight into cutting out the real fabric. I made it up using the overlocker and as it has 2 shoulder seams, one side seam and one straight line it went together in moments. I pulled it on relishing the lovely slinky feel of the knit. Then I looked in the mirror and I’d made a lovely velvet sack. Pretty, but oh so sacky and not at all flattering.
The next day I spent the commute to and from work sorting out a solution. If I cut an aline singlet dress out of swim mesh I could use it to bag out* the neckline and attach it at the hem to create a bubble hem. It wouldn’t totally do away with the sack look but it would at least make it look deliberate.
Apart from forgetting you can’t bag the neck and armholes of a dress that only have one side seam (you just end up with an endless donut of fabric that you can’t wear as a dress but makes a fetching infinity scarf). It went together well. The only other alteration was to slightly pleat the draped armhole which still had slightly too much drop under the armhole.
Totally derp photo, complete with tape stuck to my shoe, sometimes I just fail at life.
In this photo it looks like the armhole cuts in at the back but it didn’t? can only assume it had dropped a bit and I hadn’t straightened it out before I took the photo?
The beautiful drape.
I wore it to our Sydney Spoolettes Christmas get together and have worn it to work many times since and it’s so comfortable. As it basically doesn’t touch the body it’s good for big meal days or just when you need to be cool and comfortable. The fabric helps make it look dressy and I fear if I remade it in less spectacular fabric it might be more garbage bag than dress?
Fabric: Knit velvet spot purchased from Pitt Trading. As some of you may know, I spend a few days a week working retail at Pitt Trading. It’s so fun being surrounded by such beautiful fabric. I’m not asked to write about my fabric purchases in any way but as the selection there is quite fabulous you will see pieces from there pop up in my weekly makes more often. If you ever happen to be instore please don’t be shy and say hello!
*bag out means to fully enclose the neck and armholes with lining. Often referred to as the Burrito method. I can’t bring myself to say the Burrito method as the correct sewing way is to turn it inside out and twist and honestly if you did that with a burrito you’d end up with beans in your lap. For me it’s technically incorrect on both a sewing and food level and just can’t bring myself to use incorrect terminology. Sorry!
** This is an affiliate link, if you happen to buy from Book Depository then I get a small amount in return for suggesting the book to you. These links will appear every so often but only for pieces I truly do recommend.
Shop
Hello!
Hi, I'm Susan. A designer and sewing teacher living in Sydney, Australia.
Here I share tales of my sewing, my pattern collection and insights into what it's like to work in the fashion Industry.
Other recurring themes include cat photos, an ever changing hair style and knitting.