Posted on Leave a comment

Sewing Adventures – Plane Blankets

Oh no these are not just some lovely pieces of fabric I’ve just picked up. These are our brand new plane blankets, well they were in December when I made them for our trip to England.

Lets face it, international flying is you stuck in a tin can with lots of people endlessly for hours. It’s not some glamorous thing as portrayed in the ’60’s. So I do what I can to make it slightly less grot and more enjoyable.

Step one, ditch the polyester scratchy plane blankets that’s been over who knows how many thousands of people and bring your own.

Previously I’ve used scarves and it’s worked well but this time I wanted something a bit bigger. Hunting through the stash for something entirely different for another project I came across these 2 pieces of double gauze. I love them but they just never seem “right” for a project, they are however perfect for this project, lightweight, soft, wash well.

I quickly hemmed the 2 raw cut ends using my Coverstitch and hey presto, 2 soft snuggly plane blankets. They roll up small so don’t take up much space in our carry on luggage and yet are big enough to cover an adult while sitting.  Extra benefits of being made with a breathable fabric like cotton meant that you could keep covered even when the plane felt like it was stifling hot and lacking in any kind of air movement. Highly recommended to add some comfort to any plane journey.

Pattern – hemmed all raw cut ends, left selvedge edges as is
Fabric – from stash but both originally from Miss Matatabi
Alterations – none

Posted on Leave a comment

Sewing Adventures – Liberty Tana Lawn Harriet Bra

Summers seem to be getting longer and hotter, in fact it was the ongoing heat of last summer that seriously kicked me into gear over making my own bras. No longer did I want to wear padded non breathable sweaty inducing bras ever again. As such I’ve been working with lace, lightweight lining and basically anything that is going to get my bras feeling lighter and more breathable.

Naturally the next step was to try and make a cotton bra. Never one to waste time on making an ugly bra, I used some Liberty tana lawn scraps for my experiment. Normally the pieces are placed in order to cut with the greatest stretch, to do this with a women fabric I used the bias as my greatest stretch. Apart from the fact I’m using a woven fabric everything else was the same construction as I would regularly follow for a Harriet bra.

But did the experiment work? Well yes and no. It went together well and looks super cute but when I wear it I have a ripple of excess fabric along the apex where the seams meet. The shape is also much exaggerated and looks very pointy. My guess is that the bread tissue normally sits down much lower into the cup due to the greater amount of stretch. This would result in a rounder shape that pulls the fabric down rounding off the shape (the Harriet isn’t a totally rounded shape it does have a definite angle to it).

The upper cup panel I did in a woven broderie anglaise trim. It looks super cute but due to the lack of stretch it does dig in the tiniest amount on my bigger side. I’m hoping it will loosen with wear.

To try and fix it I want to try and pinch out the excess fabric and baste it in place then re try it on and see if that solves the problem. My hunch os that the lower cup is going to need to be split and have a bit more volume put in it as well. When trying to solve any pattern making/sewing issues I always try and solve one problem at a time. That way if it goes right you have done it in the least amount of steps/time and if it goes wrong you can pinpoint where it went wrong and walk it back to that step. Trying to fix everything at once can actually create more problems that are harder to solve than going step by step.

Pattern: Harriet bra from Cloth Habit

Fabric: Liberty Tana Lawn – leftovers from a dress, elastics and trims from Pitt Trading

Alterations: keep working until I find a solution for a good fitting cotton bra

Posted on Leave a comment

Sewing Adventures – Overlocker cover

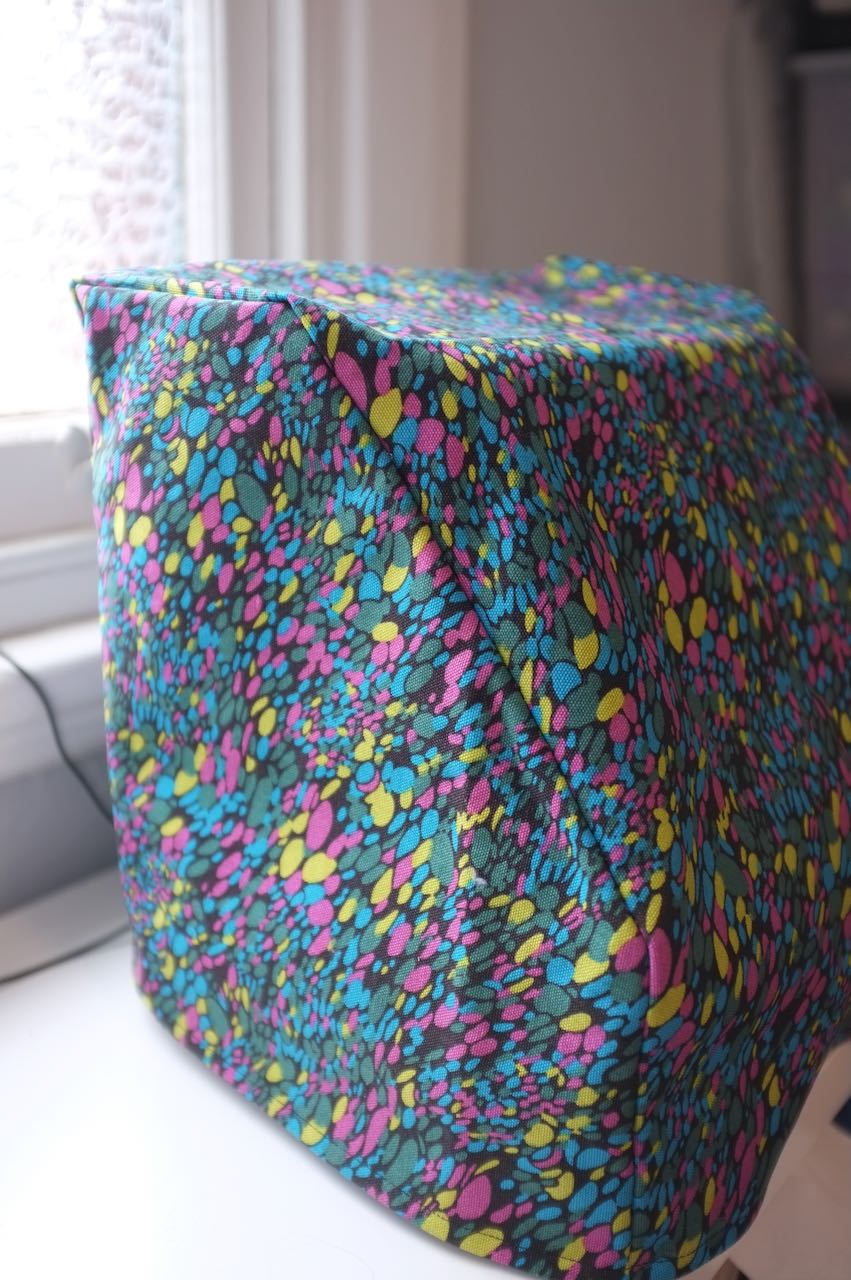
See the frosted window behind my machines, that overlooks our rooftop, normally a sunshine filled, tree lined vista…its currently being ripped apart for construction work to replace rotten woodwork and replacement of the waterproof membrane. Mostly it’s messy and noisy which is fine the work has to be done, but it is leaving a fine smattering of dust all over my machines.
My sewing machine has a hard case but my overlocker only has the thin plastic cover that came with it when I bought it.
After wiping off yet another round of dust the other day I cut open the plastic cover, dove into my stash and found this Liberty print canvas. Then got to cutting.


Ten minutes later and I have a cover which naturally then sat unheemed for four days. I’ve just finished hemming it and BAM! new heavy duty cover ready to protect my overlocker from the construction work on the roof.


Pattern: made from exisiting cover
Fabric: Liberty canvas from The Fabric Store
Alterations: Maybe add a bottom section so the entire machine is encased? See how the dust goes and do that then?

Posted on Leave a comment

Sewing Adventures – Bento carry bags

Never one to miss an opportunity I thought while my machine is all set up to sew the waterproof fabric why not make some more things while I’m there? Top of the list were some carriers for my lunch Bento boxes. They almost never leak but occasionally if you get an overly juicy tomato then you find some wet patches in the bottom of your bag.

Due to not wanting too many seams nor too big and bulky an item to carry in my work bag I went with a really simple gusseted envelope style. I quickly cut one in the same non iron on interfacing I’d used to make the pattern for the bike saddle cover and stitched it together to make sure it worked and to get it as small as I possibly could and still fit my bento. As it was I could scale down about 2cm on each side and went with a curved flap to finish the opening.

Using my rotary cutter I cut the whole thing out and then stitched the sides before adding a vertical stitch to create the box style sides.

Simple and effective. I think I’ll make an elastic loop to go around it to double down on keeping it secure but I tested it as is and it caught the leaks and went through the wash easily as well, winning!

Pattern: self drafted

Fabric: Waterproof fabric from Nomura Tailor Kyoto Japan

Alterations: next time make it the other way round so the waterproof fabric is on the inside to help increase it effectiveness…also means you can just wipe it clean and not have to put it through the machine so often.


Posted on 1 Comment

Sewing Adventures – Black Beauty bra in black mesh

I’ve been on a roll with the bra making and absolutely enjoying it! When Erin from Emerald Erin released the Black Beauty bra I put it on my “to make” list, I just didn’t expect me to take so long to getting around to trying it out.

One of the frustrating and wonderful things about bra making is that you kind of need to make an almost finished bra in order to see if it actually fits? Sometimes I make up a toile in fabric I don’t care about and other times I dive straight in.

This is one of the times when I dove straight in.

The bra itself went together really well, everything lines up and the instructions (when I used them) are easy to follow.

Sewing a see through bra is a challenge, you really have to be careful as all the flaws show up. If you look closely along where the channelling is applied at the front you can see where some of my cutting was less than stellar. Still it’s nice to be challenged to level up and keep getting better. It’s one of the things I genuinely love about sewing, you can always get better.

But how did it fit? hmm not good. The band is good and quite comfortable but the cups are enormous. I felt like I was sitting on a shelf that was supported from underneath and just nothing above. Getting past the initial disappointment I decided to put it aside for a bit and try it on again and analyse what’s wrong.

When I did that I found the upper cup is too long, leaving the entire cup sagging and not holding anything. If I add in a dart I might be able to fix this one and then next time I think I want to try this band size with a smaller cup size? I do know I’m not defeated I just need to work out a solution to getting it to fit me.

Fabric: Black mesh, patterned fold over elastic from Pitt Trading, other bits from my stash, back hook and eyes from Booby Traps.

Pattern: The Black Beauty by Emerald Erin

Changes: work out how/why it doesn’t fit and try again

Posted on Leave a comment

Sewing Adventures – Teal Lace Harriet Bra

By now I’ve made so many Harriet bras that I’m mostly including them here to help document all my makes as I don’t have any more insight into the pattern or construction. Each time I make one I challenge myself to be neater, to cover internal seams and generally just get better at sewing.

This teal and lilac one is super comfortable and I really like the fact I took the time to allow the lace to have a scalloped edge on the lower part of the cradle, it just adds another level to the bra and helps improve my skills.

Pattern: Harriet Bra from Cloth Habit

Fabric: lace and trims from Pitt Trading

Alterations: same as previous versions of this bra

Posted on Leave a comment

Sewing Adventures – Linen Produce bags

Thinking we were going to be locked down for awhile back in Match I placed an order with Spotlight for some bamboo batting and a piece of linen that I wanted to use as a backing for a project I was working on. The batting turned up 2 weeks later and the linen another fortnight after that. The linen quite frankly was crap quality. I’m actually glad I hadn’t earmarked it for a garment as it would have been terrible.


As it was it’s very lightweight to the point of sheerness, the weave feels loose like if you pulled really hard it would weaken and just all round it’s a bit shite.

Not suitable for the project I had planned for it and not suitable for garments I was in a dilemma, what did I use it for?


Researching for something else entirely I was reminded that I had wanted to make some produce bags and that linen is very breathable so I could even use them inside the fridge if I wanted to. Cutting out as many bags as I could fit I made some big ones to fit sourdough in, some mid sized and some little ones.

In an aim to improve their lasting quality I used French seams and double turned the casings so that all the raw edges were enclosed adding some strength and ease of washing to the bags. With the spirit of reduce very much in mind I uses some ribbon and tapes I had in the stash to create the drawcords.

All in all a good save for some crappy quality fabric.

Pattern: none just winged it

Fabric: linen from Spotlight, drawcords from the stash

Alterations: be even more sceptical of fabric from Spotlight

Posted on Leave a comment

Sewing Adventures – mint and lilac Mara bralet

I love the finished version of my white Mara bralet so much that I dove right in and cut another one straight away, like straight away straight away…did I learn from my mistake of not sewing after receiving distressing news? no of course not. Stupid me.

Ironically I even made some of the exact same mistakes again. Like putting the cup elastic on upside down. So silly.

Despite the fact there are a few mistakes and some of the sewing is a little crooked it did make me feel better to have achieved something on what was a pretty crappy day. I also think that maybe we beat ourselves up a bit about everything being perfect all the time. I know I want to be better every single time I sew but that’s not always the case.

As it is, 2 beautiful bralets, some distraction in the form of sewing, its not all bad.

Pattern: Mara bralet by Studio Costura

Fabric: Lace and trims from Pitt Trading, hook and eye closure from Booby Traps

Alterations: none

Posted on Leave a comment

Sewing Adventures – Mara bralet in white

This bralet has been on my sewing list since I saw the beautiful versions that Birdy_sew_obsessed on Instagram has made of it. I had printed out the pattern and had it sitting by for ages before I finally grabbed some lace and made a toile. Sometimes I make a toile in something I don’t care about and other times I just jump right in, this is a case of jumping right in using some white lace and thinking I can always dye it to a colour later.

Side note: does anyone else struggle endlessly with keeping white clothing white without using a tonne of chemicals? as soon as I wash this I feel like it will go the same dirty grey colour all my whites go unless I soak in some heavily chemical laden product which makes me feel icky because I don’t want that many chemicals near my skin and I certainly don’t want to put it down the drain into the water supply.

Between sewing the panels together and adding the elastic I got some stressful news. In a bid to distract myself I thought I’ll keep sewing…not my best decision. The picot along the upper cups is actually sewn in upside down, I couldn’t find my white strapping so used khaki but forgot to change the thread colour and then when I went to unpick it left marks in the elastic so I left it white. Then for my final mistake I’ve sewn the back hook and eye on the incorrect sides…yep totally distracted and stressed. Thank goodness I had only basted in the back hook and eye to test the fit so at least it will be easy to unpick.

Stupid mistakes aside I really like the shape and the fit is really good. Like really good. I should stop being surprised that well fitting wireless bras give a good shape but each time it feels like a wonderment of surprise that the myth that wires are the only option is broken.

Due to some accidental pattern matching I got a perfect flower at centre front which was 100% not planned and quite a lovely surprise.

Pattern : Mara bralet by Studio Costura

Fabric: Lace and trims from Pitt Trading, back hook and eye from Booby Traps

Alterations: none

Posted on Leave a comment

Sewing Adventures – Dressing Gown

Dressing gowns are big news around here. I’ve made several in cotton or silk for myself and to give as presents. The luxury of having a really lovely piece to wear every day cannot be underestimated. My go to everyday one has been a printed cotton with a tiny stretch of spandex in it that I think I’ve been wearing for like 18 years? I got the fabric in China Town in Sydney before meeting  friend for lunch, we caught the ferry to Manly. It was so cold we wrapped the fabric over us like a blanket as we ate hot chips on the boardwalk in front of the beach.

Since being used as a blanket I did that thing they always tell us not to do in fashion college. I lay down on the fabric, chalked a line around me, measured out from the line and cut into the fabric. No real pattern, no proper measurements. Despite BREAKING ALL THE RULES it was quite simply perfect. It fit it was comfortable, kept me covered, kept me warm, was perfect for wearing before I left the house so my dresses didn’t get covered in cat fur. Perfect..until last year when after dinner one night I had the cat on my lap, drinking tea and the front ripped. Years of wear (and sharp cat claws) meant it was at the end.

Taking a look in the stash I found some floral fabric, lay the old one on top of it and cut around it to make a new one (hey it worked once surely it’s going to work again?). I did fix a few things

  • added extra internal ties so it doesn’t gape at the top
  • made the hem and turn back slightly bigger then pinned and pressed it all in place before using my coverstitch to hem the entire thing
  • reinforce the ties where they joined to the garment as I did have to reattach them at various points previously

It’s wonderful, I love it and I’m hoping it lasts another 20 years!

Pattern – made from old dressing gown

Fabric – from stash, originally from Cabramatta and I want to say was about $12 a metre?

Alterations –  just the added extras from last time