Posted on 2 Comments

Sewing Adventures – Queen of Suburbia Adrian bra in yellow lace

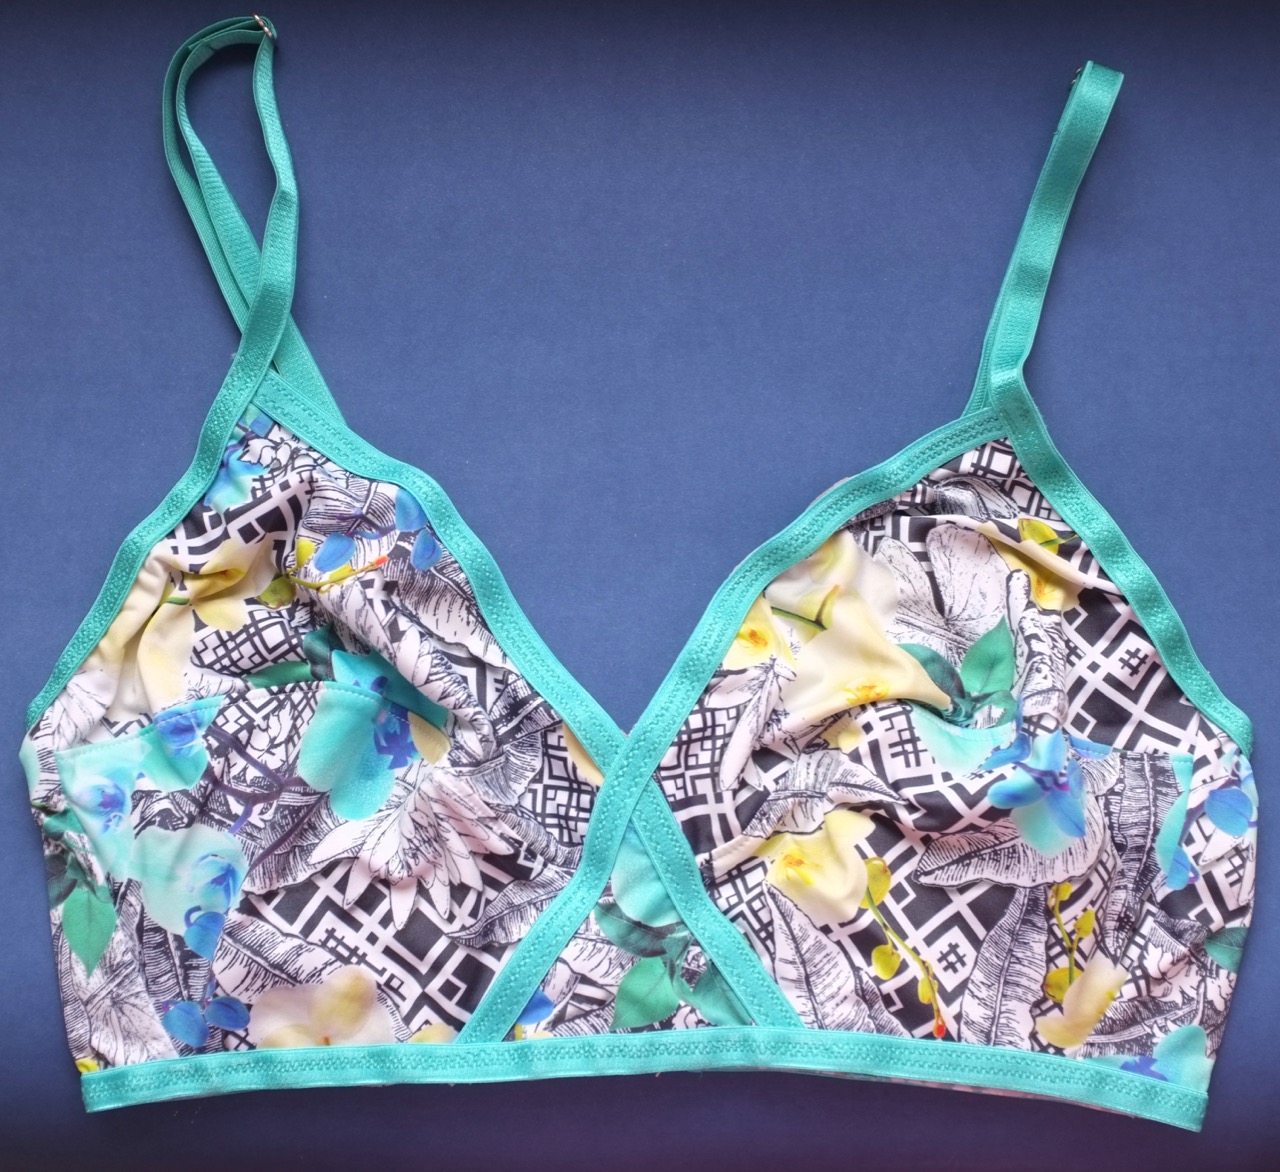
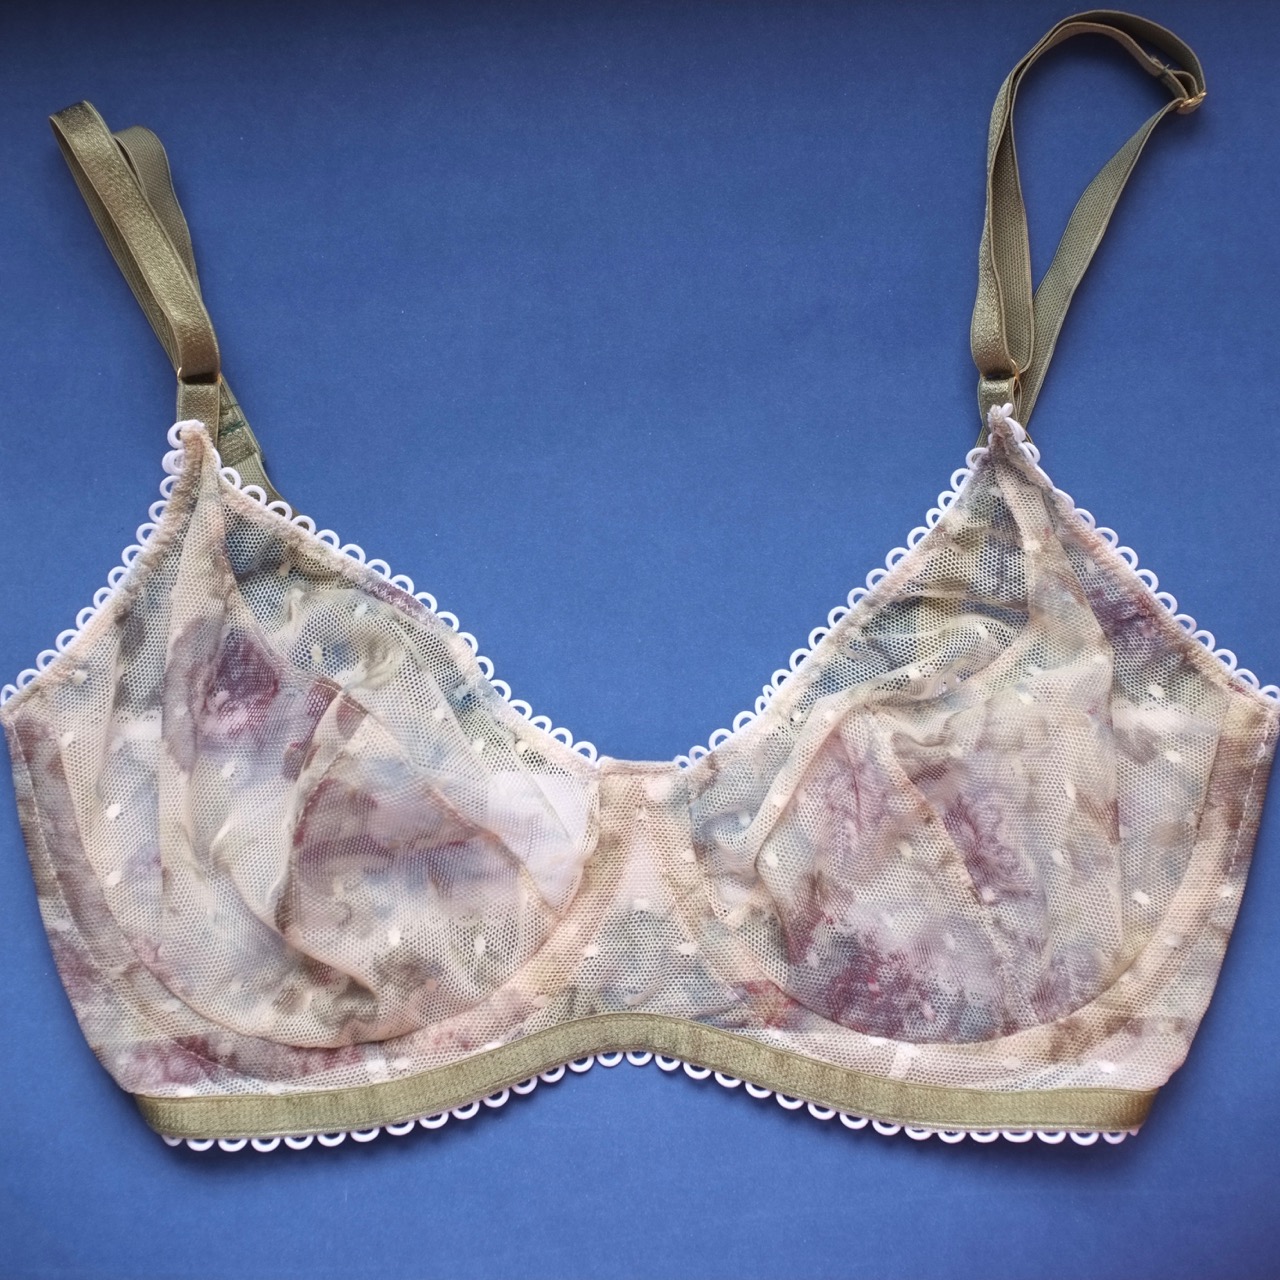
Ever make anything that you absolutely love not only in terms of fabrics, colours and look but also be so proud of the quality of your sewing? that’s me on this project. I love the lightness and colour of the lace, the electric pop of colours with the pink and the blue and I am super proud of the sewing. It’s all absolutely gorgeous.

The pattern is a new one from Queen of Suburbia or QofSpatterns, a Canadian based lingerie brand that is starting to make patterns for the home sewers. I’ve long loved their style so I was super excited at this pattern and snapped it up. It’s a half cup, not full coverage and I like that more styles of bras are being offered because while full coverage is lovely it’s a bit old fashioned feeling some times when you can’t get the patterns to match the styles you want to buy from the shops.

It went together super well, I was trialling some bra tulle from my stash for the cradle but discovered it was too stretchy. Using some white tricot I had on hand I cut another cradle and added it to the back of the existing one to help stabilise up the whole area. Apart from that slip up of my own the whole thing went together super easily and the instructions were good.

So all in all a complete WIN of a sewing project….except for one small thing. The cups don’t fit me.

The band is a great fit but the half cups are a little too low and on one side it cuts me in half a little (that side is bigger so I normally have that issue to deal with anyway). My idea is to make another one one or two cup sizes up and try again.

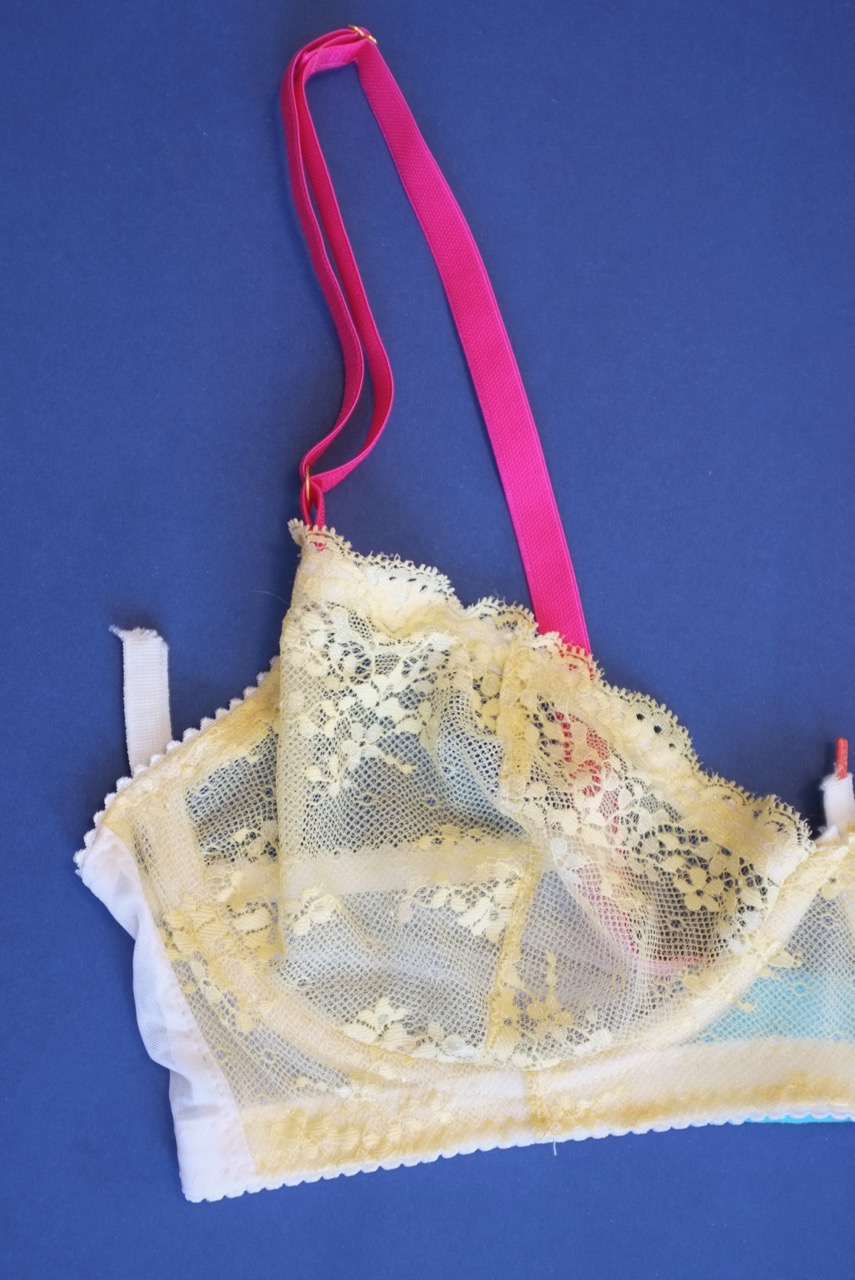
How did I get the wrong size? well I measured as per the instructions and then compared the pattern pieces to the Harriet bra I use a lot to check the sizing. Where I went wrong was I forgot it was a half cup and wouldn’t have the upper band along the top of the cup as the Harriet does…seriously don’t make pattern decisions when you are tired people because this is what happens. Now I’m the first to say when patterns don’t work but in the case it really was user error and no fault of the pattern.

So for now I’ll start again and maybe I’ll pin this one up near my sewing machine as an example of something I love and am proud of….even if it doesn’t fit

Pattern: QofSpatterns/ Queen of Suburbia Adrian bra.

Fabric: Lace and elastics from Pitt Trading, tricot from Greenfields

Alterations: get sizing right – I made the 34D (am including that here in case I forget and go to make the wrong size again)

Posted on Leave a comment

Sewing Adventures – Waterproof Bicycle Saddle Cover

Long time readers will know I was once a keen cyclist. Surgery on my back to remove a tumor followed by a house fire that destroyed my road bike has meant that for the past 3 and a bit years I haven’t been on a bike. Post surgery my torso has had issues rotating (I knew this would be a result of the surgery and the specialists said not to worry it would come back in time) this meant looking over my shoulder for oncoming traffic was an issue and then I lost my bike so I kind of just let things be.

Now with more time at home due to the COVID lockdown and then after just trying to stay away from people, I thought it would be a good time to get my shopper bike out of the garage. It was in the apartment when the fire happened and pretty much just got shoved into the garage of the building where it has been ever since. I wasn’t sure if the brake cables etc had safely survived the fire so I dropped it in to our local bike shop for a service. Apart from the guys being amazed that it survived a fire and how filthy it was, the bike itself was in good condition. It got a good clean and service before coming home again.

Long term it’s going to live in the garage of the building which is dark, dusty and not the cleanest of places. My idea is that I’ll be able to go down unlock it, pop the basket or panniers on then go for a ride or tp the shops etc. Which means either cleaning or dusting it each time I want to ride or coming up with a better solution.

Part 1 of a better solution is a saddle cover. I decided to use a waterproof fabric I picked up from Nomura Tailor last time we were in Japan because then I can pop it in my bag and use it to cover the leather saddle should I ever get caught in the rain or have to leave it outside in the rain.

Using some non iron on interfacing I traced around the basic shape of the saddle. Adding seam allowance I measured the circumference and then drew a 7cm rectangle the same length. quickly cut it out of some poplin, sewed it together and checked the fit. Adjusting the length a touch to make sure the seam didn’t interfere with the nose of the saddle I then cut it from the waterproof fabric using a rotary cutter with a slightly older blade. I knew the cutting would totally dull a new blade so took the risk on using an older one with more pressure and it worked.

The nature of waterproof fabric means as soon as you puncture it with needles or pins that is a point water can get through, that meant no pins being used and fingers crossed no unpicking. The checked underside of the fabric is a slightly brushed cotton that glides through the machine with no problems, to ease around the curved areas I bumped up the stitch length to just over 3 and changed my needle to a leather needle. it made a bit of a thunking sound going through the fabric but there was minimal needle penetration and the stitches formed smoothly with no tension issues.

Fitting the rectangle to the upper curved panel went really well, stitching the channel for the drawcord was where the issues started. Basically my machine didn’t want to feed the laminated fabric through under the pressor foot. I swapped feet, lowered the feed dogs (seriously only the second ever time in my life I’ve had to do that on this machine) all to no avail.

Then I remembered a trick Laura from Bobbin and Ink once showed me. Grabbing some matte sticky tape I covered the bottom of my regular machine foot piercing through where the needle would go. Hey Presto! it worked! glided though and made stitching the channel easy.

Using a reflective shoelace from Prym (you can never have too much reflective stuff when it comes to bikes) I threaded it through the channel and into a drawcord. Fitting the now finished cover over the saddle I pulled the drawcord to secure it.

I’m super happy with how cute it looks and how practical it will be for keeping the bike clean in the garage and dry if I ever get stuck out in the rain.

Pattern: self drafted

Fabric: waterproof fabric from Nomura Tailor Kyoto Japan, reflective shoelace from Prym, drawcord puller from stash

Alterations: none, just remember the sticky tape trick for next time you sew this fabric!

Posted on Leave a comment

Sewing Adventures – Liberty insertion Dress

Regular readers are no strangers to seeing my go to dress, my own bodice block mixed with either a gathered or pleated skirt. It is by far the garment I have made the most as its not only a fast easy make it’s easy so easy to wear.

Rewind to late November 2019, I’m working 7 days a week, it’s hot the air is heavy with bushfire smoke and we are preparing to fly to England for Christmas. To say I was busy would be a vast understatement of the facts. In my bid to speed things up I grabbed some Liberty fabric from the stash that was pre washed, my bodice pattern and headed to Bobbin and Ink to teach for the day. Good Luck with the buses meant I arrived early lay out my fabric, cut my bodice and thought yep no problems tonnes left for my skirt.

Only not so much, my skirt was too short, like much too short. In a panic and under time pressure I basically threw it back into my to do pile where it has been floundering ever since.

The fabric was way too pretty to lose so I needed to find a solution.

Cue some insertion lace and leftovers from one of my Liberty fabric Myosotis dresses. Using 2 lines of insertion makes the whole look more deliberate and less like I made a big mistake.

Showing that a little bit of a break and some creative thinking means that everything can be salvaged just sometimes we need to slow down and take a step back to find our solutions.It was also approved by the cat (an important part of the process that I’m sure all cat owners will agree with me).

Pattern: my own bodice block with a modified skirt

Fabric: Liberty lawn from Liberty of London, insertion lace from Pitt Trading

Alterations: next time just slow down and think some more

Posted on Leave a comment

Sewing Adventures – Lexington Bras

Some things are impatient and just push their way to the front of the sewing queue, these bras were certainly one of the ones that jumped the list. With the pandemic continuing and the potential for more lockdowns coming the need for some comfortable work from home bras was increased.

I’ve made the Lexington Bra from Orange Lingerie twice before. The first time was as the pattern was as, the second time I split the lower cup to add in a little more volume. This time I kept the volume on the lower cup and shortened the lower cup, front triangle and back bands by 5mm.

On the ones I had made previously I was finding towards the end of the day the lower elastic had flipped up. At first I put this down to it being too tight but after some investigation I realised the bra was too long for me. I’m only 5 foot tall. I’m well used to having to adjust patterns to my proportions. In hindsight it’s actually surprising I didn’t pick this up earlier.

Technique wise I tried something new, using my overstitch machine I attached the elastic using the single needle chainstitch. The outside looks so neat and I’m so pleased, the inside I’m less pleased with as the loops of the chain stitch shows up so much on the mesh. I’m hoping it wears well but am already thinking I’d like to try the wide twin needle to attach the elastic with as well. It’s always neat to be able to keep trying and learning new things.

As it is a few hours sewing, 2 more beautiful bras and my lingerie drawer is well on it’s way to being the riot of pattern and colour I’ve always wanted. As always I’m using what I have on hand so the back clasp on the blue one isn’t 100% the correct shade of blue and on the blue/grey I went with a contrast of a peach closure. I love the fact it’s not 100% matching as I feel better about having something using up what I have already.

Pattern: Lexington Bra by Orange Lingerie

Fabric: patterned mesh, power mesh and lightweight mesh, elastics, hardware all from Pitt Trading, back clasp from Booby Traps

Alterations: so far pretty good but lets see how these ones wear in

Posted on 2 Comments

Sewing Adventures – Sashiko Kinchaku or Rice Bag

For some time now ‘ve been enjoying the meditative quality of sashiko stitching. It’s enjoyable and fun to embrace the joy of stitching with the knowledge that it doesn’t have to be perfect to work. Mostly I use pre printed panels to stitch on as they make it even easier to be a project you can take with you anywhere. Upside is ease, downside is what to do with the panels once they have been stitched?

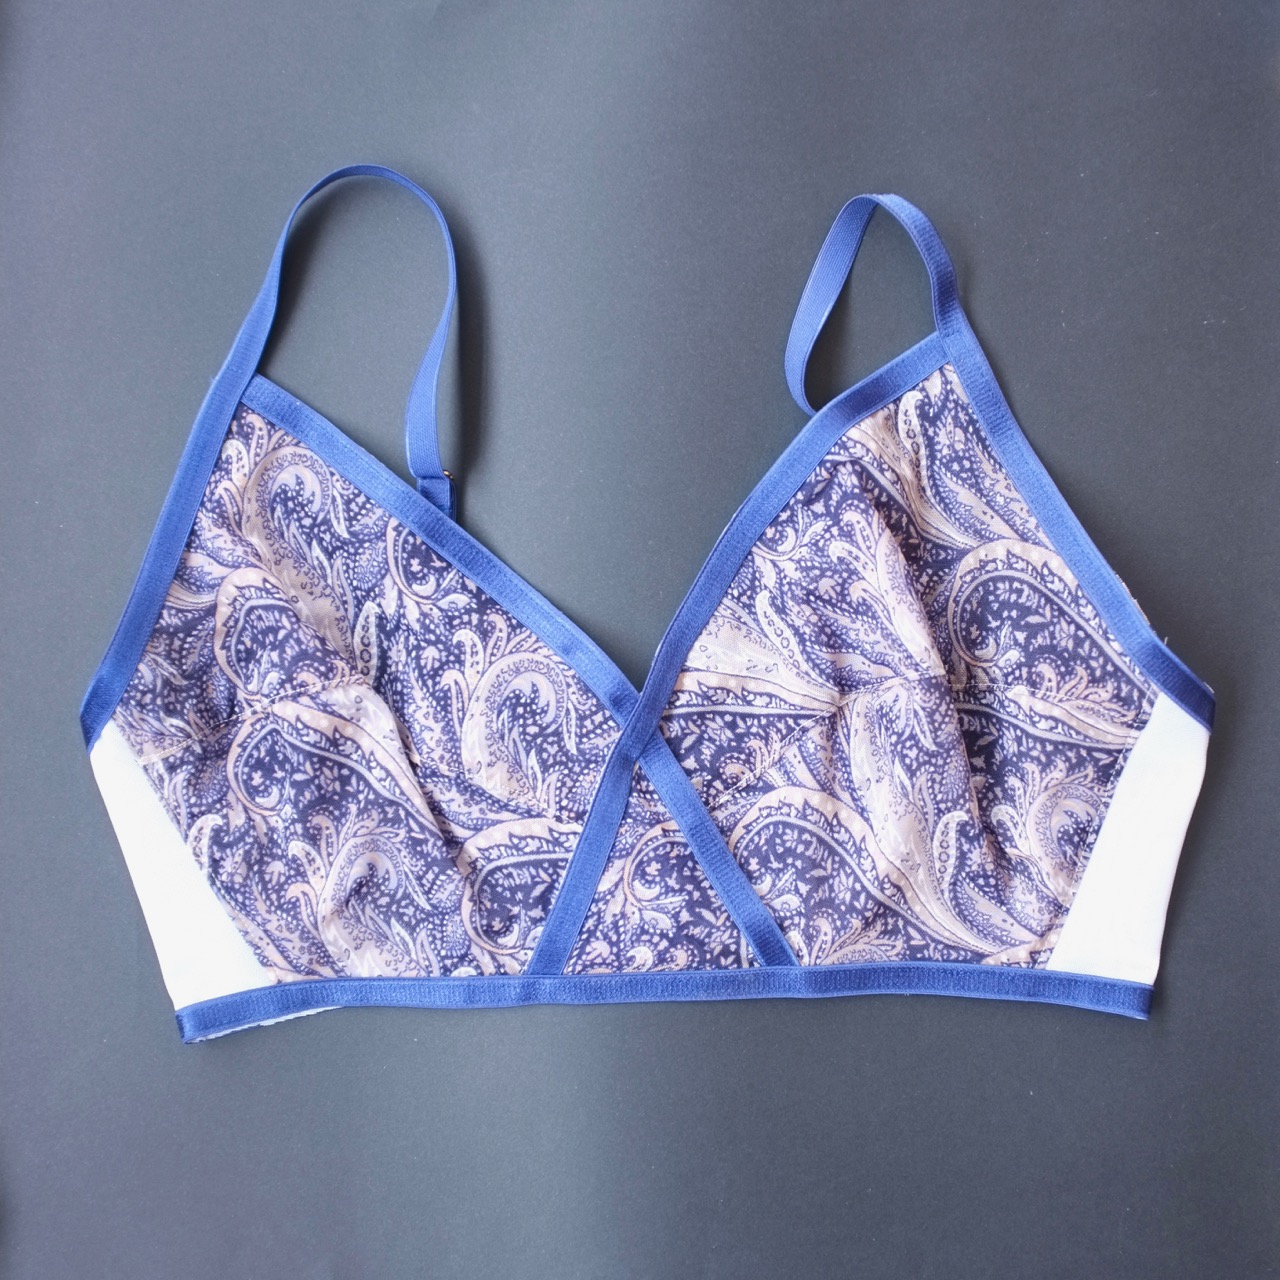
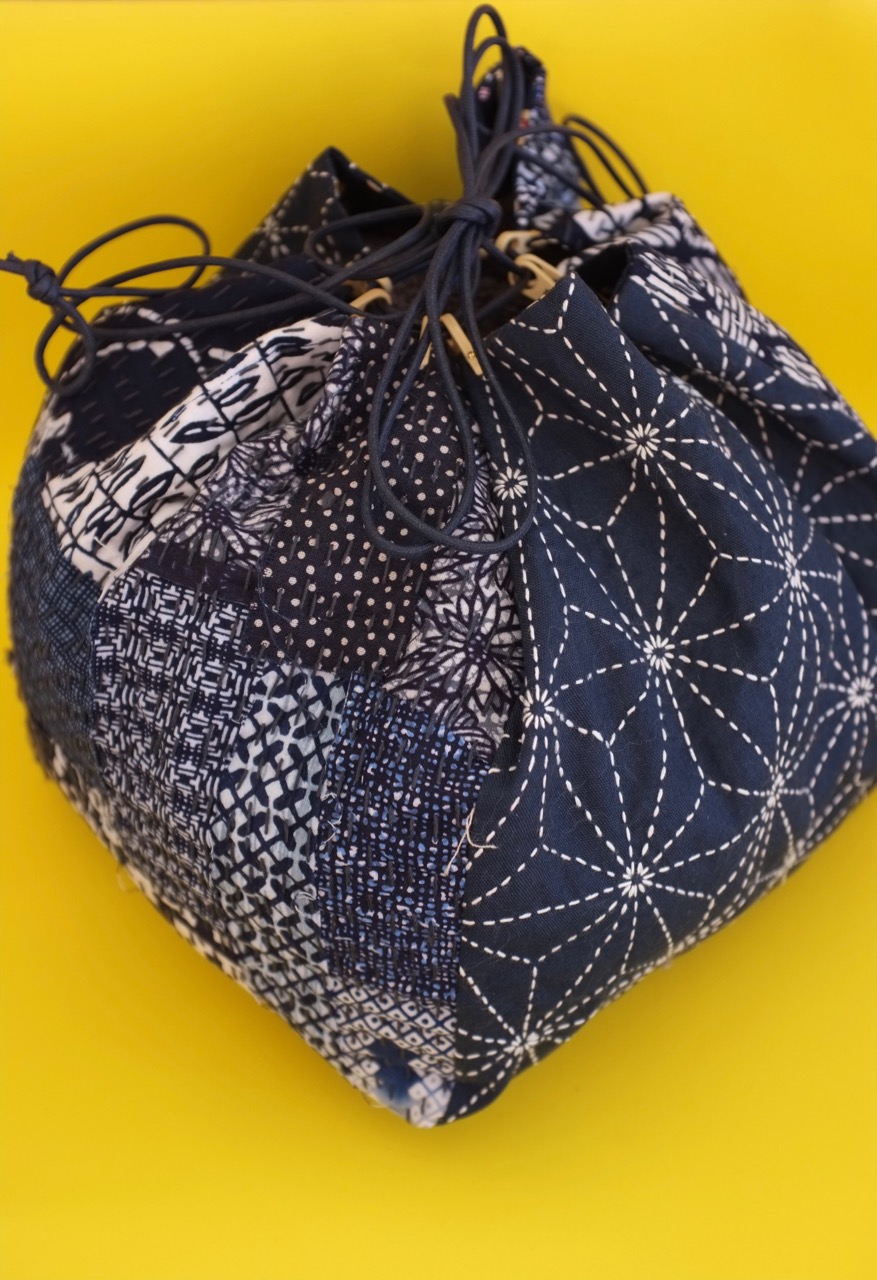
So far I’ve turned panels into placemats, coasters and now I’ve combined pre printed panels and boro stitching together to make a kinchaku or rice bag.

The original pattern is from BeBeBold and meant to be quite a bit smaller than the one here. But I didn’t want to cut down my pre printed panels so I supersized the pattern to create this.

Construction wise it’s a square bottom and 4 rectangular sides (same for the lining) all sewn together and pulled through an opening in the lining to end up fully lined. After closing the internal opening up these nifty little plastic hooks were added to the outside. The plastic has a U shape that slides down over the top edge of the fabric. A metal nail is then inserted into the hole of the plastic hook, through the fabric, through another hole on the other side of the plastic hook and out again. Bashing it down and flat with a mallet ensured it stays in place and there is no pointy bit to scratch your hands as you enter and exit the bag.

Waxed cotton cord is then thread through from either end to create a double sided drawcord. It really was a super simple make and I love the final shape it’s so lovely. I can’t wait to make some more!

Pattern: from BeBe Bold

Fabrics: Sashiko panels and mixed indigo pack, waxed cord and plastic loops from BeBe Bold. Japanese cat fabric (internal) from Pitt Trading

Alterations: this is a super big bag and I think I’d like to make one in a smaller size too?

Posted on 2 Comments

Sewing Adventures: Sashiko cloths or Hana Fukin

Ever made anything where you weren’t entirely sure what it is you were making? that’s the situation I found myself in with these sashiko cloths. I ordered them from a Japanese site with only minimal translation. I thought I was purchasing pre printed sashiko panels…which I was. These ones are a little different, the fabric is slightly lighter weight and the print has an extra panel off to one side that was printed with Japanese instructions.

Using Google translate I tried to read the instructions and couldn’t not make head nor tail of it. So instead of you know looking things up and getting expert advice I blindly waded on in with stitching. In hindsight I wish I had figured it out better but as it is it’s not a huge issue just more a case of not being correct which vexes me and I feel I’m being disrespectful to the beautiful work of the Japanese stitchers who make these.

The cloths are actually Hana Fukin which translates as flower cloth or kitchen cloth according to the research I’ve done so far (this is by no means extensive and I may have got it wrong). It indicates a soft useful cloth normally with a flower design stitched on it that is used a cleaning/polishing/useful everyday cloth.

Because I got my instructions wrong I stitched the cloth first before folding it right side together, stitching around it on my machine then turning it right side out before stitching the turning hole closed. It works even though I’m fairly sure I did it wrong.

Despite my misunderstanding they were a joy to stitch and are actually wonderfully useful in the kitchen, I tend to use them as a napkin replacement good for wiping fingers when they get sticky etc. Like many of my other sashiko pieces it’s incredibly joyful to have beautiful pieces to use everyday because there is no sense in only keeping the beauty for “good”.

Fabric – pre printed panel bought randomly on the internet and now can’t find again but similar ones can be found at BeBeBold

Pattern – pre printed but next time I’m going to find out the correct way to do them

Changes – get better at translating instructions

Posted on Leave a comment

Sewing Adventures – the making of a sports bra

Sports Bras are something I’ve long resisted making, there is a whole lot of technical things encompassing science, research, body movement, fabrics and more. My favourite RTW sports bra for running is by Shock Absorber and I’ve never worn anything so constricting feeling when you first put it on and yet comfortable while I’m running. You literally don’t even think about it which means it’s doing it’s job perfectly.

For non running sports I use some Nike ones that are getting older and will need to be replaced. They compress well, stop bounce and allow for a full range of movement while having a brilliant level of moisture wicking.

As such I’ve never really bothered with making my own, but I was kind of interested in at least making a toile. I started with the Greenstyle Power Sports Bra. Using their size guide I measured my bust and underbust to sort out my band and cup size. Checked my fabric against the recommended stretch percentages and made a first toile.

From the first toile here are the changes I made

  • reduced the overall circumference by 15cm – some at the side seam and much from the back. 15cm equals 3 sizes which is just kind of crazy size wise.
  • smoothed out the bust point so the curve wasn’t so severe
  • raised the neckline by 1.2 at centre front
  • raised the underarm by 1cm

For the second toile I used the same quality outer fabric but added a lining of power mesh to the front. The powermesh was cut to be most compressive on the side bust, less compressive over the front. The back panel was double layer of the outer fabric both cut on the reduced stretch to help aid compression. The photos showing a red version is this one. I wasn’t happy with my sewing on it as I felt like I rushed it a bit and I absolutely hated how the straps went on it looks so messy and unprofessional.


From this toile the changes made were

  • add 3cm back in circumference to account for lesser stretch of power mesh
  • bust curve needs to be reduced more so the curve is less pronounced but the volume stays the same
  • raise neckline by another 1cm
  • raise underarms – check this while being worn for exercise though as it can be a chafe point
  • reduced strap length by 6cm

For the next version I want to change a few more things

  • the way I attached the shoulder straps which looks messy and isn’t very strong
  • change the entire back construction for a neater finish at front strap join and side seams
  • smooth out the bust point more as with the extra layers of power mesh and lining it’s just rippling and projecting too much. I’m even considering splitting the seam and putting it somewhere else as right over the bust point is not necessarily the best place for a seam in a garment designed to be sweated and moved it. Chafing, rubbing, friction etc
  • adjust the base of the top so that it sits flatter to the elastic band without looking puckered or gathered

The sheer number of changes and alterations are kind of making me think while I started with one pattern it’s certainly only going to resemble a fraction of the original by the time I get done. I’ll try with the changes listed above and if I’m not liking the results then I think it’s time to ditch this pattern and spend time finding a more accurate pattern.

Pattern: based on Greenstyle Power Sports Bra but now heavily modified and still not correct

Fabric: from Pitt Trading and it’s lovely, am actually slightly sad I used it on something that I’m so disappointed in the fit on

Alterations: all of the above


Posted on 1 Comment

Sewing Adventures – fun with remnants from Home Industry

One of the great things about sewing is that you can make anything, solve problems, make your wardrobe, your home look better. Home Industry in Sydney is one of my all time favourite homewares stores. Each time I visit I ask can they move the counter out and can I just move in and have the whole place as my home. It’s gorgeous, a mix of curated fabrics, exquisite upholstery and vintage finds that just seamlessly go together to create a rich and inspiring environment.

When they asked did I want to try out some of their new remnant packs I couldn’t say yes fast enough. A few days later we did a socially distanced drop/pick up and I got two lovely packs. One in a series of navy, blue and taupe and the other in orange, sage and cream.

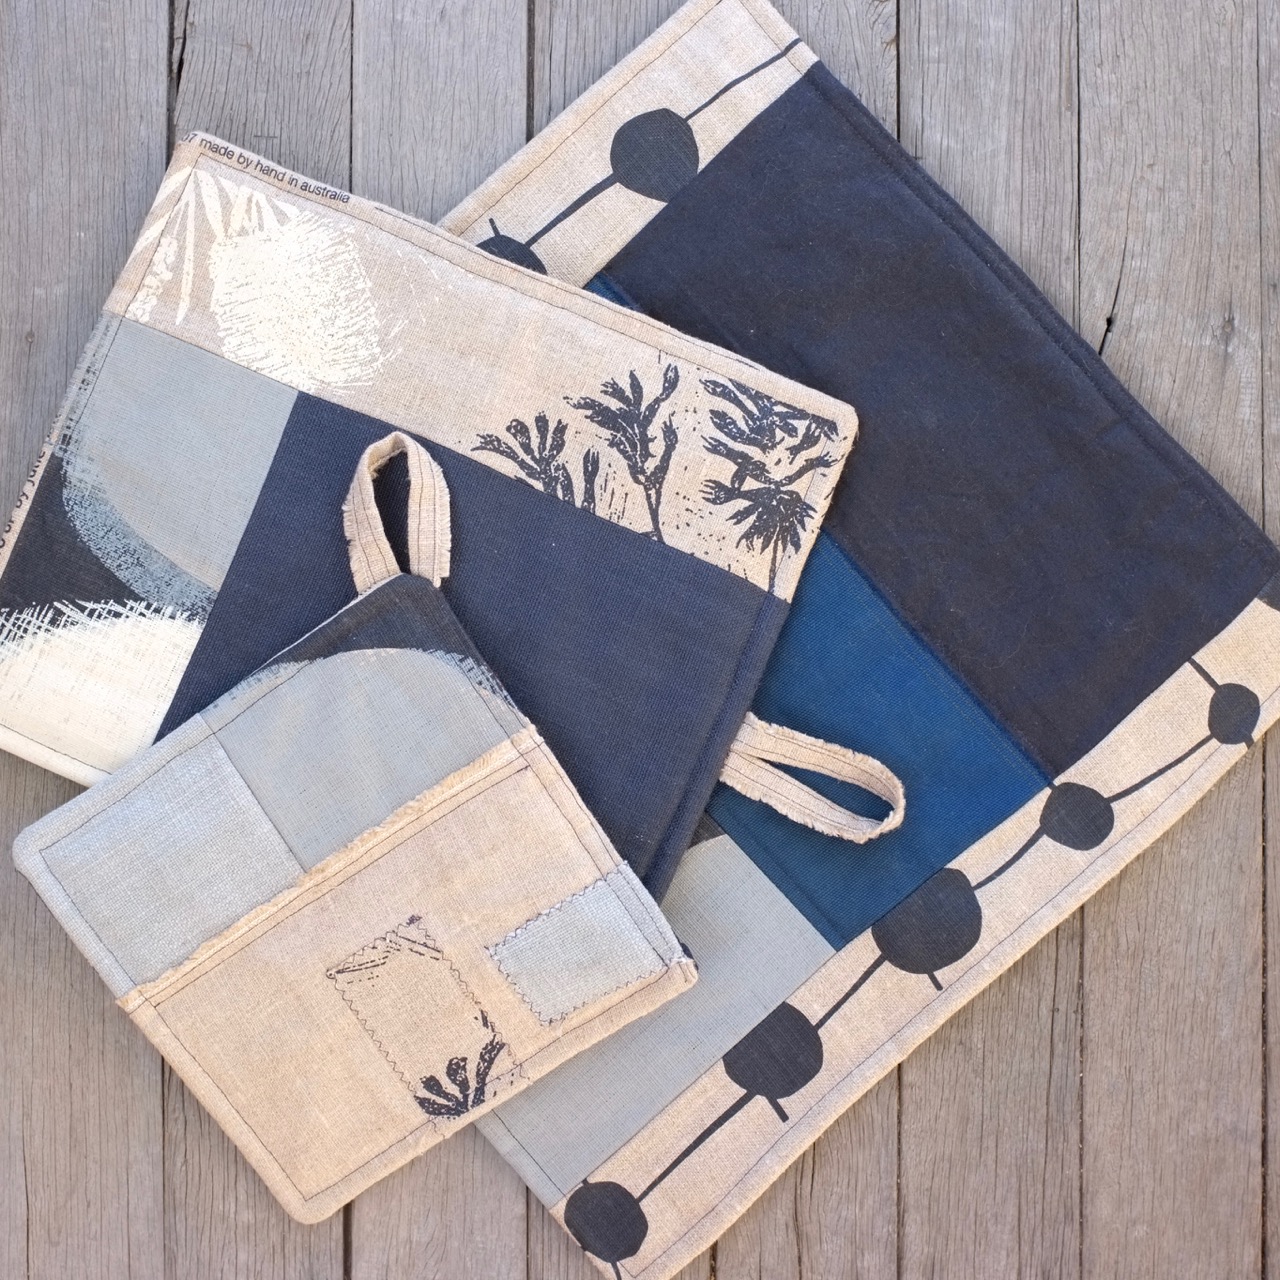
Today I’m sharing what I did with the navy set. Prior to getting the remnants I’d done some research into what I wanted/needed. Recently we invested in a cast iron pan for cooking. It’s a big skillet perfect for hearty one pot meals and can be used on the stove top and in the oven as well as on the BBQ. Apart from being incredibly useful its also big, heavy and retains heat for ages…all good things for cooking all bad things for tiny kitchens with no space. What I needed was an oversize potholder type thing to rest the pan on. Some oversize pot holders to actually get the thing in and out of the oven would also be handy.

With that in mind I’d ordered in some heat reflective wadding as well as some bamboo wadding to layer up to help insulate the surfaces. I’ve used the heat reflective one before and one layer is fine for say a bowl of soup but for getting pans in and out of the oven I find myself folding them in half or over again to give more layers of heat protection than what is available.

Having decided what I was aiming for I set up my sewing machine, grabbed my cutting mat and rotary cutter and just had fun. seriously sewing with no plan beyond a vague ‘this kind of size’ type outline is so refreshing. I photographed the stages as I went along saving them to my instagram stories but essentially by lunch time I had 3 varying sized “tops” that I could turn into pot holders. The fabrics were beautifully co ordinated and beyond having to straighten one or two seams I had virtually no scraps or leftovers. Every single piece of the pack was high quality useable fabrics.

The beauty of the packs was that it made it easy for everything to coordinate as they were already so perfectly put together. In order to use some of the pieces more fully I added some decorative touches like topstitching using a zig zag stitch or sewing so the selvedge was visible. Being able to do this really brought the pieces to life and added to the joy of sewing them together.

For the 2 smaller ones I also used the selvedge to create a loop holder so I can hang them up near the oven for ease of use. In fact it’s such a handy way to store them I’m going to add a loop to the big one too.

In just a few hours I had one small pot holder style one, a middle size and a large (bigger than A3)size. Each with 2 layers of bamboo wadding and 2 layers of heat reflective wadding with the base being some Japanese cotton I had in the stash. Infinitely useable, practical, pretty and just so fun to sew!

Pattern: made up as I went along

Fabrics: Remnant packs from Home Industry, base from stash originally from Pitt Trading, wadding from Spotlight

Changes: make more time for this kind of improvised fun sewing!

Posted on Leave a comment

Sewing Adventures – Lexington Bra in Sports Lycra

Before I get into the making of this bra I’m going to say “wow it’s hard to take a decent photo of a bra”. The cups look all wrinkly, the straps never sit straight. It’s just really hard. I have a dressmaking dummy but she is only a size 10, I am not a 10 so I can’t use it for photos so I have to do a flat lay and every time I’m less than happy with the results. Hints, tips and suggestions for better pics eagerly welcomed.

Now onto the bra. It’s an Orange Lingerie Lexington Bra. my last one can be found here, I like how it fits, the shape it gives and the fact I can wear it all day without being uncomfortable or looking like I’m not wearing a bra. However the front x doesn’t sit flat to chest. Which it should. I researched a bit, read some great debates on the Bra forum on facebook and experimented a little.

In the end I decided to try adding a small amount of volume to the lower cup. Hoping that this meant I sat into the cup more reducing the strain on the central x allowing it to sit flat to my body. This teal blue and patterned version is a working test of this pattern to see if my idea was correct.

As with my last version it has lined cups but regular stretch fabric over. This sports mesh has a greater stretch so I’m also keen to see how that reacts to being worn all day. The fabric is actually a moisture wicking performance fabric available at Pitt Trading which was gifted to me by my friend @lizardbookworm it feels perfectly smooth and lovely colours so it was fun to match with a bright teal elastic I had in the stash.

Am looking forward to seeing how it wears and what my next version will be like.

After wearing my verdict is the adjustment to the lower cup has worked well but the sports mesh while super comfortable isn’t quite as supportive as the mesh in my last version. Expect to see another version soon!

Pattern: Orange Lingerie Lexington Bra

Fabric: Pitt Trading for fabric, hardware and elastics. Back hook and eye from Booby Traps

Alterations: added volume to lower cup

Posted on Leave a comment

Sewing Adventures – Hail spot printed mesh Harriet Bra

My goal is to replenish my entire lingerie wardrobe so I have correctly fitting bras that are comfortable and pretty! So it’s another Harriet bra.

This is a printed hail spot mesh that I got from Pitt Trading, it’s greens and purples printed on a white base so I paired it with a white picot, white power mesh back and white hook eye closure. I had planned for the bottom of the front to be white as the print had this wonderful straight line where the print started. I’d decided to use this as a feature so the bottom would be white to match all the trims together.

Unfortunately I used a non stretch mesh as the cradle lining. it’s in a colour that matches my skin tone and normally looks quite invisible. except apparently under this mesh because instead of looking transparent it changed the tone of the hail spot mesh to be much more tan and completely lose the impact of the white line. It now just looked dirty and like I had cut it badly. At this stage I almost recut but decided no at the very least it’s still wearable even if it’s not visually how I wanted.

Because we are currently trying to stay at home and not go out I’m using only what I have in the house to finish off projects. I’m not going out just to get matching elastics. So when I realised I didn’t have enough wider plush elastic for the lower band I improvised. My improvisation included the same width picot as I’d use for the cups and then a decorative topstitch of some strapping elastic in green. Not only did it add strength to that lower band it also helped cover up the non white, white panel at the bottom of the cradle. It works quite well and was a good solution given the situation.

After my disaster sewing on my last Harriet I really wanted to pay attention to my sewing and get a neater finish. I think I did ok at this but always there is room for improvement (I see you non clipped section on left hand side!)

Eagle eyed bra makers will also see there is no lining in my upper cup. I’ve tried this a few times and the non lined section is much more comfortable for me, I also find if I do add a lining in there I can end up with a quad boob look which is not a look anyone wants.

As always I’ve used a mix of colours, fabrics and trims to try and create a harmonious overall colour scheme. Even on a more muted colour scheme like this one I wanted to mix up the elements to bring something else to the style so that it felt more like my style. I’m super keen to make matching knickers for this one because I think it’s going to be a fun challenge.

Pattern: Harriet Bra from Cloth Habit

Fabric: Printed mesh, white power mesh, elastics from at Pitt Trading. Underwires, hook and eye from Underwired.co

Alterations: now that I have my fit working for me I’m at the stage where I can just cut and make which is quite fun