This seems to have been one of the hottest summers I can remember, endless days where the heat doesn’t go down at night. I like summer I like the sunshine and being able to go swimming all the time, however, I do like sleeping and lately, it’s been so hot overnight that you just can’t get to sleep. Bedtimes keep getting later and later putting off that inevitable moment where you have to lie on a hot mattress.
Naturally I’m looking to help the situation through sewing. My plan? to make a super lightweight version of the Emma Slip and this pretty stretch lace from Pitt Trading is just the kind of thing I was thinking of.
I’ve made this one to the suggested length for the size 12, I often cut them longer because I like the silhouette that way but this time it’s shorter, it’s the 14 skirt width attached to the 12 bodice and I’ve shortened the cup by about 1cm at the centre front where they cross over. I’m quite high busted (short person proportions) and I was getting a little ripple at that point due to excess fabric so the shortening of the cup takes care of that.
One of the things I really strove for when developing the Emma slip was that it would be a pretty fast make and this one certainly was. The most fiddly bit is attaching the O rings and sliders to the straps.
Last year the wonderful team at My Fabric Place approached me about using some of their fabric. I took a look at their selection and fell in love with this stretch cotton sateen, they had so many lovely fabrics it was a bit hard to choose from!
They packed it up and sent it across and while I have taken it out and patted it quite a lot I just never got around to using it. mostly becuase of time and because I didn’t want to make something in it that wasn’t going to be showing the fabric off to its best advantge.
Last week I cut into it, made it up, wore it on the weekend to a lovely ladies lunch with friends, got blog photos and kicked myself for leaving such lovely fabric languishing for a whole year.
It is a delight to wear with a nice solid heaviness to the fabric but not being hot. these photos were taken on a warm day after I’d walked, caught a train, ate lunch and been in a car and it still looks pretty fresh!
Make wise it is my own bodice block which I have altered slightly when I recreated it last year. I’ve added a bit more room to the sides. it helps my dresses hang straighter and doesn’t pull so much over the lopsided section of my torso. Seeing it in photos means I’ve spotted a few other things I can fix so I’ll keep those in mind for next time I use it.
The skirt is the full width of the fabric pleated to make the front and the same for the back. I didn’t measure the pleats just eyeballed it in.
I also added side pockets, the neck and armholes are finished with satin bias binding.
The back has an invisible zip which I inserted using my regular zip foot as I always do. I find the regular foot so much better than the speicifc foot. It also means if you know this technique you cna use any machine and never have to hunt to find the speicific invisible zip foot.
I fell in love with the Deer and Doe Magnolia dress as soon as it was released, v neck, faux wrap and oddly for me I loved the long version.
When you are short you are always told to never wear floor length dresses because it will make you appear shorter. But you know what no one ever mentions? The fact that they feel awesome to wear! Suddenly you are swishing down the street like some kind of goddess, so hang being short and bring on the long goddess dresses.
I wanted to make a wearable toile and had spotted this rayon challis at Lincraft of all places. This is now my second fabric purchase from Lincraft in 20 years, woo crazy stuff I know. It was originally close to $20 a metre and while cute was not worth that, I kept waiting till it went on sale and finally got it for about $6 a metre which was perfect because this dress is a fabric eater! Even without the sleeves there is a tonne of fabric useage.
Sewing wise it all went really well. In the future I’d re toile the bodice as the princess seam is now where near my bust causing some odd drags at the underarm and I need to shorten the bodice from shoulder to waistband by about 1.5cm. I also found I could get it on without the zip so didn’t put the zip in which was good as I have a sneaking suspicion this fabric would not have liked having a zip put in.
The fabric is a dream to wear, its opaque so no lingerie, cool and breezy on hot days and doesnt crush too much over the length of the day. These photos were taken about 5pm and I’d been wearing it since 9am so that’s pretty good. The bad about the fabric is that it keeps growing. I had hemmed it to wear with my flat summer thongs. It’s now at the point where I have to wear my boot clogs or I trip over it. I think I’ll wash it again this week and then cut off the hem and re hem it back to a non trip hazard length.
While I’m at it I’m also going to sew up the leg split. I’m not sure how I managed it but I have a crotch level split. Which which good for hot weather does rather flash people more than I am comfortable with.
Pattern: Deer and Doe Magnolia
Fabric: Rayon Challis from Lincraft
Alterations: reduce thigh spilt, reduce bodice length, move princess seams to be on bust
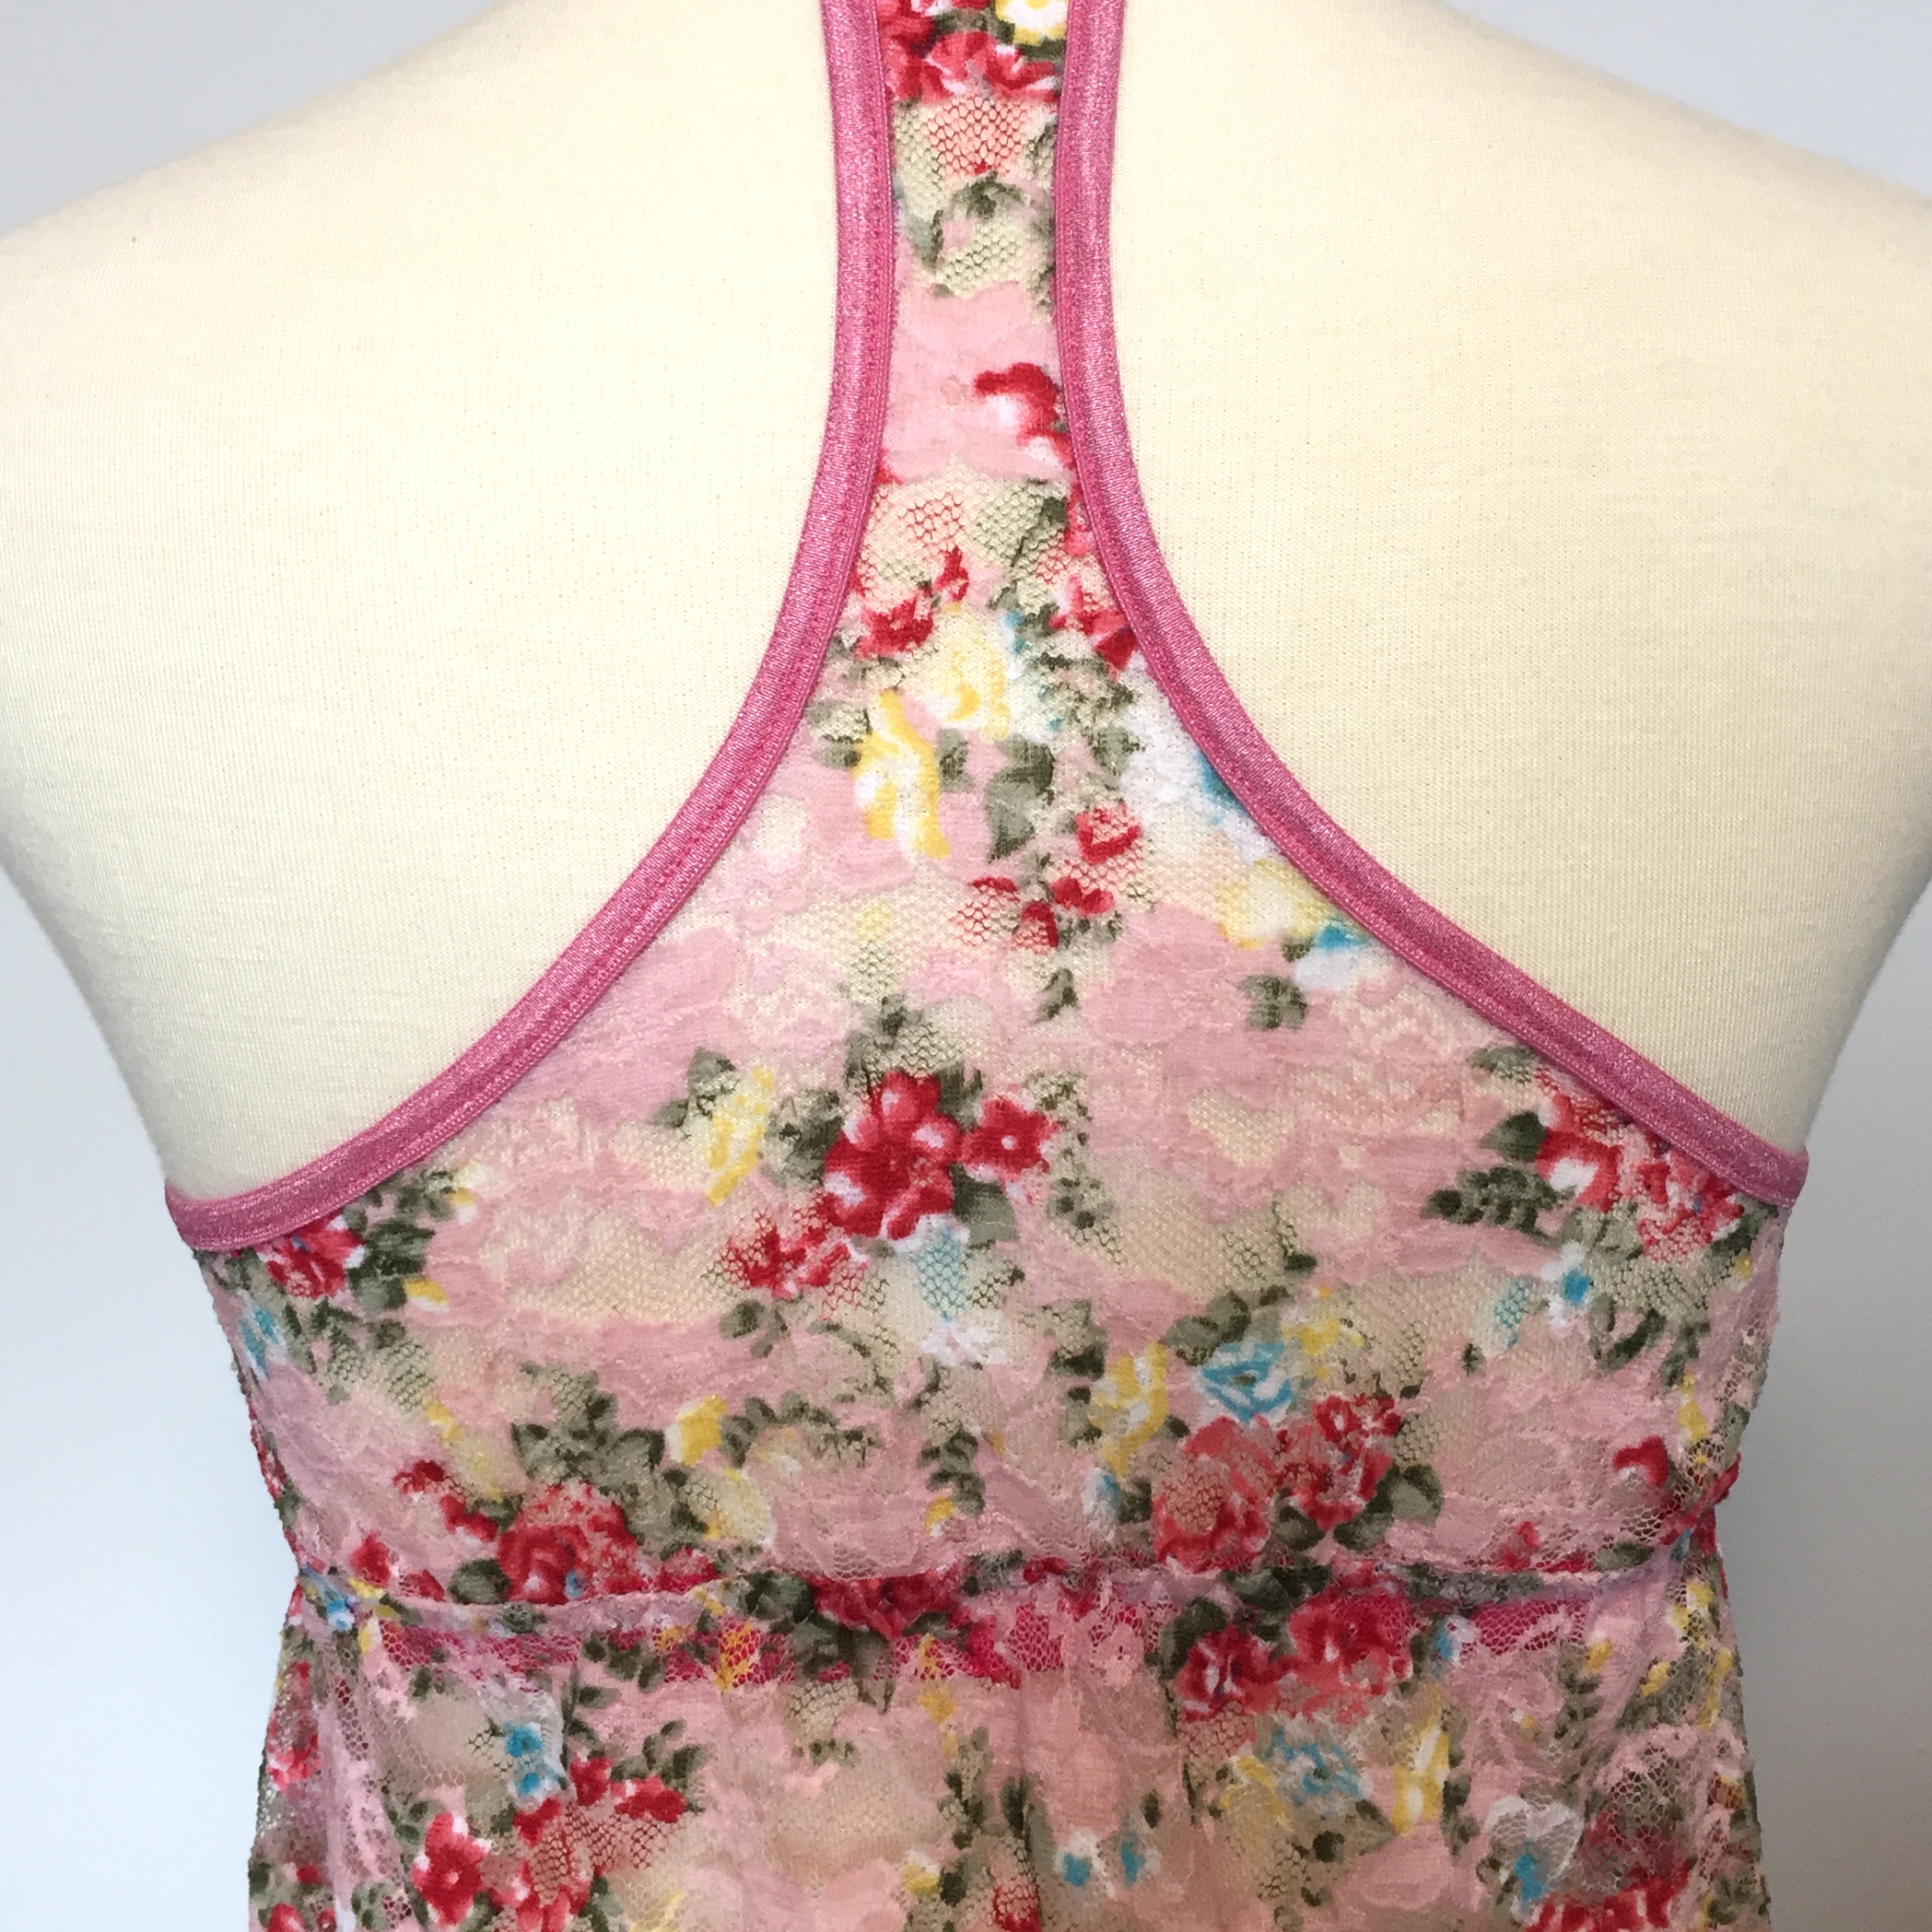
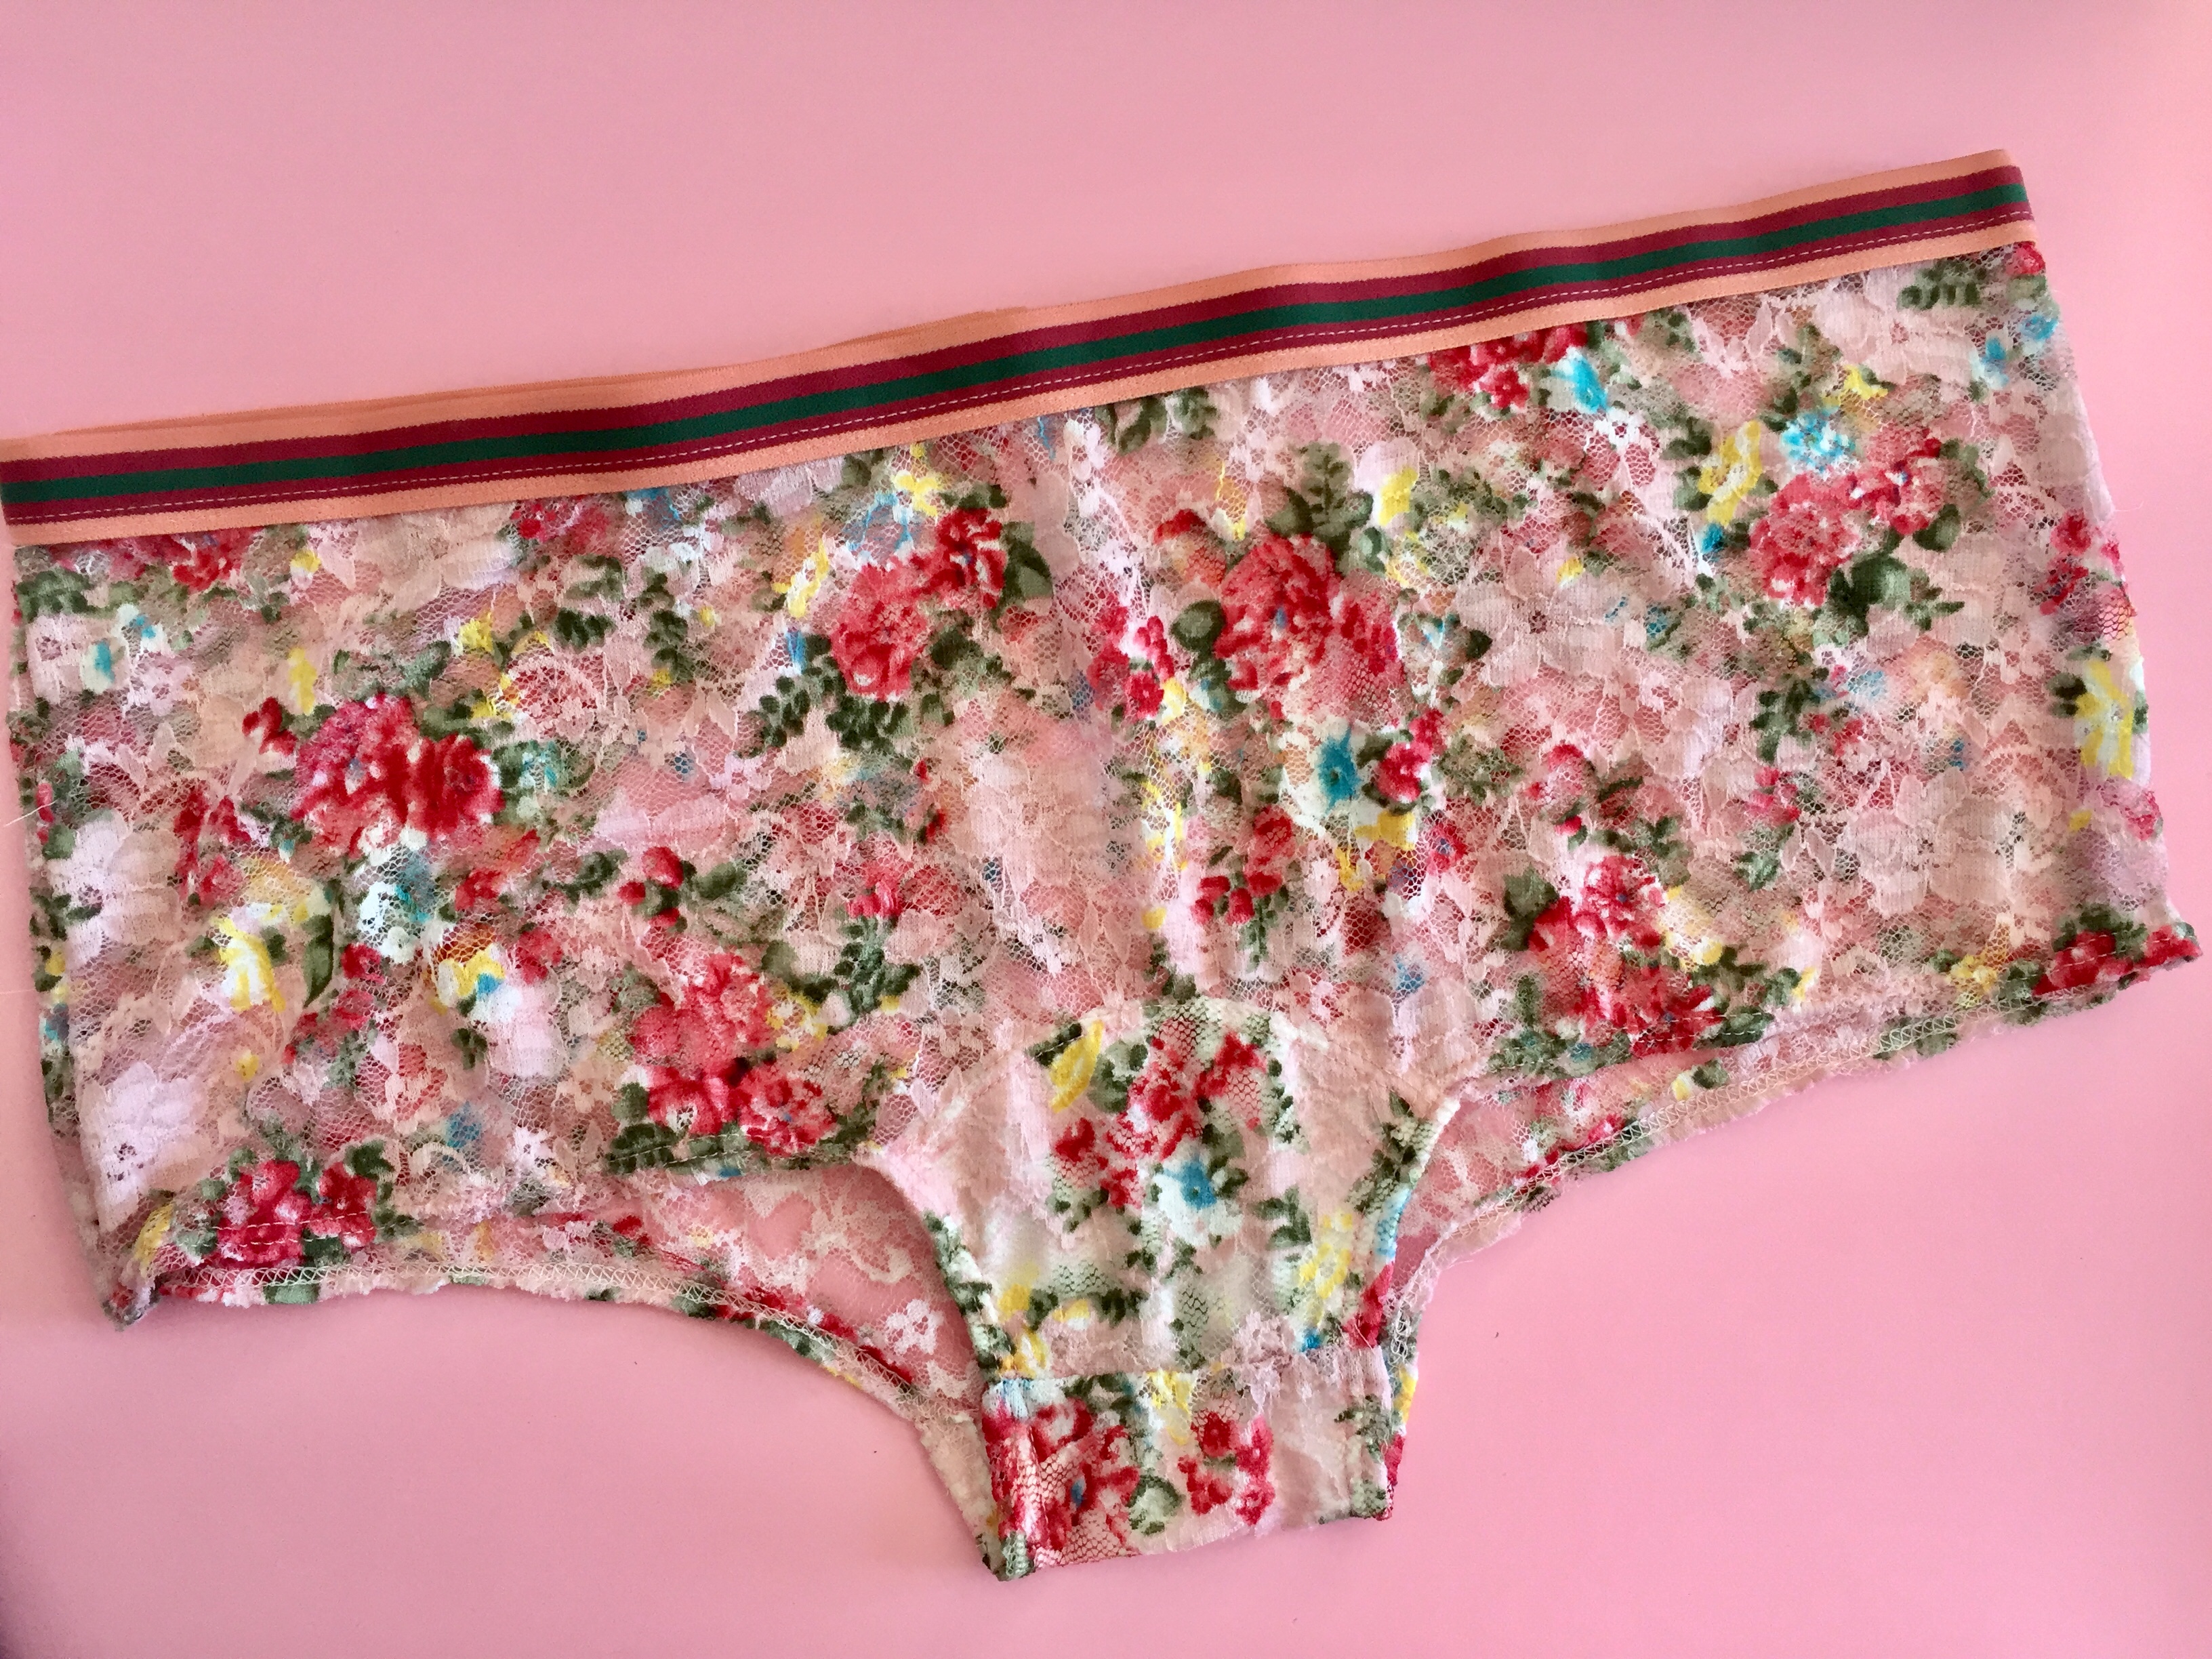
It’s been too long since I used my Mary Knickers pattern. I forgot how much I like th low slung on the hips fit and the little almost legs to them.
As part of my Make nine topics was “Operation Lingerie Drawer and I couldn’t be more pleased with how these first 2 pairs of Mary Knickers have gone.
The lace is a super soft floral print from Pitt Trading. The fabric stretches one way but not both ways. The Mary is great for this type of fabric as it doesn’t really need too much give through the height but it does mean these ones are ever so slightly cheeky but I’m ok with that. If you want to avoid that just cut them with a longer back rise. Always be sure to cut with the greatest stretch going around you.
I’ve used an organic cotton jersey also from Pitt Trading as the gusset, you can just use the lace but I prefer the cotton.
Make wise I just overlocker them all together. The gusset is actually a floating gusset but I decided to use my coverstitch machine and stitch it to the lace. Sometimes with a delicate fabric it helps give them a little extra strength and longevity.
At the last Pitt Trading pop up store I got some of these beautiful patterned elastics and put it to the Instagram hive mind to see which one got to be the waistband.
Stripes won and I attached it using my coverstitch. I often get asked about my coverstitch machine and it is my least used machine but I’m going to try and use it more and basically get better at using it. Sometimes I forget to have time to just practice at getting better so I’m going to see if I can squeeze in some practise time with it.
Now I had a metre of this fabric and I’m determined to leave no scraps unused so after I had cut some other bits and pieces I had enough for another pair of Mary’s. This time I just used a picot I had on hand for the waistband. It’s fine and very functional but not as cute at the stripes.
This is more of a wearable toile but I’ve been wearing it so much despite a few issues that I thought it was well worth it’s own blog post.
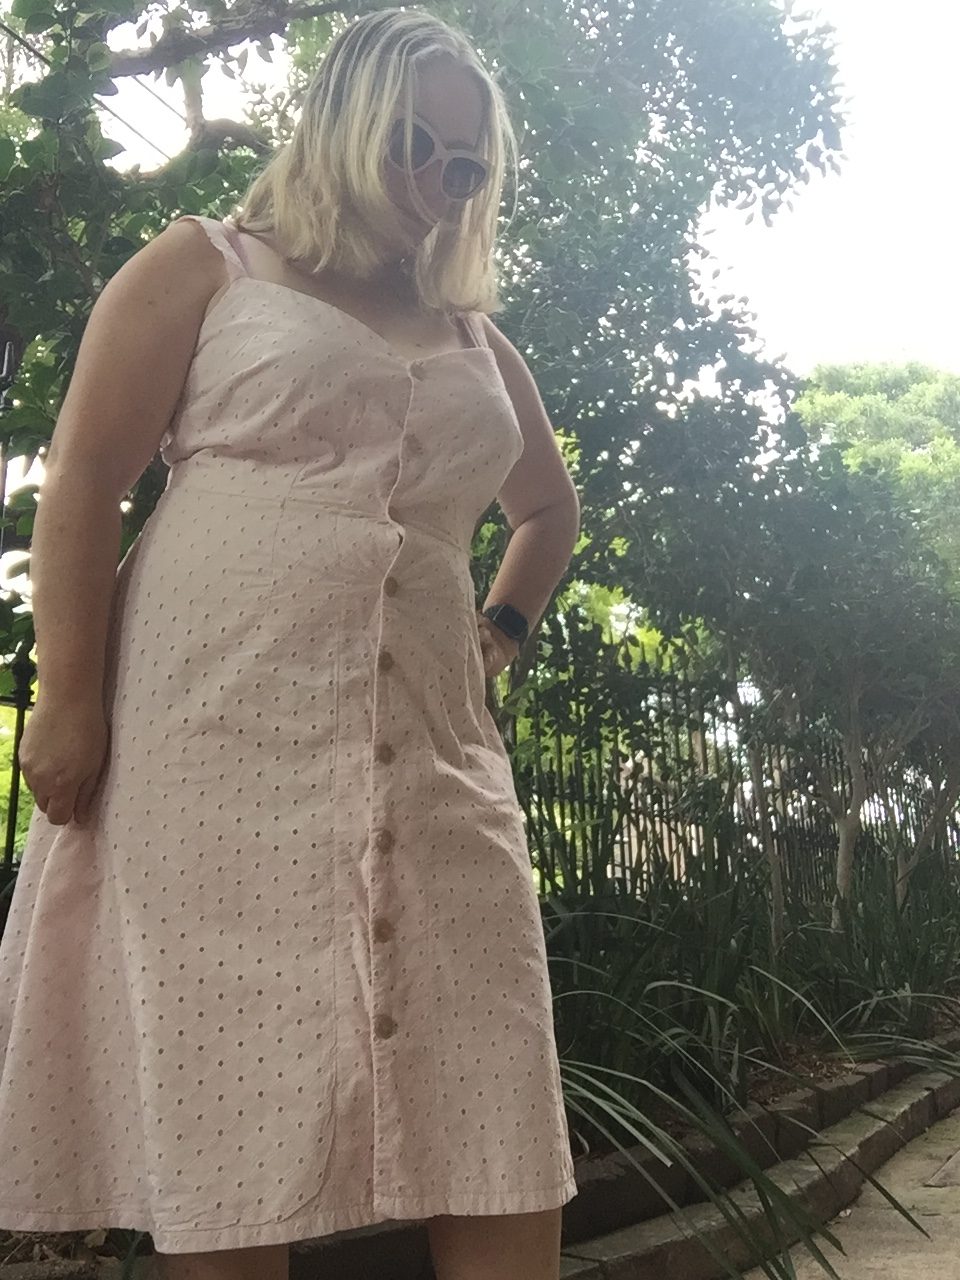
Last year when Pitt Trading did their Summer Soiree Nina Lee offered a discount code so I picked up the Kew Dress after seeing so many lovely versions online.
Because I wanted to make a wearable toile I used this vintage embroidered cotton from the stash. It’s got marks on it after the fire and while I loved the fabric it’s so very close to my skin tone that it was destined to be a dress I wore at home only. To combat the eyelet holes it’s fully underlined in white cotton voile.
The pattern itself went together with ease, all the seams line up and things just fitted which is such a pleasure in a pattern.
This one I cut without any alterations and in hindsight there are a few things I’d fix. It wrinkles at the back, the straps are too long for me (though I have a sneaking suspicion I actually cut them at the wrong length) and I need to adjust the position of the straps to cover my bra.
You can also see where it pulls at the centre front on the waist seam. This is not a pattern problem, this is because I’m lopsided after surgery and it causes things to gape there. Honestly I’m not that bothered about it on a dress I had always intended to wear at home or over my swimmers going to and from a swim. If it was intended for fancier purposes then I’d do something about it.
However, it has been such a great dress in this heat. It’s easy to wear and move about in, I particularly like the slightly dipped back hem. The buttons (awesome unicorn shimmer ones from Pitt Trading) also mean it’s not as tight feeling as a zippered dress which is good when you feel like a sweat puddle.
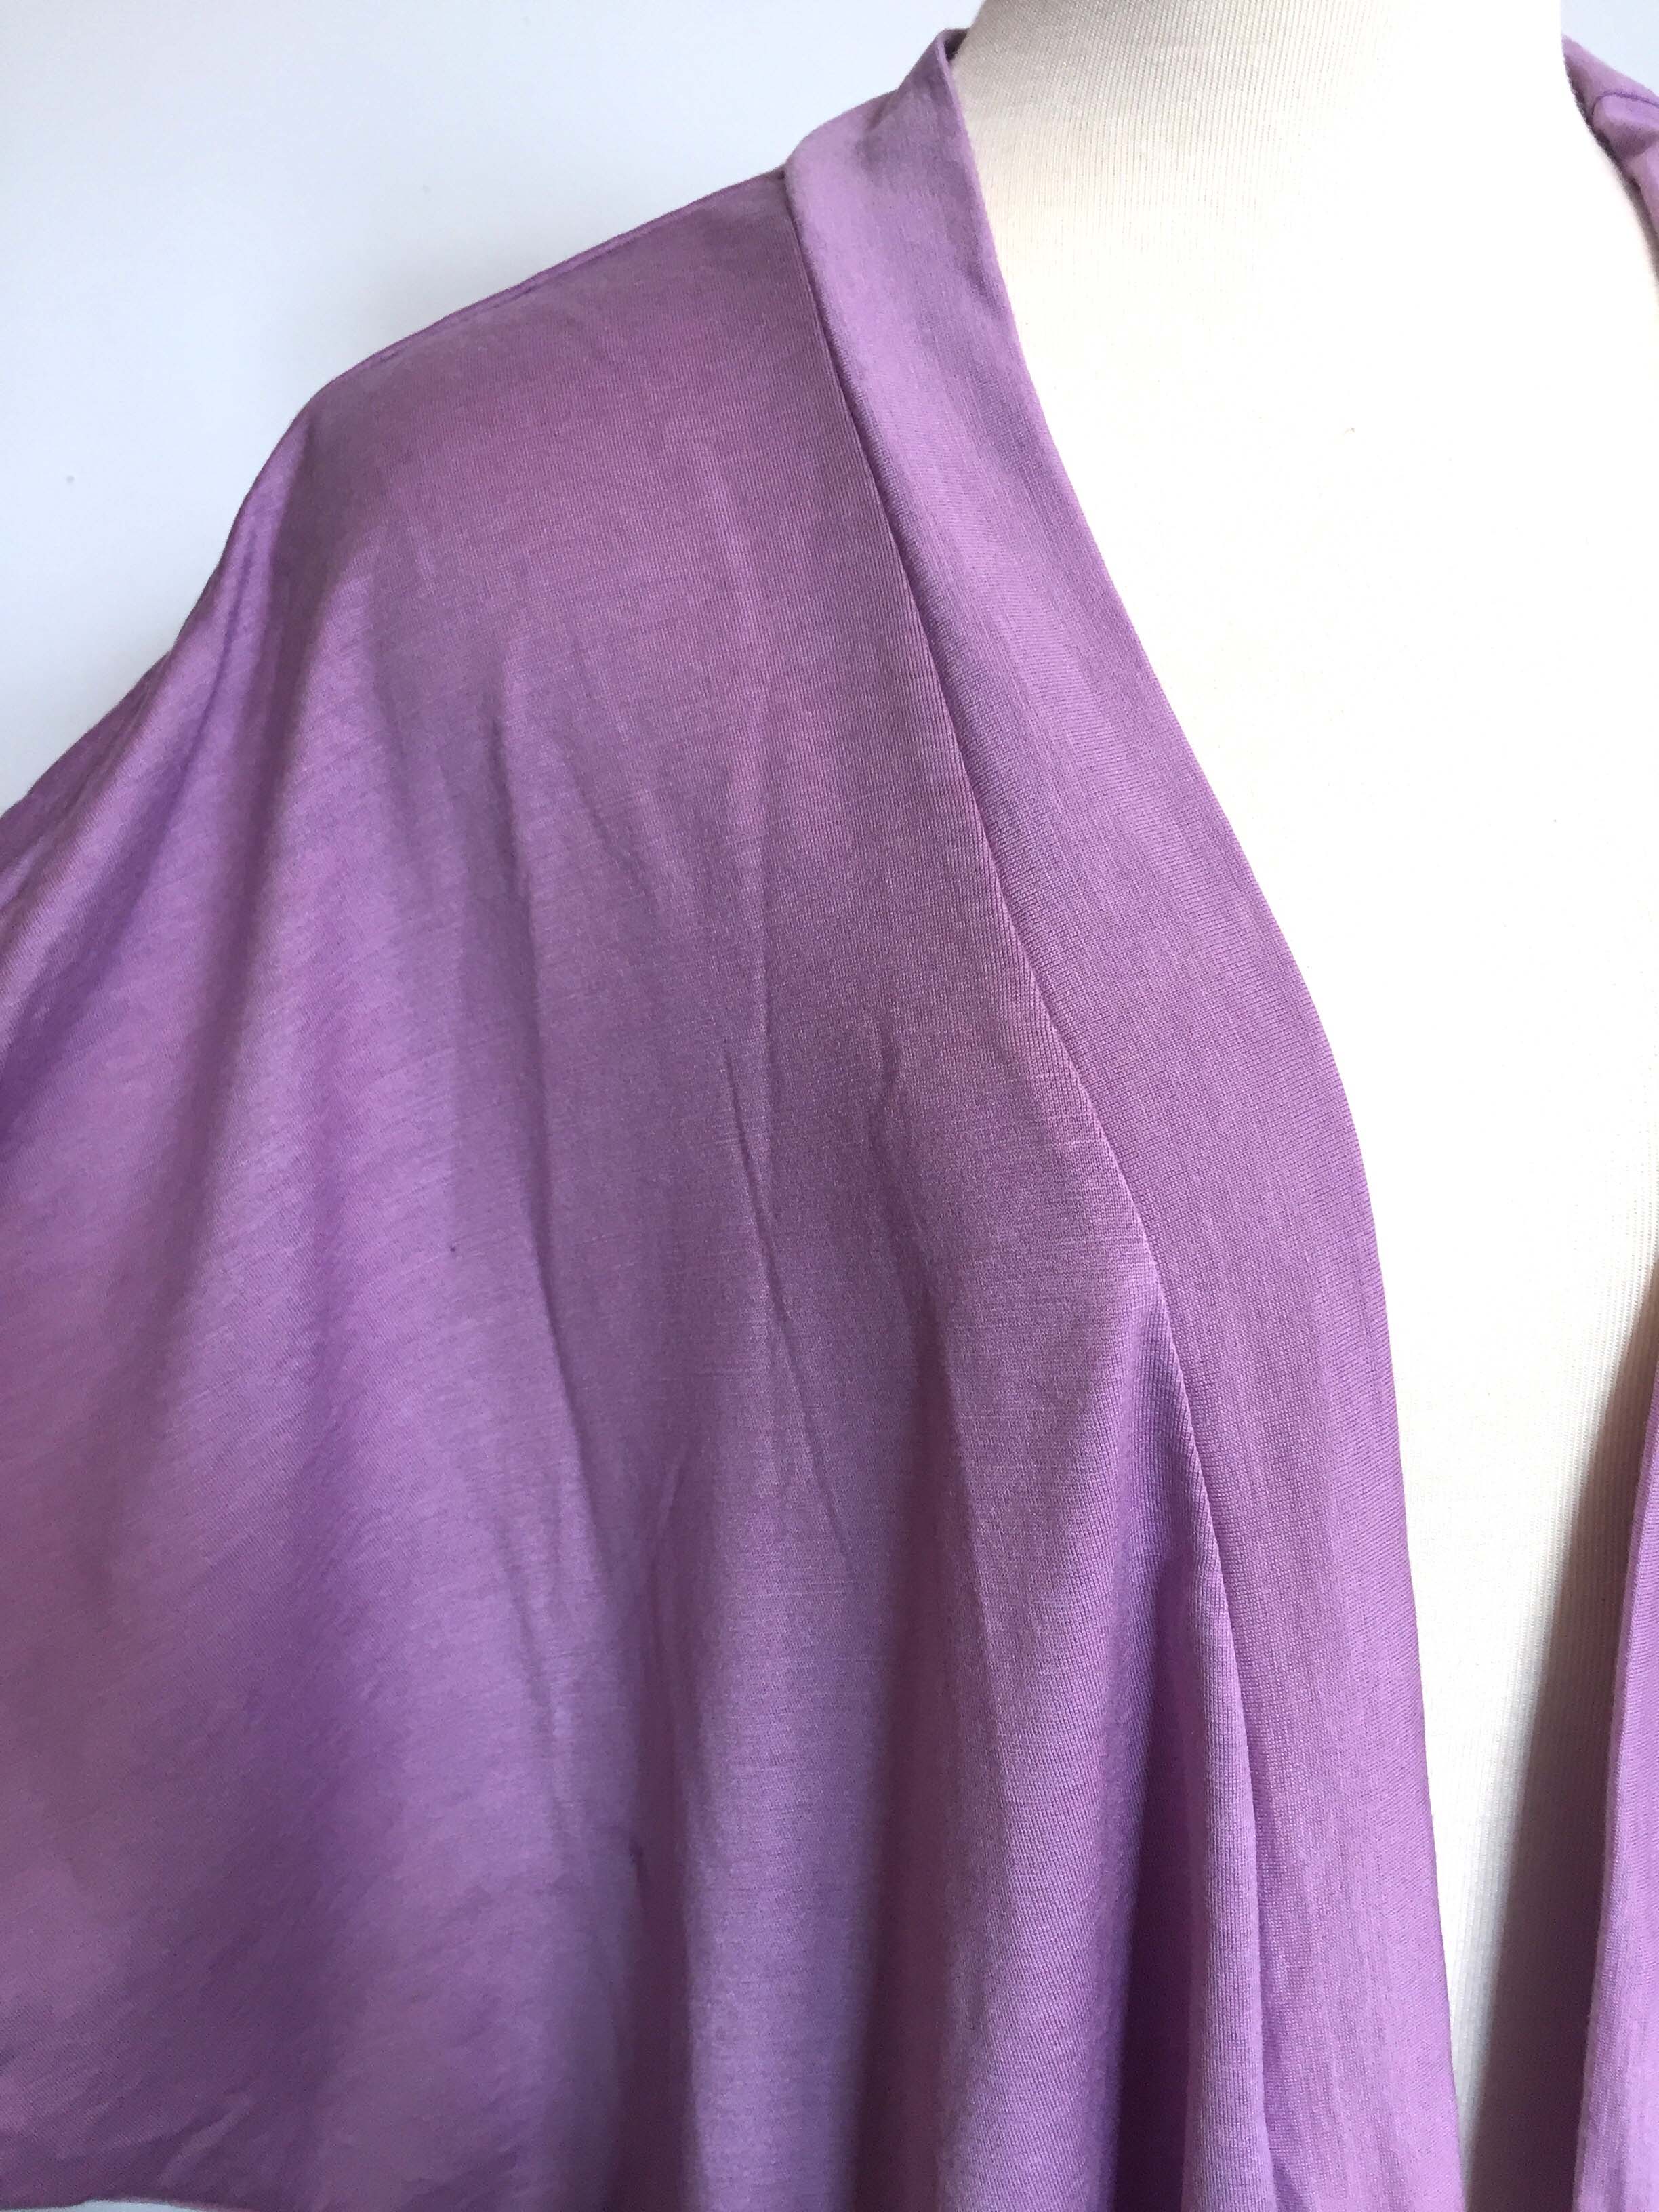
Ever have one of those moments where you are searching for a pattern but you aren’t entirely sure what it is you are looking for and then a sewing friend suggests something you are “yes, that’s what I was after!”
That is how I discovered this pattern the Jalie Cocoon Cardigan. I am so glad because it’s really kind of fabulous even in an over exposed photo. Note to self don’t take photos on really hot days where you have the entire house enshrouded to try and keep it cooler…it makes every grey looking.
Small number of pattern pieces, huge size range and it goes together perfectly with no issues at all. The only one tiny change I made was to shift the centre back join to be at the shoulder seam. Centre back joins make things look so obviously homemade and they kind of make me cringe at how unnecessary they are. The band itself went on so smoothly, so good when patterns go together with such little effort.
Apart from that loved it was made for a present and they like it and I know I’ll be making more of them as presents in the future. It also wraps up tiny so perfect for presents that need to be posted or to make and take travelling.
Pattern: Jalie Cocoon cardigan
Fabric: merino wool jersey with a good drape to it. From the stash but originally from The Fabric Store
Alterations: moved the band join from centre back to side neck seam
My “to make” list for Christmas is always blowing out as I start with stupidly ambitious plans and then need to rescale. This pattern is one I wish I had known about earlier because it would have been everyone’s present I love it so much.
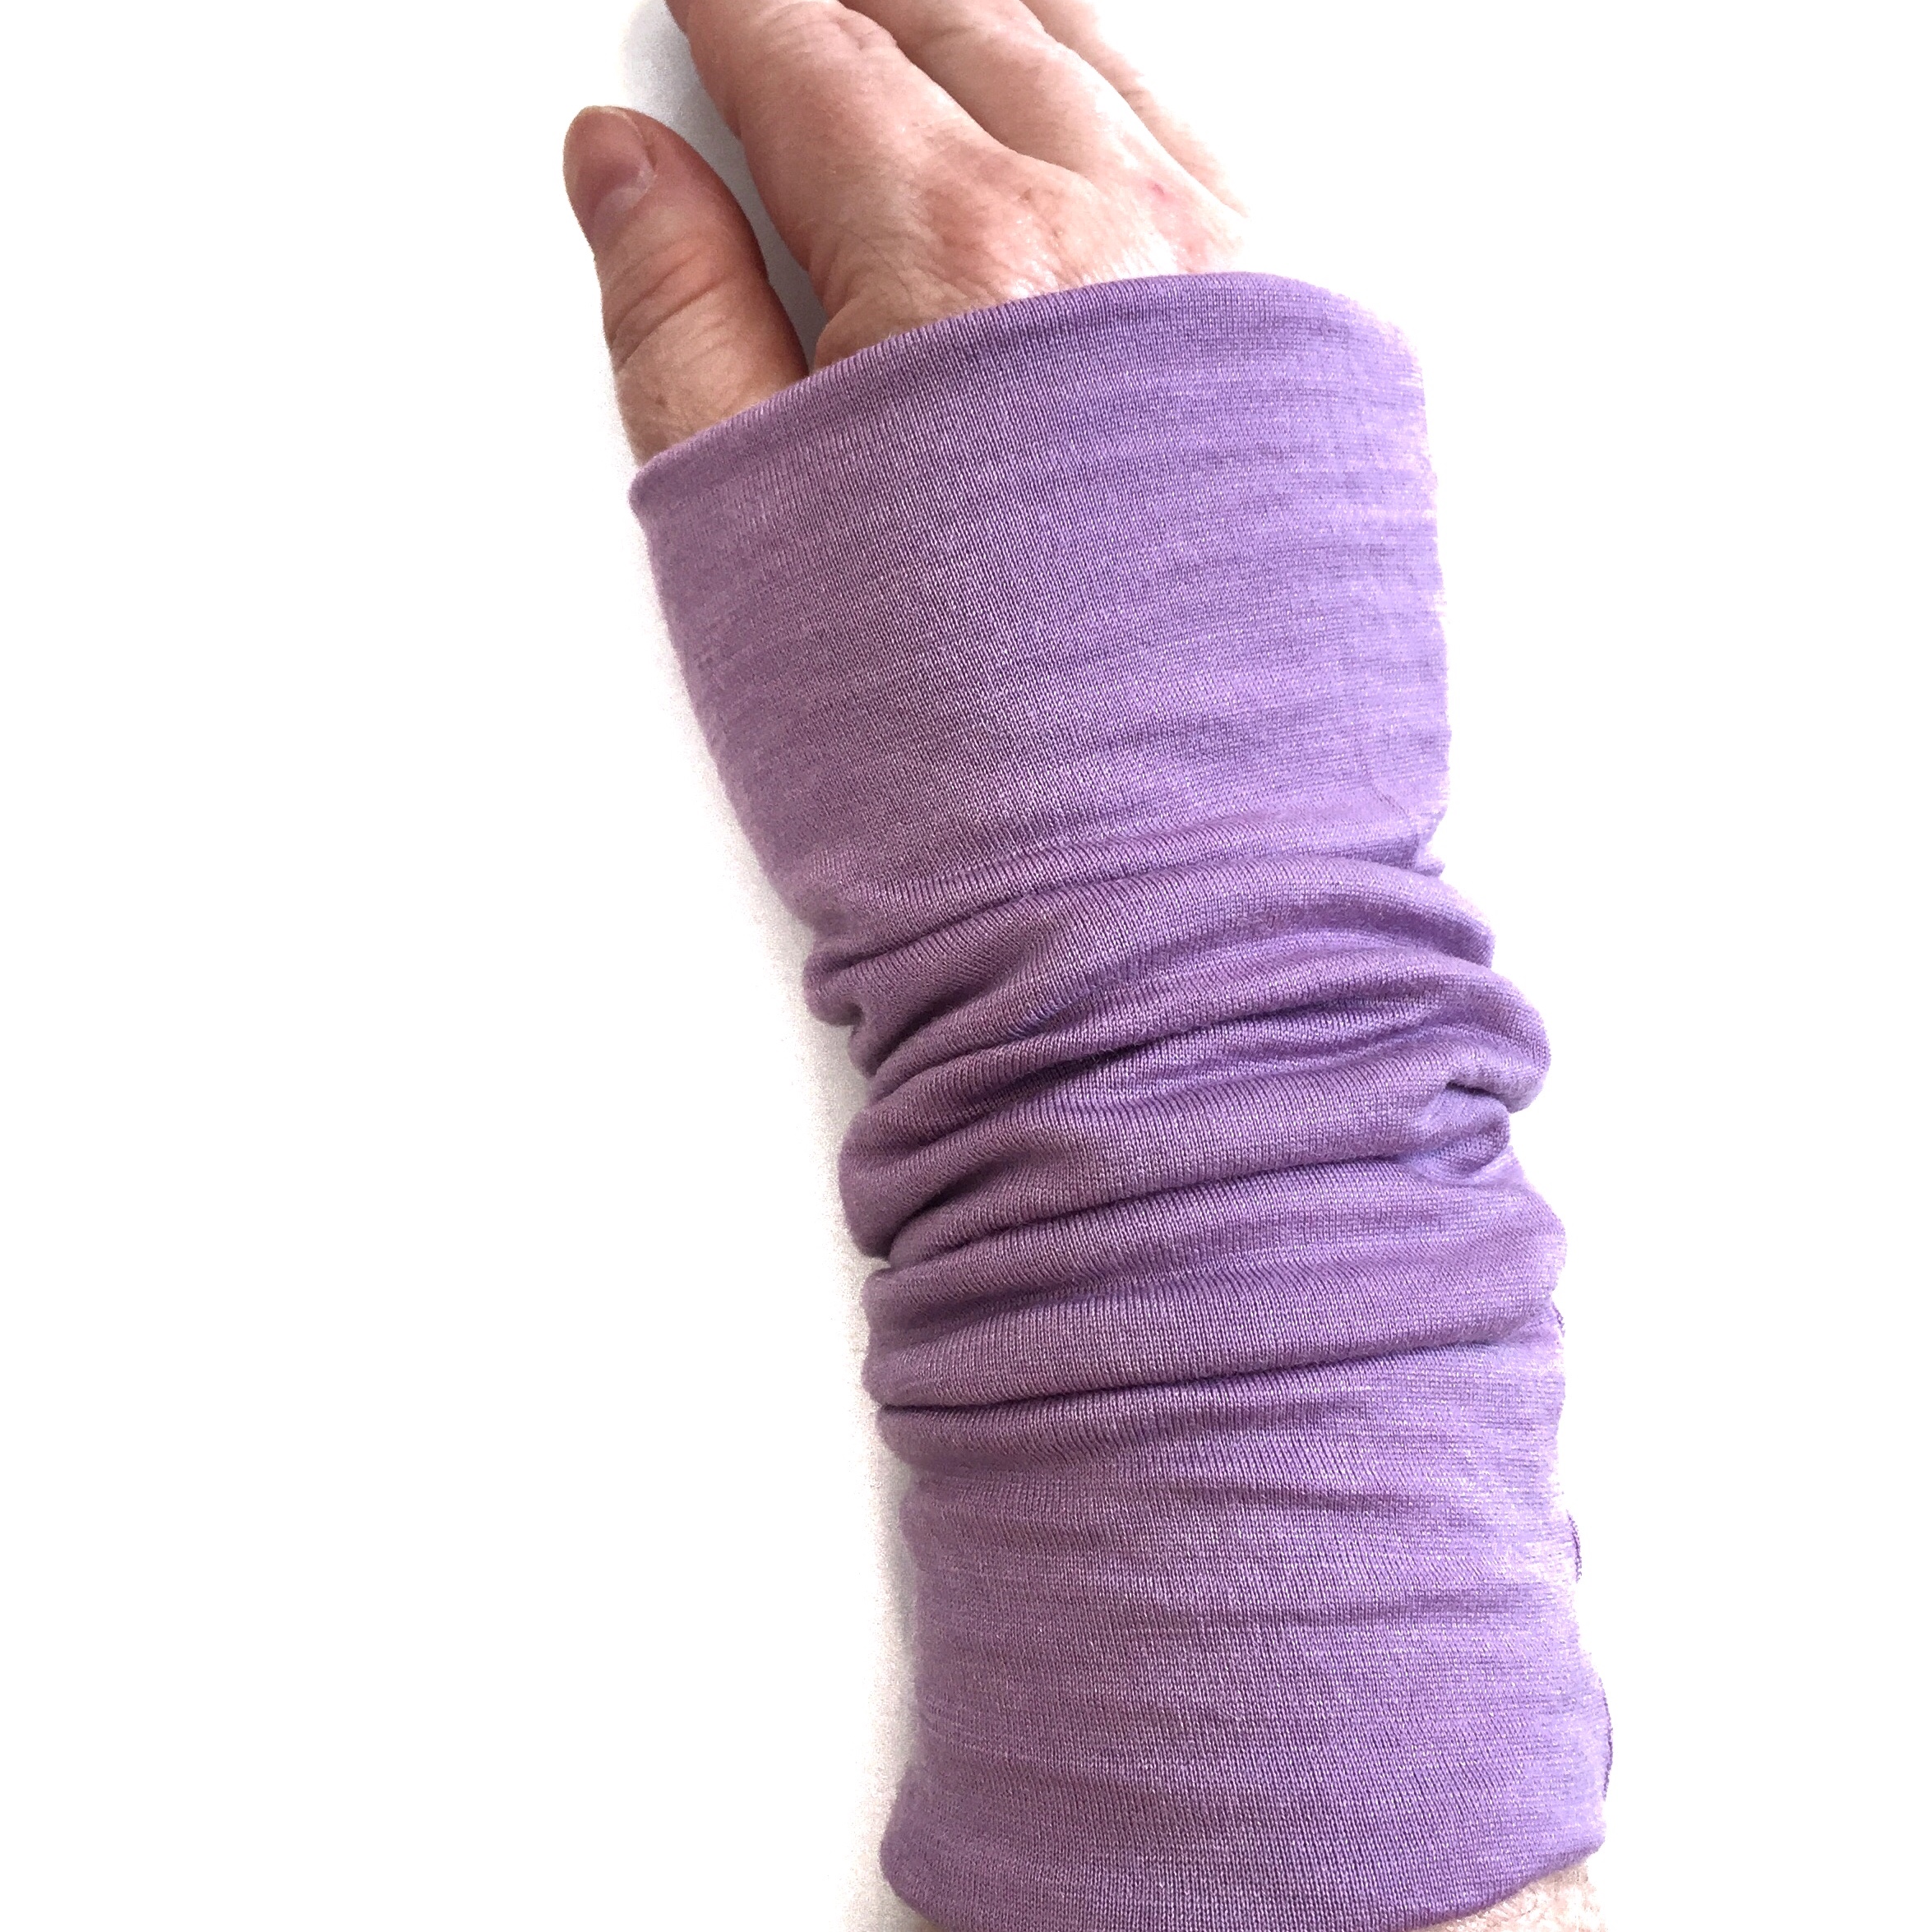
These are wrist warmers made in merino wool jersey from The Rutland Collection E Book from MIY Collection by the very talented Wendy Ward. Wendy has written a number of books in recent years as well as putting out her own patterns and the gems that make up The Rutland Collection had escaped my notice until I saw another sewer using them on Instagram.
These were a simple make but for once I really had to follow the instructions as they are so wonderfully ingenious that I simply couldn’t figure it out until I went step by step. It was brilliant and taught me some cool things. So a double plus of learning and an awesome pair of wrist warmers to give as a present!
Pattern: wrist warmers from The Rutland Collection by MIY Collection/Wendy Ward
Fabric: Merino wool jersey from stash originally from The Fabric Store
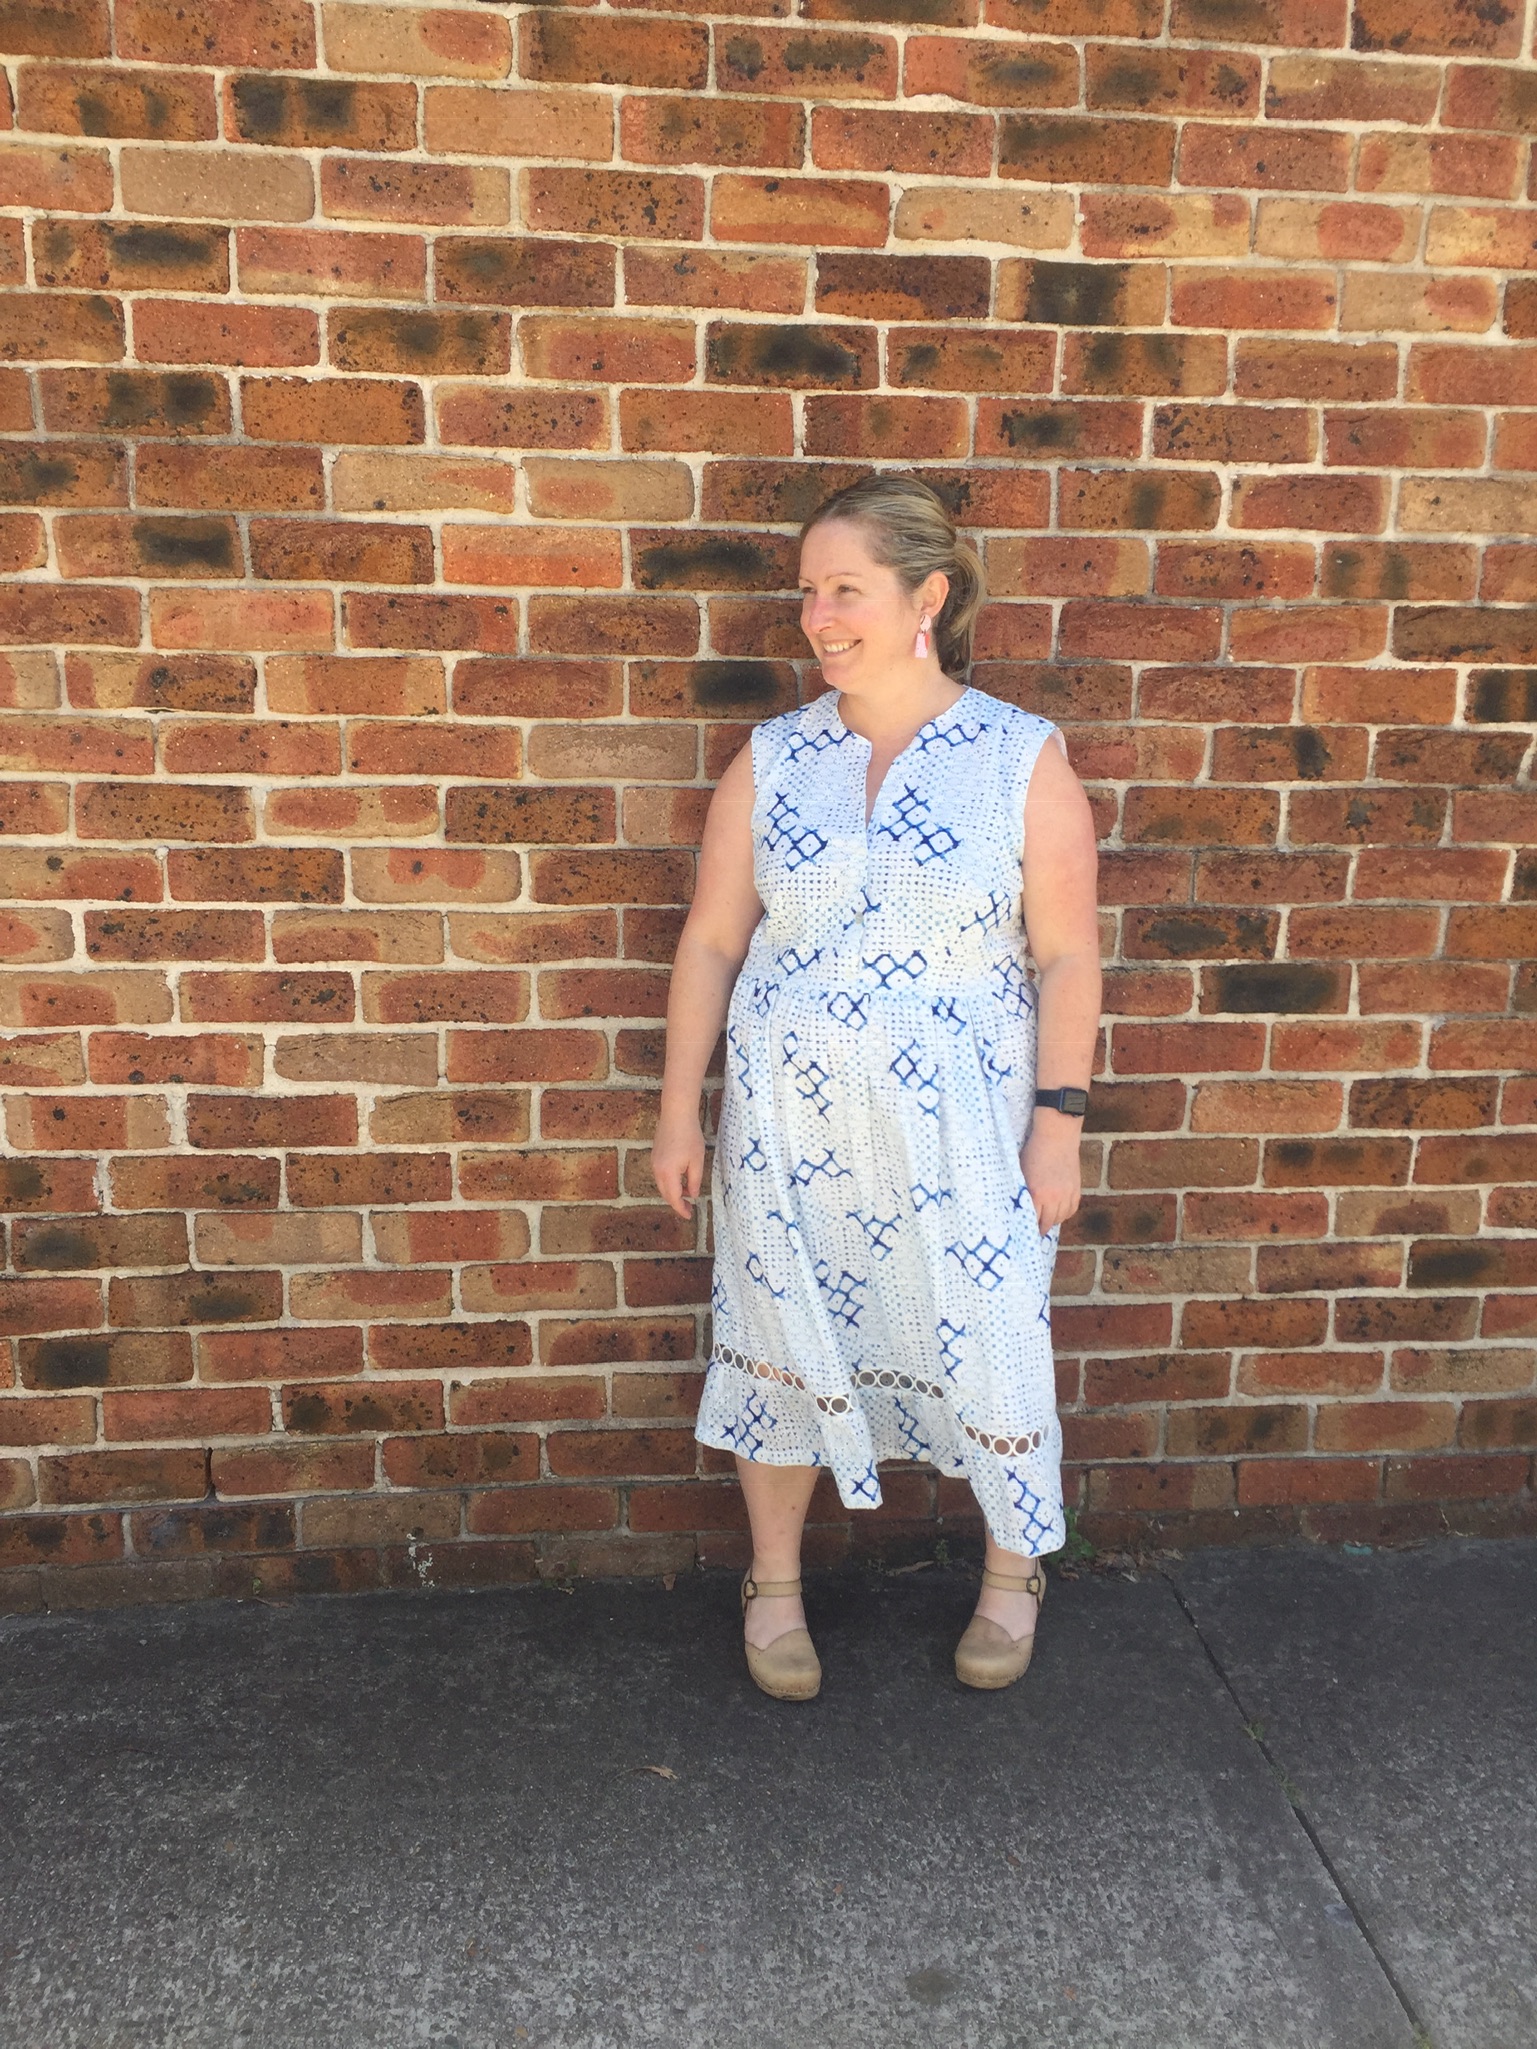
When I first made the Deer and Doe Myosotis I had no idea how much I would enjoy wearing it. I’ve made mine in a more relaxed fit and it is ridiculously comfortable. The two Liberty ones I made last year are in high wardrobe rotation.
So when the hot weather started to kick in before Christmas I had this idea to make a floaty barely there dress with tiny straps and no fuss that would be perfect for those days at home where it’s just so hot you can’t do anything and just spend the whole time drinking cold drinks and reading books.
This “Chia Blue” dense cotton lawn with embroidery and Japanese shibori style printed motifs from Pitt Trading was perfect for such a concept. So I didn’t have to worry about underwear colour I grabbed some cotton voile to line it with.
Then this gorgeous circular insertion lace came in at Pitt Trading and suddenly my idea morphed into something else and I found myself reaching for the Myosotis bodice and skirt.
The skirt is the longest length main skirt of the Myosotis and the ruffle is the width of the fabric just gathered in to fit. It’s possibly a little long but I ha thought of adding more rows of insertion so wanted some extra length so I could cut it and add the insertion without having to worry about adding and subtrcting seam allowances.
As it was I ended up only doing one row and now it sometimes feels slightly long but not enough to stop me wearing it. The insertion lace I cut where I wanted it to go, overlocked the raw edges of the fabric, turned it up and then stitched in the insertion. Doing it that way hides the tape along the side making it look more integrated into the garment and not like a trim plonked on top.
The bodice is the Myosotis without the collar, with the neckline modification I figured out the second time I made it to reduce the weird neck wrinkle I get. I also laid my own bodice block over it to reshape the shoulder and armhole to make it a more appropriate shape to being sleeveless.
The bodice is fully bagged out with the cotton voile and the skirt is lined to just above the insertion trim. I don’t actually need to undo the buttons I can pull it on over my head so I just stitched them on through all layers.
It’s light and breezy and perfect for hot weather.
Fabric: Chia Blue purchased at Pitt Trading as was lining and insertion lace
Alterations: longer skirt, added insertion, no collar, re shaped shoulder and armhole for sleeveless, eliminated need for button holes and scooped out neck to fix neck wrinkle.
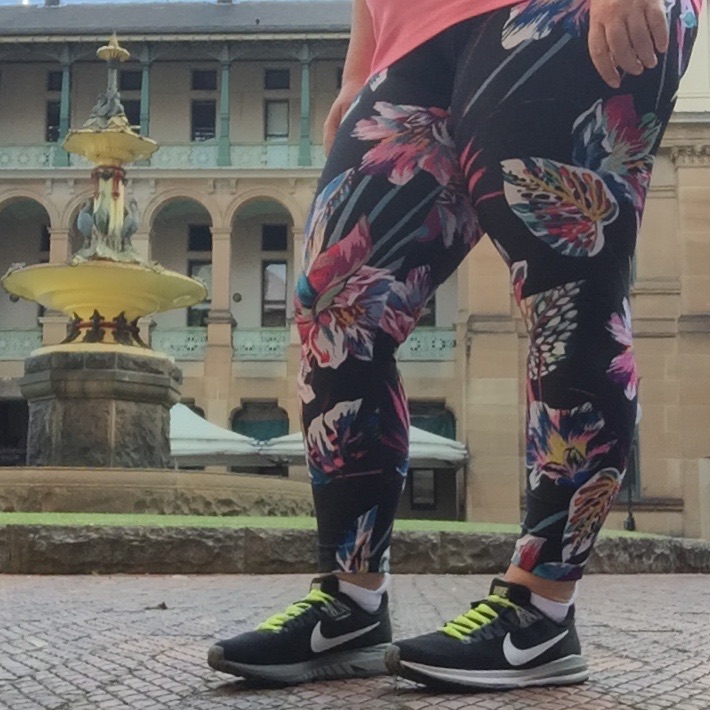
After the utter success of making tights from the Pre Printed tights panels at Pitt Trading, when I saw a new print I jumped on them and whipped them up straight away…..it then took me forever to get photos because I keep using all my tights!
Make wise incredibly similar to how I did it last time but I made sure to use my coverstitch to hold the elastic on the top of the waistband down. I haven’t done that in some of the others and every so often it will twist a bit and become a rub point.
Now I’ve had lots of people asking how the fabric performs so here is how I’ve been wearing them and what I’ve felt. When working with athletes and sportswear companies one of the things I always strive for is that the garment is not thought about during the activity. If you are thinking oh that pulls, that feels wet, thats itchy etc etc then the garment design has failed you. It should feel like you are wearing nothing at all while aiding your performance not detracting or distracting.
I’ve been walking most mornings in heat up to about 32 degrees with high humidity. While walking you don’t feel wet or damp at all. Very occasionally (on really hot days) I could do with having a 3/4 pair for walking to allow a little more ventilation but that’s due to sheer heat not the fabric.
At the end of my morning walks I’ve often been going swimming so I change from my walking stuff to my swimmers. My sports bra and parts of my top will be saturated but my tights are only damp around the waistband, crotch and back of knees. All expected places for sweat to be gathering in an upright activity. The fact that they are damp and not wringing wet like the others certainly suggests the moisture wicking capabilities are high.
I’ve been running in them a bit and I’m experiencing very similar results to the walking except at the end of the run the tights are wetter but I’m yet to feel damp while actually moving. I’ve deliberately made mine extra high waisted to cover the swelling and scar post surgery. considering they are high enough to meet some of the bands on my sports bras I’m still not feeling too hot through the torso which surprised me a bit.
Even stretched in use they retain their bright colours and don’t grin white and stay opaque even when damp with sweat.
All in all I’m very impressed and I’ve noticed the have the cherry blossom print back in stock too!
Pattern: Pre printed onto tights panel with a modified Jalie Clara waistband
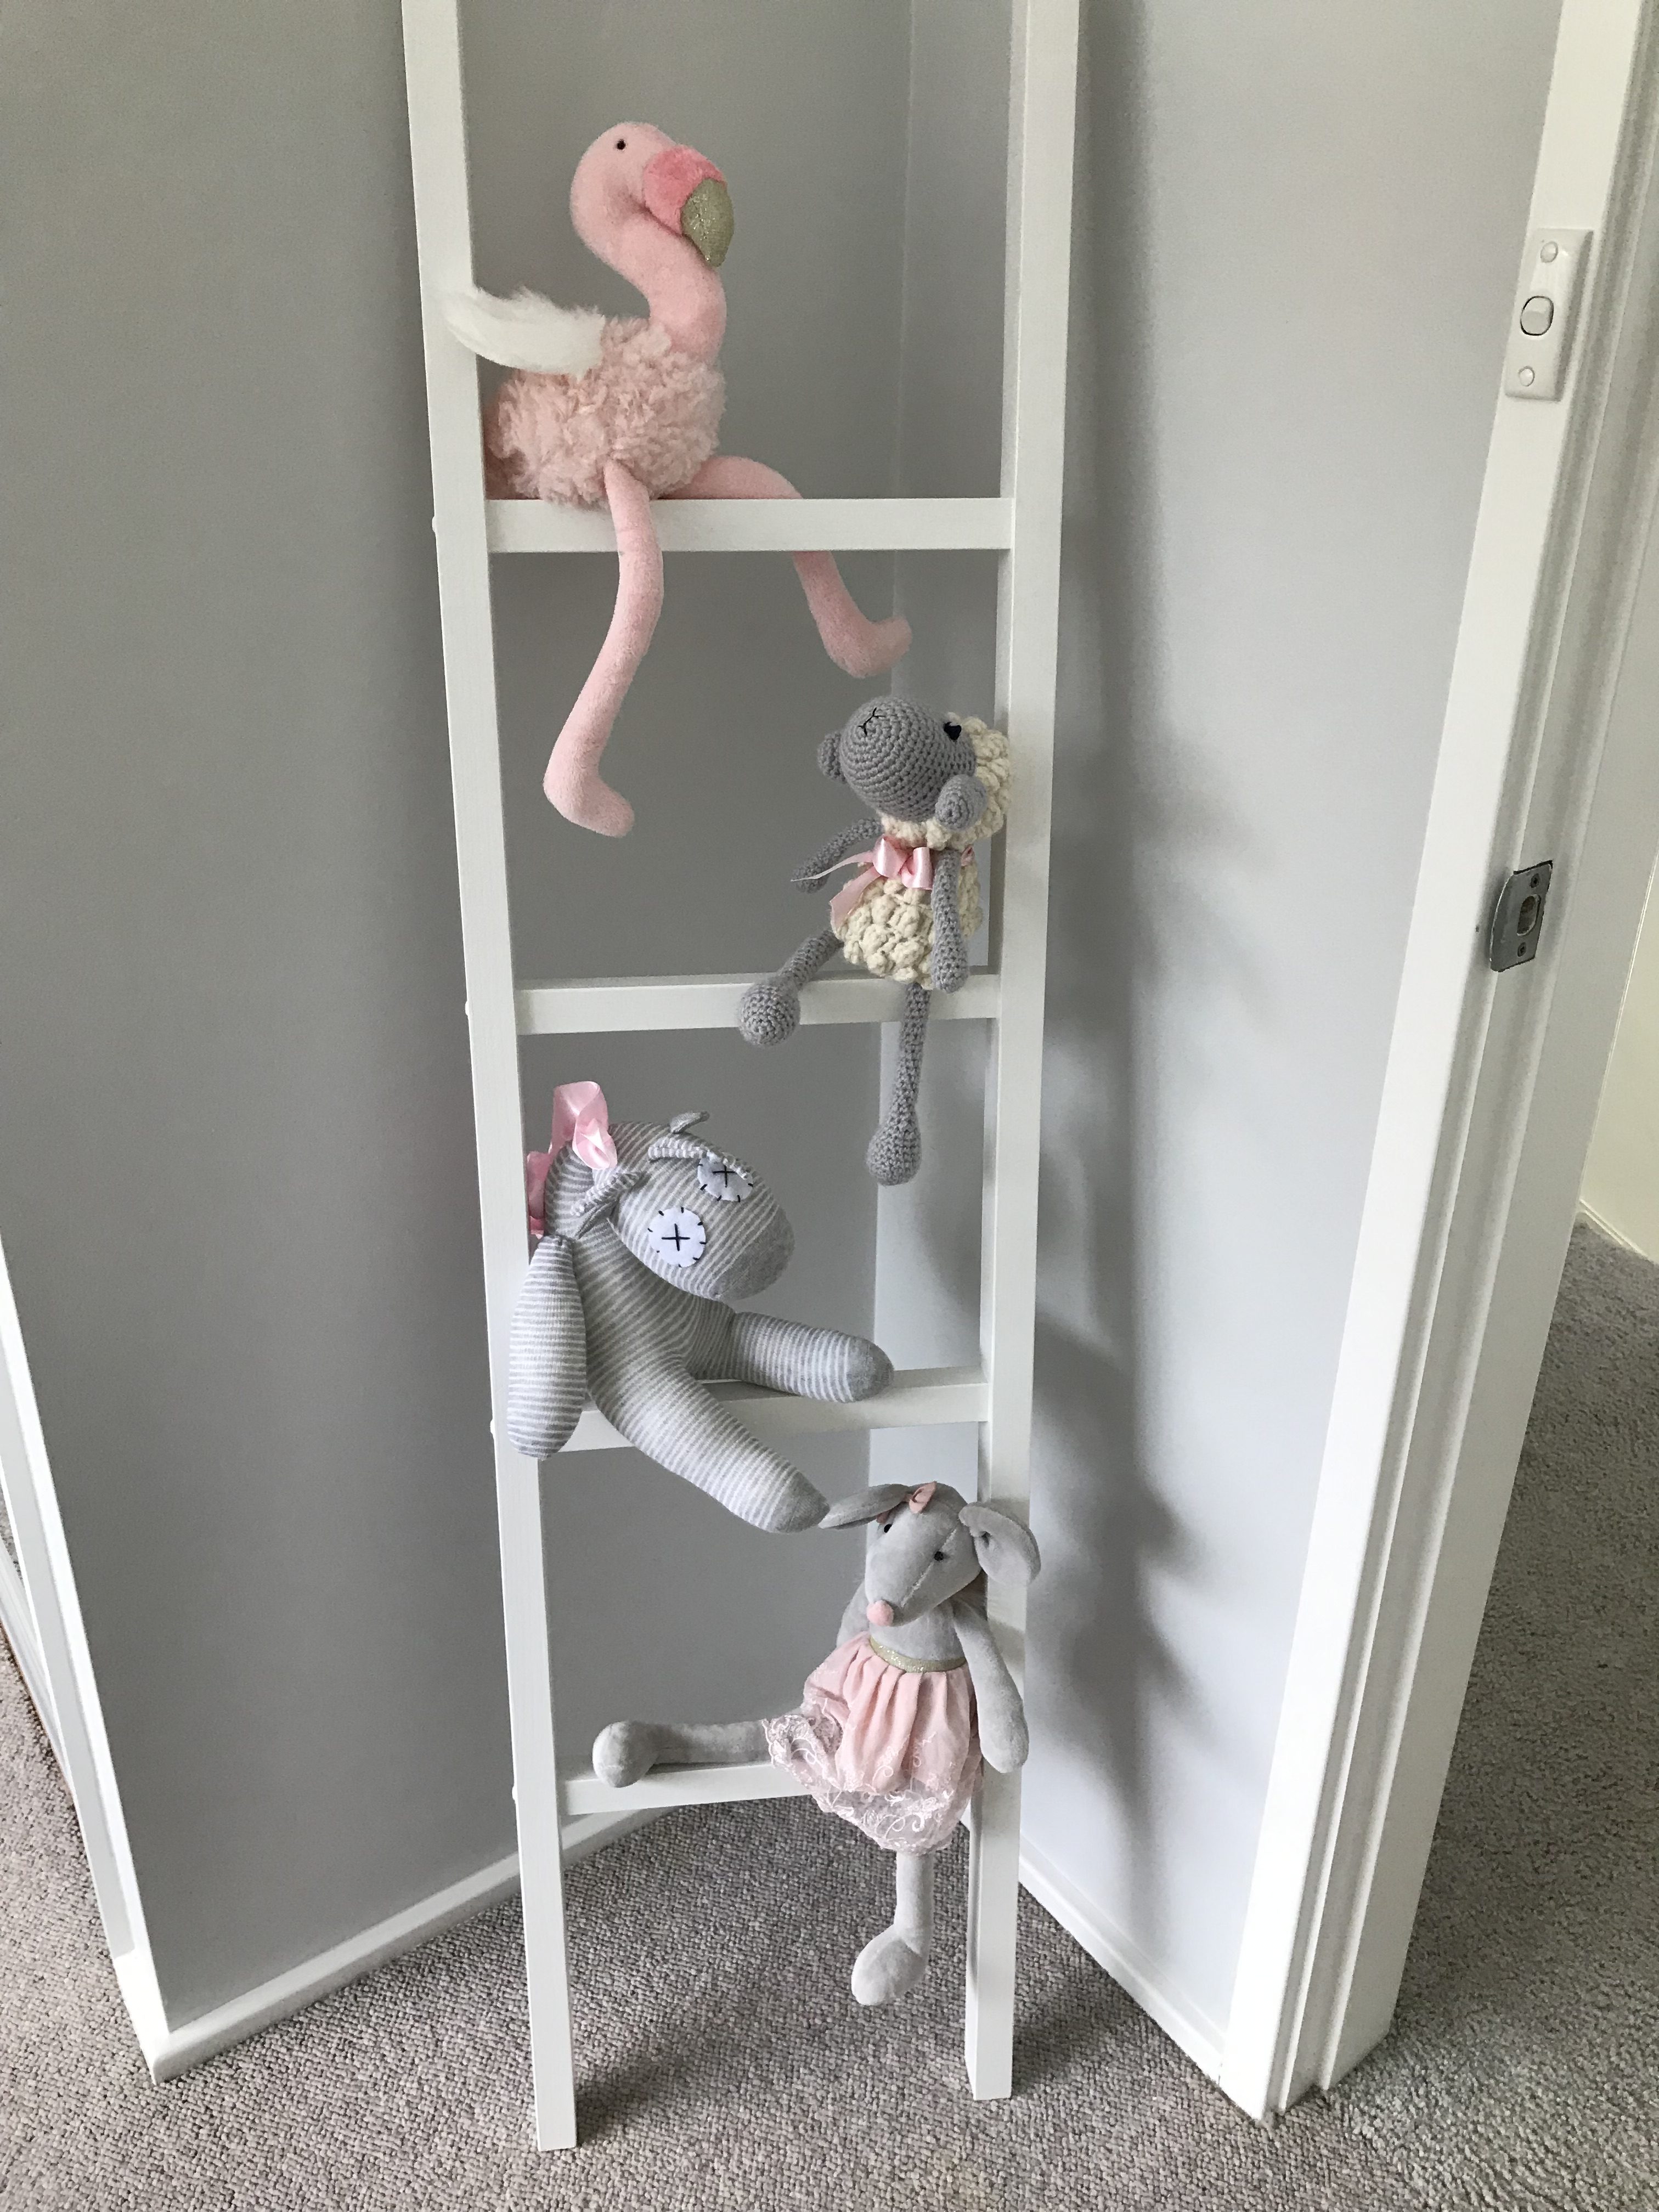
Making sock toys is something I love making and giving to family and friends with kids. They are so cute and make an awesome handmade gift for anyone expecting a little one. You can see others I’ve made here
This little giraffe was a gift to one very excited grandmother to be, she went straight home and placed it on the toy ladder so it is ready and waiting for the little girl due soon.
Shop
Hello!
Hi, I'm Susan. A designer and sewing teacher living in Sydney, Australia.
Here I share tales of my sewing, my pattern collection and insights into what it's like to work in the fashion Industry.
Other recurring themes include cat photos, an ever changing hair style and knitting.