
https://youtube.com/shorts/x49Wqx_8NEE
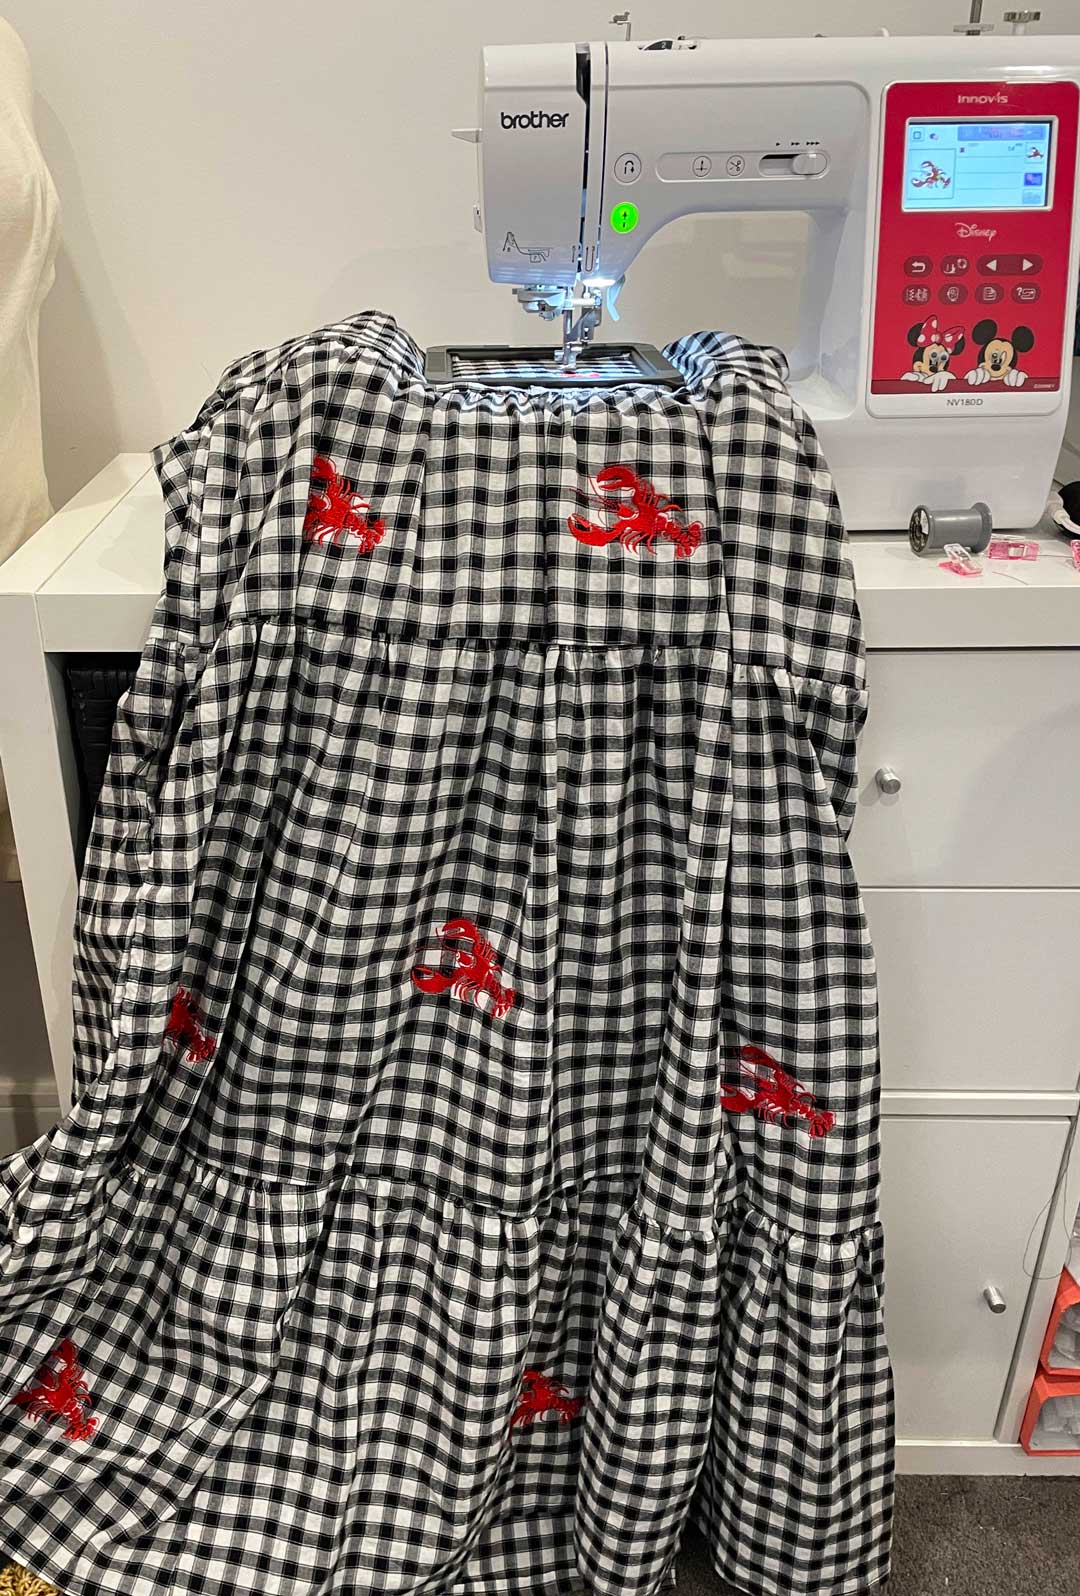
When a student asked me to embroider her recently finished dress with Lobsters, I opened up Hatch Embroidery Software and got to work. With my Brother Sewing and Embroidery machine it was so easy
https://youtube.com/shorts/x49Wqx_8NEE
When a student asked me to embroider her recently finished dress with Lobsters, I opened up Hatch Embroidery Software and got to work. With my Brother Sewing and Embroidery machine it was so easy
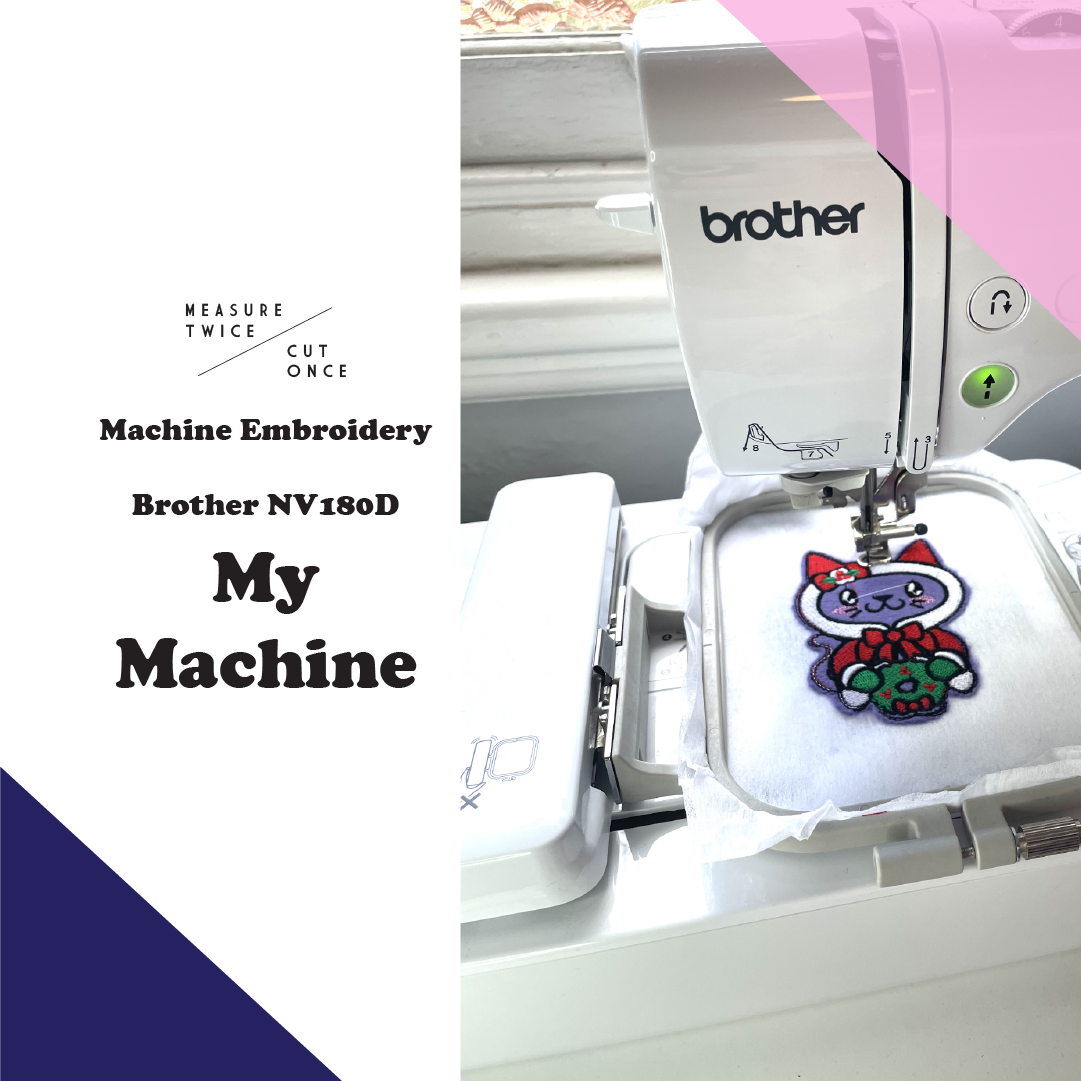
Today I’m showing my machine in its embroidery set up, you normally see it in regular sewing mode.it’s sure easy to swap between the 2 and i love having the fun experimental option of some embroidery. If you’ve got any questions, add them down below and don’t forget to subscribe!
My machine is a Brother NV180D available at Bobbin and Ink https://www.bobbinandink.com/products…
The pattern is available from Urban Threads https://www.urbanthreads.com/products…
Embroidery Thread is from Brother, available at Bobbin and Inkhttps://www.bobbinandink.com/products…
Wool Felt from My Felt Lady https://myfeltlady.com/
2022 is my year of taking the Scary out of Sewing! I want as many people as possible to take up sewing so they can create, make, mend and more. To help take away the scary, every Friday there is going to be a new video with accompanying pattern for a project entirely aimed at beginners. Each week there will be different techniques to learn or go over and it’s going to be a super fun way to grow your sewing skills.
See more of my sewing and shop patterns at https://www.measuretwicecutonce.com.au
Follow me on Instagram https://www.instagram.com/_measuretwi...
Follow me on Twitter https://twitter.com/_MeasureTwice
Support me on Patreon https://www.patreon.com/MeasureTwiceC...
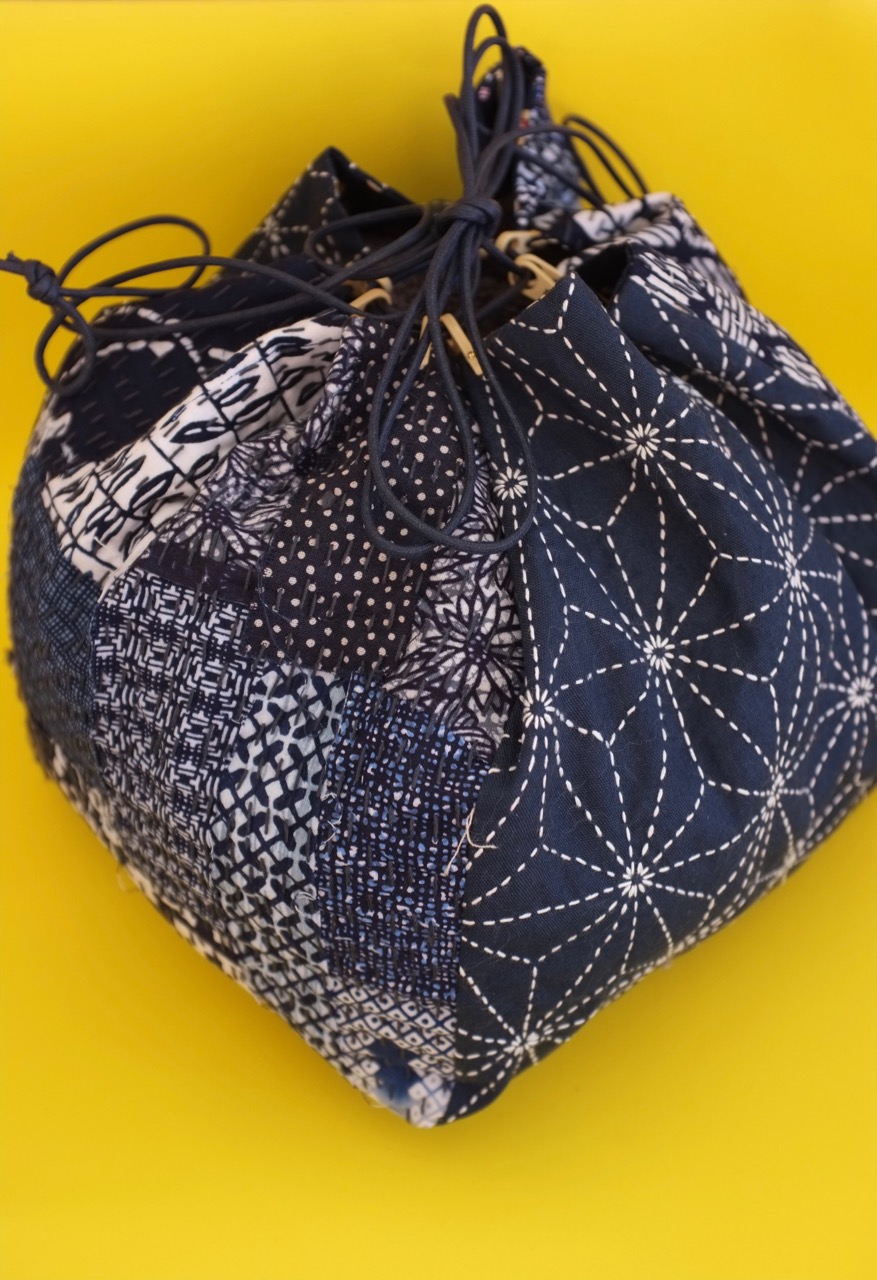
For some time now ‘ve been enjoying the meditative quality of sashiko stitching. It’s enjoyable and fun to embrace the joy of stitching with the knowledge that it doesn’t have to be perfect to work. Mostly I use pre printed panels to stitch on as they make it even easier to be a project you can take with you anywhere. Upside is ease, downside is what to do with the panels once they have been stitched?
 So far I’ve turned panels into placemats, coasters and now I’ve combined pre printed panels and boro stitching together to make a kinchaku or rice bag.
 The original pattern is from BeBeBold and meant to be quite a bit smaller than the one here. But I didn’t want to cut down my pre printed panels so I supersized the pattern to create this.
 Construction wise it’s a square bottom and 4 rectangular sides (same for the lining) all sewn together and pulled through an opening in the lining to end up fully lined. After closing the internal opening up these nifty little plastic hooks were added to the outside. The plastic has a U shape that slides down over the top edge of the fabric. A metal nail is then inserted into the hole of the plastic hook, through the fabric, through another hole on the other side of the plastic hook and out again. Bashing it down and flat with a mallet ensured it stays in place and there is no pointy bit to scratch your hands as you enter and exit the bag.
 Waxed cotton cord is then thread through from either end to create a double sided drawcord. It really was a super simple make and I love the final shape it’s so lovely. I can’t wait to make some more!
Pattern: from BeBe Bold
Fabrics: Sashiko panels and mixed indigo pack, waxed cord and plastic loops from BeBe Bold. Japanese cat fabric (internal) from Pitt Trading
Alterations: this is a super big bag and I think I’d like to make one in a smaller size too?
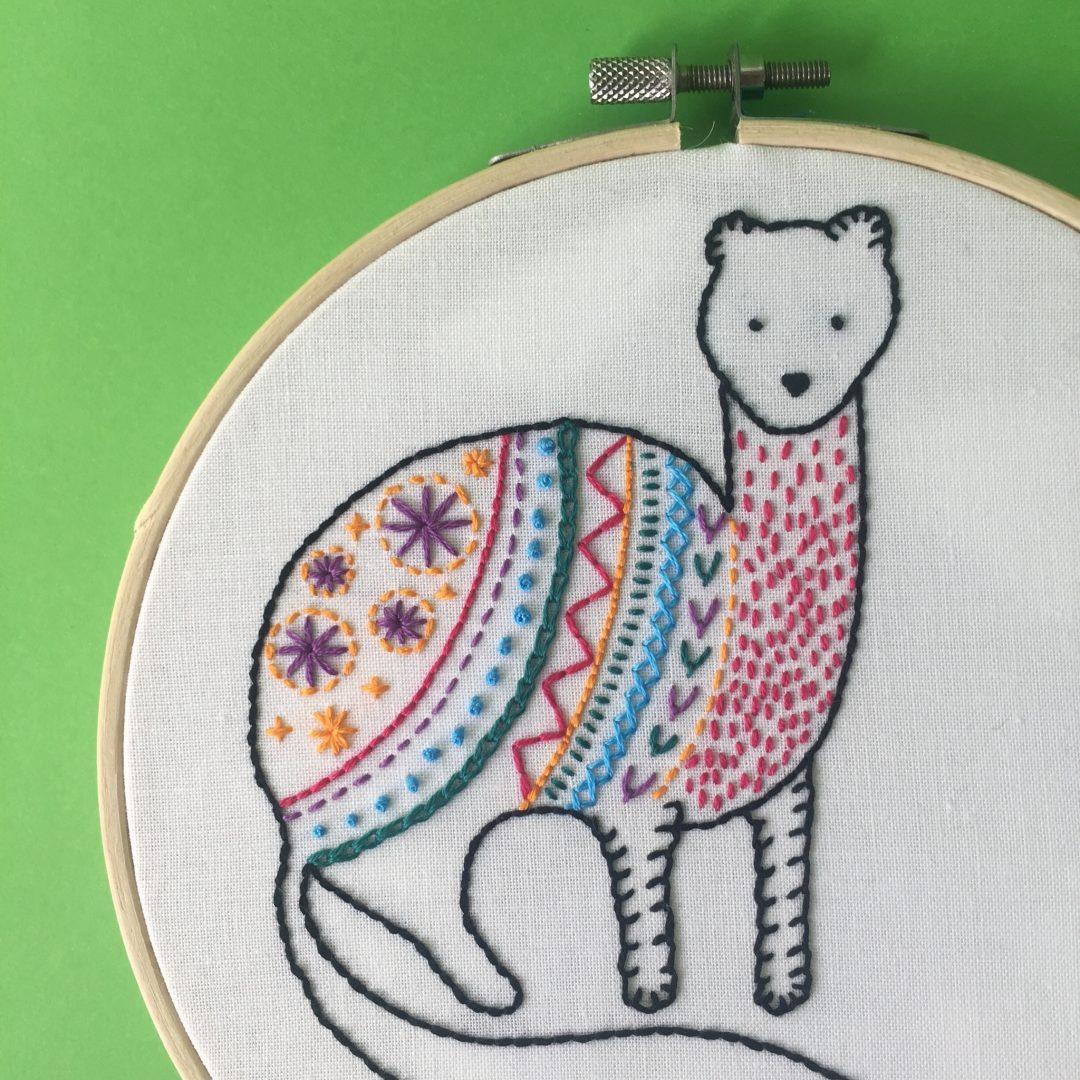
Have you seen the adorable embroidery kits from Hawthorne Handmade? They are so cute and I love the fact that they use unusual animals in their designs its so nice not to just see a clip art bird on everything.

I picked up some supplies from them last year during their Black Friday sale and had it delivered to The Englishmans parents home as I knew we would be there for Christmas.
In theory the purchase was for my niece’s Christmas present. I wanted to give her something stitchy to do in the hope she will love it like I do. But I couldn’t resist sneaking in this stoat for myself.

The pattern comes pre printed on white cotton with the relevant coloured threads, a needle and a frame. Everything was very clearly laid out and simple to follow and a perfect gift for a beginner.

I finished it earlier in the year but never got around to properly framing it up ready to hang. To finish I’ve added a circle of white poplin to the back which I handstitched in place.
Now it’s all done and just awaiting a wall to go on.
Pattern: Stoat from Hawthorne Handmade
Fabric: All supplies (excluding scissors) are included in the pack
Changes: None except maybe to get some more!
Some friends just bring light into your life and CL aka Claire Louise The Thrifty Stitcher is one of the best. Separated by distance we still try to chat via messenger and she does wonderful things like send me video messages on the morning of my surgery last year or listened to me cry about losing most of my stash to the fire we suffered in December. Being the ace person she is, she organised for a gift voucher to BeBeBold so I could get myself some Japanese embroidery supplies.

It was such a touching and thoughtful gift and I wanted to make sure I remembered not only her kindness but the kindness and support of the entire sewing community by making something we could use everyday and be thankful for those who helped.

I ordered some pre printed panels and sashiko thread. I got them delivered to Pitt Trading as we have no postal address to send anything to and have been in almost 10 different locations while awaiting our apartment to be ready to move back in. These panels have been stitched in all of those locations with the aim of turning them into placemats, pot holders and useful everyday pieces that are beautiful and sentimental.

Once stitched I’ve cut the panels out, added a heat proof wadding and Japanese print backing (both picked up at HobbySew Top Ryde while purchasing replacement machines). Placed right sides together with the wadding onto of the embroidered panel I stitched around, clipped the corners and turned them right way round through a small hole I’d left on one side. Once the corners were nicely pointed I stitched the width of a machine foot in around the entire rectangle, topstitched the opening closed and then practiced quilting by drawing different lines using my Prym chalk tool across the backs and stitching through all layers.

They turned out even better than expected and when showing a friend she exclaimed they were too beautiful to be put to practical use and should be displayed. But I love the idea of being surround by beautiful meaningful things and these are special to me on so many levels. a gift from a wonderful friend, hours of meditative stitching in what has been an incredibly stressful time and now we have something to add to our home.

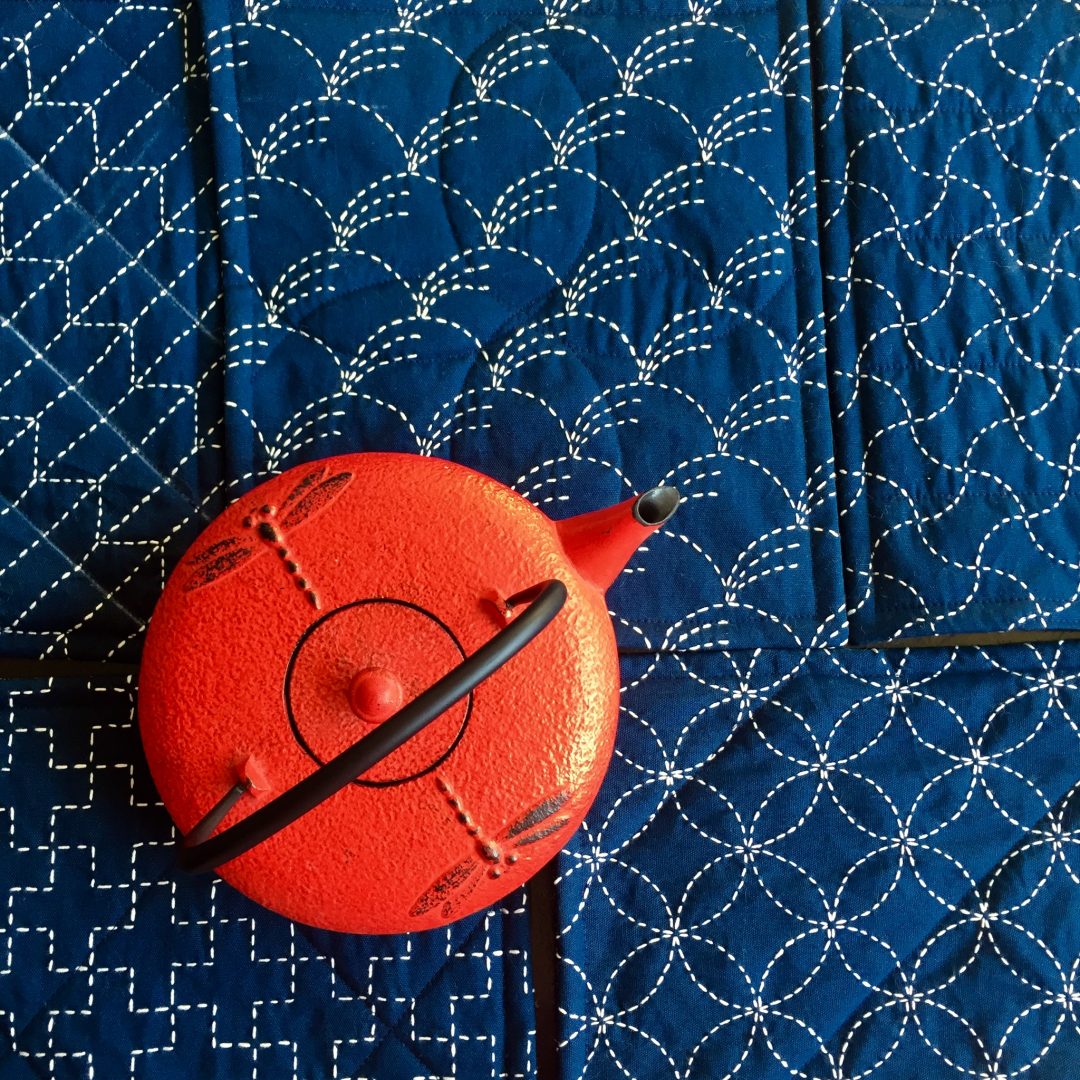
These are the first 5 finished and I still have some more panels in varying sizes to go so am keen to find more practical and beautiful ways to use them, the red teapot was at one of the places we have staid this year and matched in so well it made the perfect photo prop.
Pattern: pre printed panels from BeBeBold
Fabric: from BeBeBold and Hobbysew Top Ryde
Alterations: none that I can think of right now
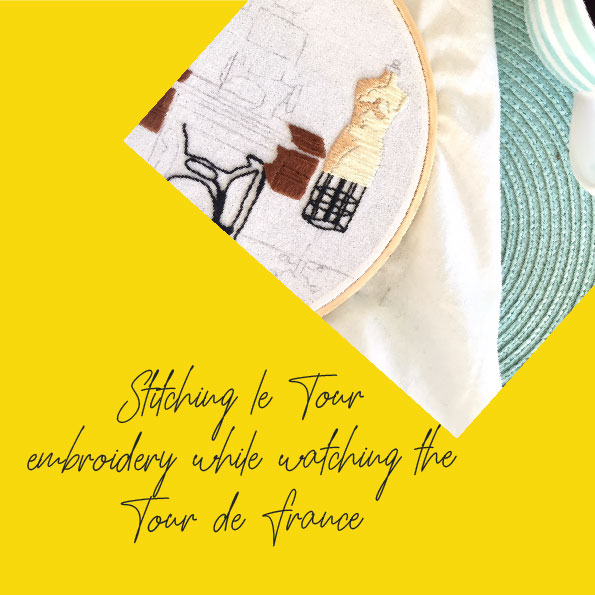
It’s almost Tour de France time and I couldn’t be more excited. It’s sure to be an exciting race and as I do every year I’ll be “stitching le tour” Being in Australia and being a cycling fan means lots of late nights. Easy to do for one or two nights but when we are talking about 3 weeks of late nights it gets tough.
My way to cope is lots of tea and hand stitching. Each year I work on different projects throughout the 3 weeks which means staying up late is not only easier it’s also productive.
This year I’m challenging myself a bit more and working on some pieces I have designed myself and when finished are set to hang in our apartment.

I’m working on 2 pieces, an interiors piece which features an idealised view of my dream sewing set up, sized for a 7″ (18cm) hoop and a second piece I refer to as “Army of mannequins” sized for 5″ (or 13cm) hoop.

Both are currently available in the web store for $8 a piece. You will receive a .pdf giving you the outline of the embroidery at actual size ready for you to transfer to fabric to stitch on. A digital colour guide and suggested stitches is also included in the .pdf. To get started you will need some cloth to embroider, embroidery threads, needle and a hoop.
To see my progress keep up with me on Instagram as I’ll be sharing my stitching there! Happy Tour time!

There was a time in my life when I would do a form of embroidery every day. I did big multi month pieces and always had a piece to work on.
Over time I got out of the habit and yet it was not replaced with something of substance. Endless scrolling for inspiration on my phone oddly left no inspiration and at nights end I had achieved nothing.

So this year I decided I was going to do more. I started with some sashiko pieces and kept fairly busy but now with weeks of enforced slowing down and beautiful wonderful time with zero pressure to do anything I have found an old friend. The meditative friend of embroidery.
I had lots of pieces pre planned for the time but an unplanned one has brought possibly the most inspiration?

While I was in hospital I was lucky to have some visitors one of whom was Maria aka Velosewer. She utterly spoiled me with a bouquet of flower chocolates, an array of magazines and yummy donuts! Such treats.
The issues of the New Yorker and Frankie Mag were shared through the whole ward but I kept my issue of Mollie Makes as it had the sweetest embroidery kit attached.

This simple Scandi floral hoop was an absolute joy to stitch and I love the colour palette.
After such enjoyment I’ve rediscovered my embroidery stash and will be adding more projects to my ever growing to do list. The advantage here is that these can be done while watching tv and will replace the endless scrolling.

And this simple embroidery? Am going to tuck in all the excess fabric, add a circle of calico to neaten the back and hang it above my desk as a constant source on inspiration.
Pattern: Scandi Florals Hoop Kit from Mollie Makes
Alterations: none
Fabric: included in the kit
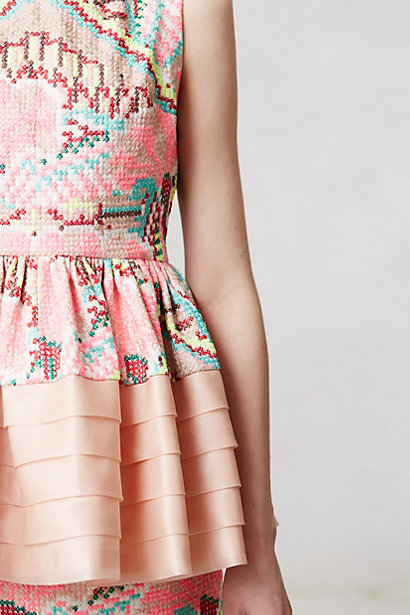
An image of an embroidered garment keeps popping up on my Pinterest timeline.

Every time I see it my heart skips a beat. I just love it.
The drama of the curve, the oversize cross stitch, the colours, the detail of it, just everything about it makes me feel a little breathless. It is from Anthropologie and unsurprisingly sold out.
I’ve been thinking how I can use a little bit of embroidery in my own sewing. I’m quite a speedy hand sewer so I don’t think the task would be too long. Plus I have a lot of long train commutes to use up. A bit of stitching on the train might help take away the tedium of the commute?
Perhaps a collar, or a bodice? Even a wide hem would be cute. Not sure yet how it will happen but I will work out a way of getting a bit of stitching into my wardrobe.
Till then I am sure that image will keep popping up and making my heart skip.
What about you? What details make your hearts flutter?


