Posted on Leave a comment

Sewing Adventures – Liberty insertion Dress

Regular readers are no strangers to seeing my go to dress, my own bodice block mixed with either a gathered or pleated skirt. It is by far the garment I have made the most as its not only a fast easy make it’s easy so easy to wear.

Rewind to late November 2019, I’m working 7 days a week, it’s hot the air is heavy with bushfire smoke and we are preparing to fly to England for Christmas. To say I was busy would be a vast understatement of the facts. In my bid to speed things up I grabbed some Liberty fabric from the stash that was pre washed, my bodice pattern and headed to Bobbin and Ink to teach for the day. Good Luck with the buses meant I arrived early lay out my fabric, cut my bodice and thought yep no problems tonnes left for my skirt.

Only not so much, my skirt was too short, like much too short. In a panic and under time pressure I basically threw it back into my to do pile where it has been floundering ever since.

The fabric was way too pretty to lose so I needed to find a solution.

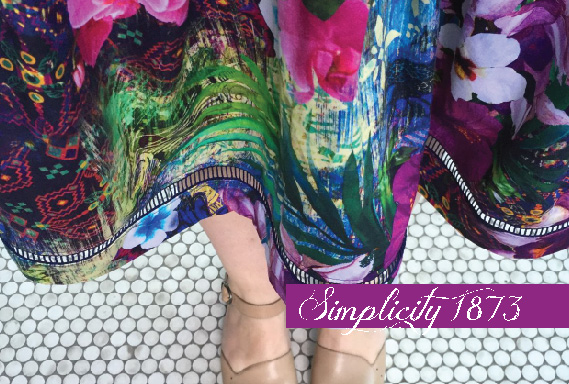
Cue some insertion lace and leftovers from one of my Liberty fabric Myosotis dresses. Using 2 lines of insertion makes the whole look more deliberate and less like I made a big mistake.

Showing that a little bit of a break and some creative thinking means that everything can be salvaged just sometimes we need to slow down and take a step back to find our solutions.It was also approved by the cat (an important part of the process that I’m sure all cat owners will agree with me).

Pattern: my own bodice block with a modified skirt

Fabric: Liberty lawn from Liberty of London, insertion lace from Pitt Trading

Alterations: next time just slow down and think some more

Posted on 6 Comments

Sewing Adventures – floral insertion dress

So I’m a little bit in love with this dress, it’s so cool with all the amazing trim detail.

The fabric is a lightweight cotton Sateen with a small amount of spandex which adds a nice bit of “give” to the fabric.

Inspired by my last dress with insertion trim I wanted to see how I could use it more? Then Pitt Trading got in even more amazing trims and so I got to planning.

image

This wide trim I loved but it felt too wide to use it as is, so I cut it in half.

image

Using the width of the fabric I sewed the trim along creating the hem, then measured up a small section, cut and overlocked the edges, inserted a trim and repeated that all over again for the third row of trim. Super easy.

image

If you do this just be sure to measure where you are in relation to the length of your skirt or your trim may be inadvertently flashing your knickers!

image

The bodice is my own block, I wanted to be able to wear a bra so I slashed the panels to allow for that and inserted the trim.

image

While I really like the fit and flare silhouette I find it can get a little repetitive? Adding a ruffle sleeve seemed like a good idea to break up the “sameness” of the shape and take advantage of how fashion forward I wanted to the dress to look. I added the ruffle, I wasn’t sure so I did an Instagram poll.

image

It was evenly split down the middle on the yes/no count. Right up till the very end I was going to keep the ruffle and then I tried it on and went nope. So off they came.

The back of the dress is finished with an invisible zip, neck and armholes are bound with bias binding. I had the zip in and tried it on again, I decided I wanted to take a little more out of the back neck and increase the sway back adjustment. I unpicked the zip, made the changes and put the zip back in again.

image

All in all a fairly easy make but really taken to the next level with the addition of such fashionable trims.

Here it is in action while working at Pitt Trading. I’ve paired it with my Brightside Shrug from MiY collection by Wendy Ward.

image

Fabric: lightweight cotton sateen from Pitt Trading
Trims: all from Pitt Trading (they come in colours other than black too).

Dress Pattern: My own bodice block and gathered rectangle skirt.

Alterations: look at increasing the sway back adjustment on the block, take 1cm wedge out of each side of CB neckline where zip is inserted.

Posted on 6 Comments

Sewing Adventures – Simplicity 1873 insertion trim edition

Sydney has been hot, like hot hot and it’s unrelenting so even overnight it doesn’t cool down very much so it’s been an endless amount of feeling too warm. Which is kind of nice because yay summer and also kind of over it, would like to not constantly feel hot and sticky.

It was on one of these hot days that I was working at Pitt Trading and by the end of the day I declared it was far too hot to be wearing a skirt and a top. I purchased one of my favourite new fabrics that has only just arrived instore along with some insertion trim with the plan of making a dress. If you want the same fabric you can get it here or come instore.

IMG_7903

Pressed for time and wanting a sure fire sewing win I went with Simplicity 1873 which I have made before with much success. Construction wise it was very much like what I’ve done before. Slight sway back adjustment, invisible zip at centre back, no linings or facings I’ve just used bias binding around the neck and armholes. I was pretty happy with my invisible zip.

IMG_7862

The only big departure from previous editions was the addition of the insertion trim. I cut the skirt panels 5cm longer than I normally do, constructed the entire dress and then proceeded to measure 10cm up from the raw edge of the skirt. I cut along this line and overlocked the new hem of the skirt.

insertion 1

To place the insertion trim in, I stitched the edge of the trim just above the finished line of overlocking, turned it under and topstitched it down. Then taking the 10 cm circle I cut off, pressed it half with the iron reducing the height to 5cm, overlocked the top edge and pinned it to the lower edge of the trim.

insertion 2

Some slight fiddling with the seams helped it line up correctly as it was slightly larger in circumference than the insertion trim due to the nature of the flared panels of the skirt. Repeated the stitching, then topstitching and hey presto insertion trim and pretty hem.

IMG_7905

I’m so happy with it as the insertion trim really lifts it out of the homemade arena and into a more fashion item. It’s certainly the type of garment that I’m aiming towards with my makes this year, more fashion less plain sewing.

Fabric: Polished cotton from Pitt Trading, insertion trim also from Pitt Trading who have one if not the biggest number of trims instore anywhere in Australia.

Dress Pattern: Cynthia Rowley by Simplicity 1873

Alterations:  Added the insertion trim as explained, other alterations as per previous editions of this pattern, I cut the skirt width as per the pattern this time and didn’t add extra volume.