Posted on 8 Comments

Bra making – how to DIY your pattern part 2

diy_bra_header2After scanning my pressed pieces, I am going to set about tracing them using Adobe Illustrator. Now as I said in part 1 you don’t need to make a digital pattern. I’m doing it because it’s going to make visuals easier for me to show on the blog and because I have a cat who likes to nest in lots of pretty patterns. Invariably I lose pattern pieces. This way I am ensuring that none get lost and I don’t have to unpick another bra and start the whole process over again.

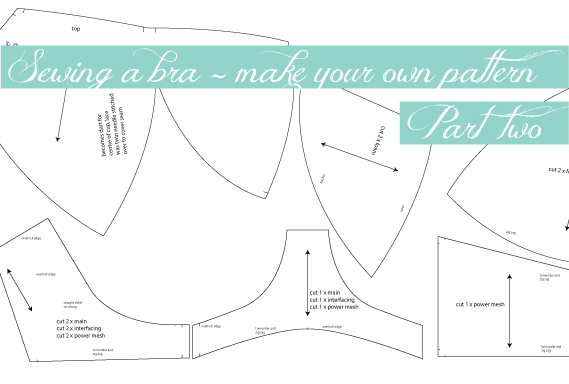
Start by tracing any pieces that are asymmetrical in shape. If you are using Illustrator the pen tool is your best option for this. Double check to make sure your scans are at actual size. Do not resize them from the original size or you will run into sizing problems when you make your actual bra.

tracing your bra pattern

If you are creating a traditional manual pattern use pattern weights to hold the pieces in place while you trace around. If your pieces are too small for that, try taping them in place using some magic tape or washi tape (basically any tape that is easy to remove. Now is not the time to be using super sticky tape that may damage your pattern). Use a sharp pencil, ruler and french curve to help you get the most accurate tracing possible. Be sure to mark seam allowances, grainlines, stretch direction and if needed add notes. The shapes are odd and very small so it can be easy to mix them up. A well placed this side up, this seam joins to that seam marking or note can make your life a whole lot easier. This pattern is for YOU so make all the notes and markings you need to.

Screen Shot 2014-10-09 at 2.34.28 pm

Once you have all the asymmetrical pieces traced now it’s time to work on the symmetrical pieces. Mark the centre point of each of the pattern pieces. Take a sheet of paper and fold it in half. Placing the fold line under the original fabric piece. Lining it up on the centre line you just marked. Once it is correctly aligned then you can trace out one side of your shape. Creating them on the fold is more accurate. Do this for all symmetrical shapes. If using illustrator, trace half and then copy the piece and flip it. Re join it to create one pattern piece.

Screen Shot 2014-10-09 at 2.40.56 pm

As you go through tracing your pieces be critical in the assessment of them. Is there an odd bump going upwards on what seems to be a straight line? Does one corner pull down in an almost arrow like way? Pattern lines should be smooth. If it’s a curve, a straight line or an angle. The line is to be smooth and free from bumps or ridges. When you are tracing from a garment that has been worn you will find more bumps and ridges as the fabric has distorted. You can see in the above photo that the fabric piece has been distorted. See how warped the gingham checks are. I’ve drawn the piece to help compensate for those factors. So take your time now to be aware of this and adjust if needed?

It all comes down to the accuracy of your pattern. Take your time, trace carefully but also measure. Ensure that pieces that are to be joined are the same length, mark your notches, grainlines. Use your notes and photos to give yourself as much information as you need to get a really good pattern created.

Screen Shot 2014-10-09 at 5.13.58 pm

Next time I’ll be talking fabrics, trims and notions. Until then if you need anything clarified or just have more questions, ask away in the comments.


Posted on 13 Comments

Bra making – how to DIY your own pattern part 1

diy_bra_header

It seems that bra making is capturing everyone’s interest so I thought I would do a few more technical posts on how I create my own patterns for bras. This way you can see how to create a pattern from a favorite bra you already own. Today is part 1 and I’ll be following up with more posts covering the steps. I do hope that this is useful for you, I know it was the information I was looking for when I wanted to make bras and I couldn’t find it so did it my own way instead.

First up grab a bra you like the fit of but is looking a little worse for wear. In my last bra post I referred to these as zombie bras, as in not quite dead. You want one that still retains the majority of shape and stretch as the more warped it is the more fit tests you are going to have to do to refine the pattern. You could of course use a brand new bra but sometimes we can’t always afford to do that. If you can though, go for it. Using a brand new one means it hasn’t had time to warp or stretch so you should end up with less faffing about to get your fit perfect.

Photograph it.

full_bra

Include detail shots, like how the band/cups are constructed. Interior shots are good too.

band_detail

What the back looks like.

bra_back

Then unpick it

unpicked-bra_blog

As you unpick, it’s a good idea to keep notes on the construction methods used. Like was it straight stitch or zig zag, was there a bar tack at the very top or a few millimeters away from the very edge. Was the elastic sandwiched in between the underwire casing and the outer fabric. I tend to take photos as well as notes to help jog my memory.

Once you have it fully unpicked then grab your iron and get pressing. You want all the wrinkles out and your pieces as flat as possible. Be careful though. What you are looking for here is to press the pieces to their original shape. In the photo above you can see the back of the bra is a floppity looking. It’s quite stretched and in all honesty not perfect for this project. So I press it flat with some of the wrinkles in it. I don’t want to press it out to the newly warped shape. Press but be mindful of not distorting the original shape.

Now that I have all the pieces and they are more or less the correct shape I’m going to scan them. That way I can create a digital pattern for myself. If you don’t want a digital pattern you can create a traditional paper pattern also.

bra-scans-not-at-actual-sizeI’m going to leave it there for now so you can get unpicking. The next post will be covering how to make the pattern and then we will continue on from there.  If you need anything clarified or just have more questions, ask away in the comments.

Posted on 23 Comments

Sewing adventures: making a bra

bra_header
I love Lingerie, from a simple cotton set to silk and intricate lace I love it all. So naturally once I conquered making my own knickers I wasn’t going to sit around with a drawer full of non matching sets (the horror! ha ha).

For a few months I’ve been gathering supplies. Foam for the cups, elastics, channeling for underwires and other bits and pieces. They’ve been sitting in a tub mocking me. Why mocking? because I kept putting it off. Too often we read/hear/get told that sewing is hard and certain things like lingerie are held up with this mystique of being difficult. For some silly reason I got spooked and didn’t want to start. Obviously I got over that and just got on with it.

The actual sewing of a bra is not that hard or difficult. If you can use a zig zag and a straight stitch you can do it. What is hard is getting the fit right. Due to my love of lingerie I own um…quite a lot of it. So I’ve been putting aside the ones that are starting to show signs of wear but haven’t completely disintegrated yet. These not quite dead bras (zombie bra’s if you will) have been photographed and then unpicked.

By photographing them I know what they are meant to look like when I reassemble but it also gives me a stitch template to follow. When to use straight stitch, when to use a zig zag. This is super helpful as you end up with lots of very small pieces and putting them together is a bit like a jigsaw so a visual guide is a saving grace.

Once unpicked I’ve been creating a pattern from them and this bra is the first toile I’ve made up from one of my zombie bras. I managed to re use the underwires, the hook and eyes and the straps from the original as well. That was a nice added bonus after all the unpicking.

sewing bras1

My lovely model as you can see, doesn’t quite fill out the cups. I do and the fit isn’t too bad for this style of rather simple bra. With only a few very minor tweaks it will be identical in fit to the original purchased bra before it started to wear.

The back needs a bit of an adjustment as it’s come out quite rounded from the strap placement down to the hook and eye. It’s not bad or wrong so much as it can be improved and so it will be.

sewing bras2sewing bras3

Where the front cup meets the strap it could do with a bar tack for extra strength.

sewing bras4

The original bra had molded cups, these aren’t always available and I can find the shape a little bit bullet bra for my liking. So I’ve purchased bra foam. It comes by the metre and is far far cheaper than buying individual molded cups. To take this into account I cut the original molded cup into 3 pieces, cut them flat from the foam and then zig zag seam them back together again. You can faintly see it through the mesh here. It worked really well sewing wise and I can’t wait to see how it wears as I feel like it could be a really good solution for when you can’t get cups or don’t like the shape they create.

sewing bras5

If you are looking to make your own underwire bras this is a great way to start for a few reasons
– you know the original bra fits. I should mention if you are going to unpick one try not to do it to one that is totally wrecked. It’s very hard to take a pattern off pieces that have stretched and warped. To the point where a wrecked bra would actually make it more difficult. While a new bra is a bit expensive to rip apart it is a good start point, or do what I do and go for one that is gently worn and be sure to allow for this when making your template pattern from it.
– the unpicking process gives you the reverse order of assembly so take notes and photographs to help with the sewing steps
– you can salvage hardware
– it’s a cheap way to see if you like making bras

Posted on 4 Comments

First Year anniversary and a discount!

discount_header

Today marks 1 year of having this blog. It’s been an amazing year and to say thank you to everyone who has been a part of it, all orders are 15% off until the 5th of October.

Use the code firstyear at the checkout.

To use, select your purchases and add to cart. In view cart add firstyear to the apply coupon section. Then hit apply coupon to make the discount % apply. The discount appears in the tally below.

Thank you all for being part of this fabulous year, I couldn’t do it without you all. From meeting local sewers and becoming part of the Sydney Spoolettes, to releasing patterns and meeting international sewers it has all been fantastic.

Here’s to many more years to come.

Posted on 4 Comments

Marc Jacobs

marc_header

I’m quite the fan of Marc Jacobs and own more than one pair of his shoes (I make all my dresses and then spend the money I saved on shoes! ha ha not really).

marcjacobs

What I admire most about Marc is his ability to be cool. It’s as if the clothes themselves have a nonchalant laid back attitude that just sets the tone for the season. The collections always appear accessible, you can spot any number of pieces that would slot right into your life right now. And he isn’t afraid to add a touch of quirk and whimsy into the ranges.

Cool, accessible and a sense of humour lead to some pretty stellar collections and I feel he will be one of my favourite designers for years to come.

via Lily Loves via Fashion Gone Rogue via Fashion Blog News via Harpers Bazaar 


Posted on Leave a comment

Sign up to our Newsletter, get earlybird notice to upcoming sale!

newsletter_header
Soon we are going to be having a bit of a celebration sale for our 1st Birthday!

Newsletter subscribers are going to get a few days advance notice, so why not sign up now and be the first to get the news?


Subscribe to our mailing list

* indicates required


I promise that the Newsletter will be jam packed filled with good things, not spammy and not too often.

Posted on 8 Comments

Just a sewing day

sewingday_header

I’m having one of those sleepy feeling days. I know I should be searching through my fabrics and patterns and finding something new to make. Today I just feel like sewing and skipping the whole getting organised bit.

Thankfully I can pull something out of my “to make” tub and its all bundled up inside its zip lock bag. Everything is there and all I have to do is start sewing.

So that’s what I’m going to do, hope you have an enjoyable day sewing too!

Posted on 6 Comments

Gaultier

gaultier_header

Cone bras, striped shirts and crazy corsets all come to mind when I think about Gaultier. A true crazy genius who always marches to his own drum. With a quirky sense of humour and an eye for the ridiculous some of Gaultiers styles were less fashion and more art.

gaultier

Which is fine, creation for the sake of it should be applauded. Then every so often amongst the craziness you would catch a glimpse of a sublime dress or piece that took your breath away. It’s this crazy mixed with gorgeous that makes him admire him so. Am very excited that there is an exhibition coming to Australia so I can see more of the pieces up close.

via Vogue via Haute Couture 2012 Via Harpers Bazaar

Posted on 14 Comments

Sewing Adventures: Girls Japanese knit skirt

Cucito-knit-skirt_header

After the fun of making the City Gym Shorts for my niece I decided to make something else for her.

A few weeks ago I won a copy of Cucito on Instagram. I was so excited as it was so unexpected. It arrived in a lovely parcel and I fell in love with this gorgeous knit skirt (and pretty much every other style in the magazine).

DSCF7353

From the stash I grabbed this 2 faced knit. It’s wonderful soft and has spots on one side and stripes on the other, could there be a cooler fabric? The hem and the pocket openings are all bound using cotton bias binding, also from the stash.

bound hem

I traced out the pattern and didn’t make any adjustments from the instructions apart from attached the elastic in a slightly different manner. No big reason I just like doing elastic in a different way.

cucito knit skirt

It looks adorable, I so want it in my size for the summer! Making kids clothes is fun as it’s so speedy and everything looks cute at tiny sizes.

Posted on 4 Comments

Sewing Adventures: City Gym shorts for kids

city-gym-shorts_header

Today I managed to clear the decks for a few hours of sewing this afternoon.

dressbefore

This dress has been one of my favourites for years, but the top contrast fabric and straps has been showing signs of wear and I knew it wouldn’t make another summer. The skirt however was still in great condition, so I decided to refashion it into something useful.

I’ve had the Purl Soho City Gym Shorts printed out since they were released, so I quickly taped them together and got to work.

My niece and I share similar favourite colours so I knew a pink floral would be a welcome addition to her wardrobe. For contrast binding I used a cute floral bias I got from Daiso.

binding

It all went together fairly easily, had a slight issue with the waistband fitting to the shorts. I think I measured it incorrectly? I don’t do very well with inches and converted on the fly instead of doing it properly.

final shorts

For a quick make it has turned out well and I can’t wait to hear my very fashion conscious niece’s verdict (and I hope they fit?).