A few weeks ago I was doing some procrastisewing (you know, procrastinating by sewing). I’d decided it was suddenly vital to empty the work in progress box and get some of the half mades into something wearable or decide of they were just terrible and cut them into something else.
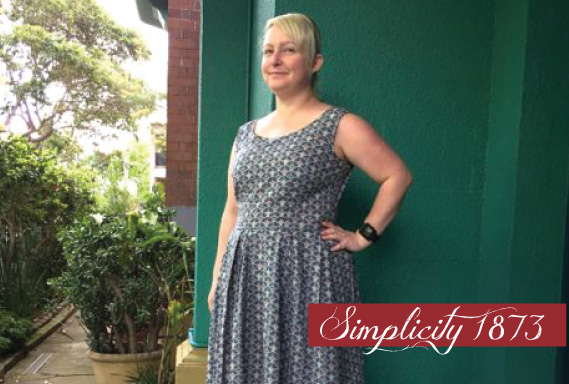
This dress has been sitting there since this post where I detailed how I’d cut the sleeves upside down. Well it got put away in a huff and it’s been pulled out a few times but every time I tried it on I felt huge in it. A high neck and sleeves are not my thing. So I pulled out the sleeves, cut down the neck and tried it on again.
Good enough. I finished the edges with bias binding and popped an invisible zipper into the back. I’ve not sewn in an invisible in an age and was ever so pleased when it went straight in. I use my regular zip foot not one of the special invisible zip foots as I find them way too much drama. Regular zip foot, nice and slow is the way for me.
So I was all excited I had a pretty new dress to wear. I’ve worn it a few times since and until this morning had no idea that this happens at the back.
What an ugly ugly wrinkle. We took these photos on the way out this morning and since coming back I’ve been trying to figure out how on earth I missed such an obvious and fixable wrinkle (back length needs shortening). Well it appears that when I try on my dresses and look at my back in the mirror I round my shoulders. By doing this I lengthen out the back panels and the wrinkle disappears! So lesson learnt, stand up straight and alter that back panel.
So I’ve made my first piece of activewear. Honestly I never thought I would. I’m more than happy with the kit I already use and I know the high performance fabrics available within the industry are far superior to what is available for home sewing purposes. So why then did I make the leap into making my own?
Pandas.
I love Panda’s and when Spoonflower had free shipping on offer I ordered up some activewear fabric and some of their cotton (not yet made). The pandas are designed by Andrea Lauren. I thought the pandas would look cute and it also references one of my favourite cycling moments when Dan Martin was racing Leige Bastogne Leige 2013 and as he came into the final few hundred meters a fan dressed as a panda was chasing him down. It was hilarious to watch and quickly spawned the tag of #pandapower. It also had the incredibly cool effect of the team then partnering with the WWF to help bring the plight of endangered species to a bigger audience.
2013, Liege – Bastogne – Liege, Dan Martin from Garmin Sharp, chased by the panda before going on to win the race
Overall I was super excited to be getting activewear fabric with pandas, it seemed to combine many of my favourite things. Then the fabrics arrived and it was well childlike? I was so disappointed. The scale is way too big for adults clothing and just looks juvenile and clunky. Perhaps ok if it was for a top or skirt but not the look I was hoping for with activewear. It was packed up and shoved in the stash and left for more than a year.
Despite the fact I genuinely enjoy exercise I’m neither as fit as I’d like to be, nor look as fit as I want to be. Thus I try, always trying. At the moment I’m trying to be more consistent with my running and want to add in some more things along the way to help be fitter and stronger so general day to day things like walking stairs and carrying groceries are easy (when you don’t own a car you realise how much the ability to carry your groceries home is really important).
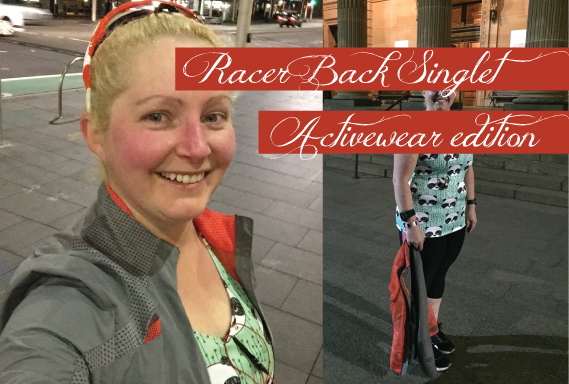
I had finished some work, had a bit of time spare and spied the panda fabric. I grabbed it and my racer back singlet pattern. The original pattern is designed for a fabric with more stretch so I measured my favourite RTW run top and adjusted the pattern. I cut a size 16 bust and out to an 18 at the hip to allow for the lack of stretch. I also added 4cm to the hem length to keep my top long as I didn’t want it riding up while running. Cutting out, proved to be the longest part of the process. Due to the oversize nature of the print I was in massive danger of having panda boob, something I seriously wanted to avoid. The only way I could manage it was to not centre the print. That way the pandas fell on the sides and not directly over my boobs. Cut, overlocked and lightning bolt stitch down the neck, armholes, hem and I was done before The Englishman was home and it was time to run. Stitching wise it went through the overlocker with ease but the lightning bolt stitch was laboured. It really felt like the needle was having trouble piercing the fabric and it’s nowhere near as neat as I’d like it to be. It really disliked the twin needle too. Perhaps I should’ve cut a band or bind and finished it that way for a really nice finish?
Photos taken pre running (just outside the Art Gallery). I’m hanging onto my running jacket as these were really some quick snaps.
I was super curious as to how the fabric was going to perform? It was ok. I didn’t feel any dampness so the moisture wicking was decent but I could feel the heat building up in my lower back (below bra above waist) which suggests the fabric isn’t as able to handle warmer climate performance? It wasn’t super bad but I could feel it and normally I don’t feel that at all. The night was warm feeling but there was a cold wind. Just to be sure I checked the data against some other runs. The time of night was pretty much the same as my regular running time, the temperature was close to what I’ve been running in during the current season, my pace/intervals and heart rate was very close too. The only difference was my top. Obviously one run isn’t enough data to say for sure what is happening but the first impression is that the fabric is good for cold climates and cool weather running but I’m skeptical to how it would work in comparison to my RTW pieces in the heat and humidity of a Sydney Summer. I’m going to chart my runs with the top so I can report back with a more informed result later in the summer.
Overall I like the length and size of the singlet, it performed moderately well to good, but it still feels super novelty and while that’s ok I’m not entirely sure it’s the look I want from my activewear?
Alterations: Adjusted sizing for stretch difference cut 16 bust to 18 hip, added 4cm to hem length.
I tried to link to information about the actual performance fabric from the Spoonflower site. It’s really difficult to find and after a few minutes of searching I stopped looking. ** It’s too hard to find the exact specifications on their fabrics and then when you do find them they are nowhere near comprehensive enough and merely say “performance”or “active”. I see this way too often in fabric for home sewing and frankly it’s just not good enough. What makes it performance? is it moisture wicking? what are it’s exact fabric components? is the moisture wicking on the construction of the fabric or a finish that has been added? how many washes will it last if it’s an additive? what washing instructions are needed to keep the life of the performance fabric. It’s this lack of information on the specifics of performance fabrics offered by many within the fabric industry for sewers that frustrate me so when it comes to active fabrics. I want the details as one fabric and one set of performance criteria does not suit all sports. Perhaps one day I’ll write a series of blog posts on active fabrics and sportswear from an industry perspective so I can rant away about details and specifics then. Till then, happy running.
** With thanks to Robyn in the comments she found the page I was looking for and here is the link http://www.spoonflower.com/spoonflower_fabrics#view_fabric it does indeed contain the information I was looking for, including things like washing instructions. Very happy that someone was able to find it and point me in the right direction for the information I had thought was lacking but is indeed supplied. Many thanks to Robyn and Spoonflower for providing me with the details.
This past weekend there was a Sydney Spoolettes meet up with everyone invited to come to Pitt Trading for some Spring Fabric Shopping and indulge in some Cupcake Dolly cakes (just up the street from Pitt Trading).
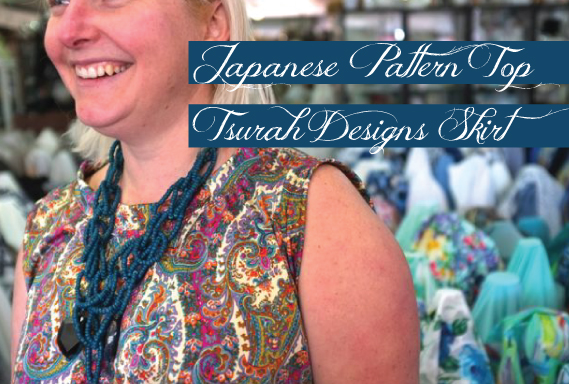
I work Saturdays at Pitt Trading so it was fun to see the Spoolettes on work time and I grabbed the opportunity to get some photos taken of my new work top while at work. Huge thank you for Maria for taking the photos for me.
This is one of the first times I’ve had problems understanding a Japanese pattern. Mostly because there was no way my neck or arms were ever going to work with the tiny pieces allowed for the neck and arm bands. So I calculated out my own bands and used them instead. I also cut the front neckline down a little lower as I don’t like things pressing against the bottom of my neck it makes me feel gaggy. I also twin needled down the neck and armbands. Fist Pump for twin needle stitching like an absolute dream and making the finish look so pro. I love my twin needle.
My fabric is a poly/lycra I bought from Pitt Trading. I like to wear their fabrics when I work there as I find it can be a good icebreaker with customers to talk about the fabrics and sometimes you see a fabric made up and it sparks a whole bunch of ideas you may not have thought about earlier? This is the same quality I’ve used for the Burda Swimsuit and the Nookie Bikini. It’s soft handfeel yet super stable to sew with and has a lovely drape. It really does work for so many patterns and styles.
Talking always talking..
Overall I like the top it feels lovely and swishy on and is a great loose fit through the torso which I so like to wear as it’s so comfortable. Some people find the boxiness of some of the Japanese styles a bit overwhelming. I like the odd shapes as it gives me a chance to experiment with drape and proportion. At times like now when I’m feeling less than svelte I find it nice to still be able to wear an interesting piece that isn’t super fitted or super clingy. It gives me a chance to approach dressing on a different level than just trying to cover up what isn’t currently working for me.
The skirt I’m wearing is the Tsurah Designs straight skirt, which I pretty much live in at work (I now have 4 of them, you can see another one here) for me it’s the perfect ponte skirt. It takes about 30 minutes from cutting to hemming and BAM! new skirt. Love it.
Top Pattern: View G from rectangles and circles with head holes.
Alterations: dropped front neck, increased length of neck and arm bands, bands were attached and then twin needled down. Also no hem, the lycra doesn’t fray so I just cut super straight and left it raw.
Fabric: Printed Polyester/lycra purchased at Pitt Trading.
I made a traffic cone! or at least a top that makes a pretty good impersonation of one.
The top is Sleeveless Flare Blouse (view O) from I Love Tops (Japanese pattern book by Yuko Takada) and made without any modifications with the exception of eliminating the back neck slit (the scuba has a slight stretch so I didn’t need the slit to get it on over my head. Yoke fabric is a laser cut Scuba Knit and lower is a cotton burnout and lined with cotton voile. Only the lower portion is lined, the scuba knit is unlined and features raw cut edges on neck and armhole.
The sizing is great around the neckline and armholes and I’m hoping the fabrics all soften down after a few washes as it’s currently very voluminous feeling and looking.
It’s kind of big and I’m still not sure if it’s in the kind of big this is awesome type way or in the wow this top gets in the way it’s got so much fabric type of way?
So far we’ve decided it would be a good traffic cone, smuggling space to carry the cat on cold days so she could act like a hot water bottle or perfect should I ever want to eat my bodyweight in Mexican food and still be comfy.
Only time will tell if it becomes a favourite or a dud, the skirt however is already a firm favourite and possibly one of my go to TNT or Tried N True patterns.
I’ve made the Tsurah Designsstraight skirt a few times all of which are currently not yet blogged, so while this is only the 2nd one I made in terms of timeline it’s the first up in the blogging queue.
When cutting I added the smallest extra bit extra over the hips as I felt my first one was a little too tight over my bottom and had the tendency to work it’s way up my body. I also cut the foldover waistband down in size as in the heat of summer I found the extra height or weight a bit hot.
While I love the colour of this skirt I don’t think I should’ve added the extra over the hips as this is a much softer double knit. Am leaving it as is for the moment but am interested to see how it goes after a few wears. I might take it in a fraction if it does stretch out. Good news is it hasn’t stretched out but I have lost a fraction of weight and now it’s a tad too big. So I may well run it back in over the hip only.
Top Pattern: Sleeveless Flare Blouse (view O) from I Love Tops.
Alterations: eliminated back neck slit
Fabric: Laser cut scuba, burn out cotton both purchased at Pitt Trading.
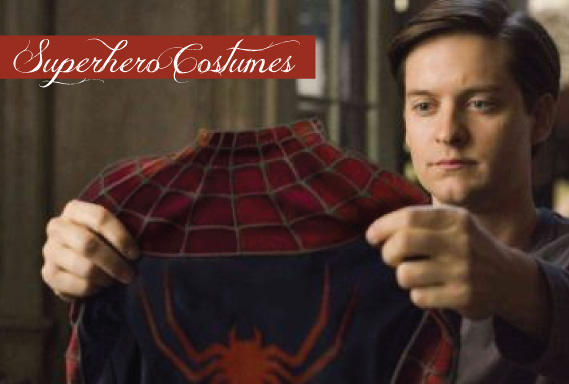
This was a topic of discussion the other night. We were watching the new Daredevil TV show and I was complaining about the fact that regular clothes with a bit of fabric tied over his face does not a super hero costume make.
In the Spiderman movies not only does Peter Parker find time to teach himself how to sling around buildings he somehow also manages to figure out how to mold and make an entire latex/spandex suit…overnight.
At least in Superman (Dean Cain version) we knew that his S was on his baby blanket and that his mum helped sew him an outfit. So from a sewing knowledge/skills point of view that all works. Plus they made this natty montage too.
https://youtu.be/wehGfglnzyA
Thor comes from a planet where he is a ruler so I’m sure he has an entire armory contingent to make his leather and metal armour so he doesn’t need to make his own.
Bruce Banner/The Hulk seems to just wear his regular clothes but why do his pants increase when he changes but don’t shrink back down when he returns to being Bruce Banner?
Is Alfred the Butler really an amazing latex tailor in his spare time to create and maintain Batman’s outfits?
But all these others how do they do it? and if learning amazing technical sewing virtually overnight comes with being a superhero then is there a secret stash of fabric in the batcave?
This week I’d planned to take some photos of my recent (and not so recent) makes that haven’t made the blog yet. I figured out my outfits, ironed everything and then this weather happened….for 3 days. I decided the wild, wet and windswept look was not for me, ditched the idea of photos and decided to have a giveaway instead.
My love for Japanese pattern books is well known and I’m a happy enabler anytime a sewer is in the city to take them to Kinokuniya‘s and while away some time looking at the gorgeous books. So I was pretty excited when Tuttle publishing got in contact and offered me a free English Language version of “She Wear the Pants“. My dilemma was, I already own the book in the original Japanese, so would they mind terribly if I gave the book away? They liked the idea so much they’ve sent me more than one copy to give away! yay! and thank you!
So if you’d like your very own English Language version of “She Wear the Pants” please leave a comment on this post telling me your favourite Japanese pattern book, favourite place in Japan or dream destination in Japan. Mostly because I’m planning another trip to Japan and am looking for inspiration on where to go. I will post to anywhere in the world and will pull names out of a hat at random on Sunday the 26th of April 2015.
I’m also going to give a copy away on instagram, so to double your chances of being selected why not head over there and add your name again?
Disclosure: These books were sent to me for free, I am giving them away and paying for the worldwide postage myself. The BookDepository links are affiliate links, if you choose to you them I may be compensated.
I had a post written on this dress and all that was waiting was some nice photos to go with it. My first attempt at getting The Englishman to take photos on our walk to the train station led to some very derp faced awkward arm style posing. So I thought, no worries will try again another time.
Then disaster struck. The dress got accidentally put into the washing machine the right way out not in a wash bag. It got mangled against the agitator of the machine and the entire wash ended up with super fine velvet particles all over it and my dress lost quite a lot of spots and was quite ruined … Sad. So now in addition to a ruined dress I get to delight you all with with some wonderfully derpy photos of me from the original attempt at photos! So onto the story of the dress.
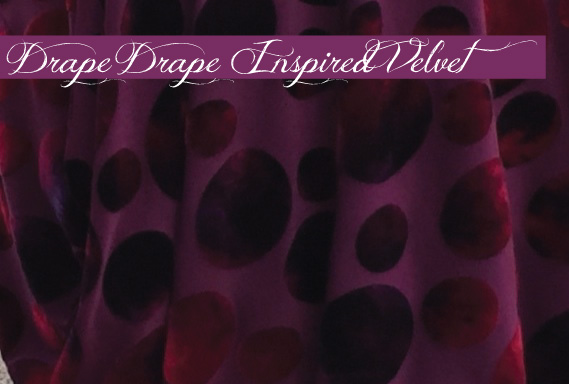
Sometimes a fabric inspires the dress. That was certainly the case with this dress. I saw the fabric and just had to have it.
A knit featuring multisized velvet spots that have an ombre effect. Really that’s pretty much a perfect fabric in my books. It reminded me of the phases of the moon or planets with the way the colour shimmered across the velvet.
Thing is, I didn’t have a pattern that would do this justice. So I dove into the stash and come up with some lackluster options. I wanted it to fold and move and ripple to show the amazing fabric off. So I started scouring my Japanese Pattern books and settled on the front cover from Drape Drape (book 1). **
It however requires over 3 metres of fabric. I had just 2 metres. I started searching blogs looking for reviews of the Drape Drape series. I’d always admired the simplicity of the drape tank which I knew Lizzy was a big fan of. She even had a photo of what the pattern piece looked like on her blog.
To start I cut a piece of interfacing to match the folded width of my fabric, I didn’t have any pattern card wide enough to use so that’s why I used the interfacing. I used the fold line as the grainline and with some measuring worked out that the centre front needed to be at a 40 degree angle. Using a protractor app on my iPhone I managed to get it all lined up. I traced the top half of the Baseball Singlet, angled out one side to become an aline skirt as I just extended it to the length I need. The other side I drew the shape to mimic the drape drape pattern. I then cut the interfacing along what would be the fold line to slash and spread the pattern to add even more volume into the drape area. The front and back of the pattern are identical.
I quickly ran up a toile using some slightly heavier knit fabric and realised I need to alter the draped side armhole to avoid flashing quite alot of side boob. I reshaped the armhole and went straight into cutting out the real fabric. I made it up using the overlocker and as it has 2 shoulder seams, one side seam and one straight line it went together in moments. I pulled it on relishing the lovely slinky feel of the knit. Then I looked in the mirror and I’d made a lovely velvet sack. Pretty, but oh so sacky and not at all flattering.
The next day I spent the commute to and from work sorting out a solution. If I cut an aline singlet dress out of swim mesh I could use it to bag out* the neckline and attach it at the hem to create a bubble hem. It wouldn’t totally do away with the sack look but it would at least make it look deliberate.
Apart from forgetting you can’t bag the neck and armholes of a dress that only have one side seam (you just end up with an endless donut of fabric that you can’t wear as a dress but makes a fetching infinity scarf). It went together well. The only other alteration was to slightly pleat the draped armhole which still had slightly too much drop under the armhole.
Totally derp photo, complete with tape stuck to my shoe, sometimes I just fail at life.
In this photo it looks like the armhole cuts in at the back but it didn’t? can only assume it had dropped a bit and I hadn’t straightened it out before I took the photo?
The beautiful drape.
I wore it to our Sydney Spoolettes Christmas get together and have worn it to work many times since and it’s so comfortable. As it basically doesn’t touch the body it’s good for big meal days or just when you need to be cool and comfortable. The fabric helps make it look dressy and I fear if I remade it in less spectacular fabric it might be more garbage bag than dress?
Fabric: Knit velvet spot purchased from Pitt Trading. As some of you may know, I spend a few days a week working retail at Pitt Trading. It’s so fun being surrounded by such beautiful fabric. I’m not asked to write about my fabric purchases in any way but as the selection there is quite fabulous you will see pieces from there pop up in my weekly makes more often. If you ever happen to be instore please don’t be shy and say hello!
*bag out means to fully enclose the neck and armholes with lining. Often referred to as the Burrito method. I can’t bring myself to say the Burrito method as the correct sewing way is to turn it inside out and twist and honestly if you did that with a burrito you’d end up with beans in your lap. For me it’s technically incorrect on both a sewing and food level and just can’t bring myself to use incorrect terminology. Sorry!
** This is an affiliate link, if you happen to buy from Book Depository then I get a small amount in return for suggesting the book to you. These links will appear every so often but only for pieces I truly do recommend.
Sometimes you have an idea and you know it’s either going to be brilliant or an epic fail. This is one of those times.
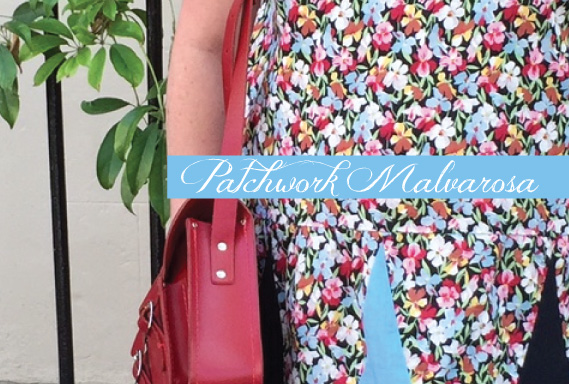
I picked up this fabric at a Garage sale, along with a bunch of other, I really liked this piece but it just wasn’t big enough to make a dress. So taking this Gorman skirt as inspiration, I thought I’d try an experiment?
I used the Pauline Alice Malvarosa dress. Cutting the floral on the top and the band for the skirt. Using the scraps of the floral, some blue and black from the stash to create the other panels.
The panels were calculated out by dividing the rectangle that creates the skirt up and cutting the number of triangles needed. I didn’t quite have enough of the floral so there is an uneven pattern happening but I don’t think it matters that much.
Attaching it all together using my overlocker, I used bias binding for the neck and armholes.
So after all that maths and cutting and drawing the dress is well, ugly. It’s really a bit weird and not in the good quirky sense. Oh well you live and learn and it’s only fabric.
It’s all very exciting and while she has plenty of clothes for the little guy I thought that something he could wear towards the end of this year as he grows would be a nice addition to his wardrobe. Plus this fabric was just too cute to leave behind.
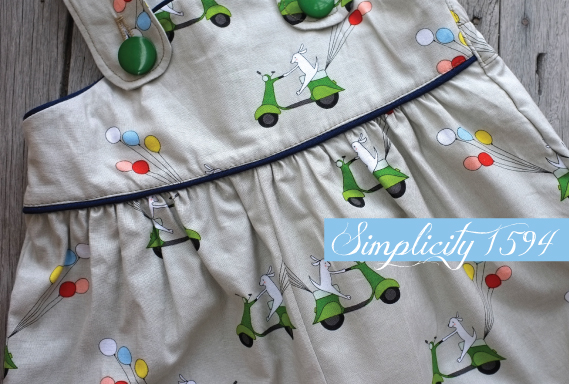
I used Simplicity 1594 which I had picked up in a Spotlight sale while my sister was pregnant thinking it would be cute to make up. The pattern itself comes with options for lots of ruffles or bows but decided to just go plain and add a piping to help break up the fabric.
Overall it went together easily but I’m a little disappointed that some of the sewing is not perfect. I rushed it a bit and I feel like I should’ve slowed down and made it better. It’s fine, I just need to be more attentive which is tough during the busy holiday time. Size wise I went with the largest size in anticipation of his growing by the end of the year.
I chose some green vintage buttons to match the adorable vespas in the print. There has been much debate over the animals on the print and if they are rabbits or dogs? I had initially thought rabbit but am thrown by the tail. So perhaps dogs?
They go into the post later in the week, I hope my sister and the little guy like them!
Pattern: Simplicity 1594.
Alterations: Added piping, changed elastic construction on legs, didn’t add ruffles and bows from pattern.
Fabric: Just for Fun by Marisa and Creative Thursday for Andover Fabrics, Pattern 6042, purchased at Pitt Trading. Piping purchased from Greenfields.
Shop
Hello!
Hi, I'm Susan. A designer and sewing teacher living in Sydney, Australia.
Here I share tales of my sewing, my pattern collection and insights into what it's like to work in the fashion Industry.
Other recurring themes include cat photos, an ever changing hair style and knitting.