Posted on 11 Comments

Sewing Adventures – African Wax Print and Simplicity 8048

IMG_9569

African wax print is not a common sight in Australia. Occasionally you may see someone wearing it but I’d never seen it for sale anywhere. That is until I missed the train at Cabramatta and had 15 minutes to use up before the next train. Rather than wait in the rain, I dashed up the street to the closest fabric stores for a quick look.

IMG_9427

They had some nice pieces but this one caught my eye. I asked the price and was sure she said $14, I was about to say no when I asked again and she said $4. 2.5m later I was running back to the train.
It’s a lightweight cotton lawn so a dense weave but very light. So I don’t think it’s real wax print as my impression is that is a much denser slightly heavier fabric?

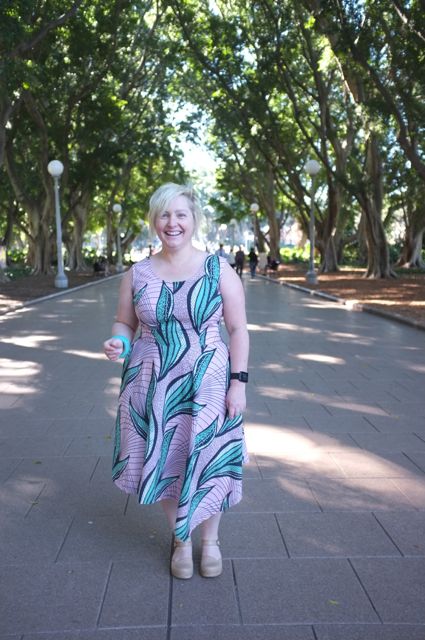
The print repeat is huge so I wanted a style that didn’t cut into it too much. Simplicity 8048 was a contender as I really liked the dipped angle of the front skirt.

Screen Shot 2016-08-11 at 2.57.27 pm

The angle is a separate piece that is inserted into a circle skirt. Pinning the panel straight onto the skirt pattern I eliminated the seams and made it one continuous pattern piece across the front.

Once again I used my own bodice block. I raised the neckline slightly to help balance out the oversize print but made no other alterations to the basic bodice. It’s not fitting perfect right now but I think a bit of winter pudginess has crept on and I’m hoping once that drops the fit will be ideal again.

IMG_9487
Once the pattern matching was done (seriously that was the hardest part of the entire make). It went together in no time. Neck and armholes are finished with bias binding.

DSCF8741

DSCF8744
Because I cut the front skirt as one panel the side seam had some crazy grain line action happening. To help compensate for this I let it drop for a few days before hemming. It didn’t move at all which was very encouraging. I had planned to shorted the entire skirt length after letting it drop but I ended up liking the longer length so I kept it. The invisible zip went in with ease once gain.

IMG_9508

I love this dress, the longer length feels swishy and the big bold print is so striking and fun.

Fabric: cotton lawn from Cabramatta. It comes in a cream/blue and khaki/pink combination also in case anyone else likes the print.

Dress Pattern: My own bodice block and skirt from Simplicity 8048

Alterations for next time: look at increasing the sway back adjustment on the block, and take 1cm wedge out of each side of CB neckline where zip is inserted.

Special thanks to my fellow Sydney Spoolettes for helping with the photos. We met up in Hyde Park and helped each other take blog photos.

Posted on 3 Comments

The Jacket project with Brother ScanNCut

Sometimes you see a garment that stops you in your tracks. Just stopped, your breath quickens and it lights a fire of ideas and imagination within you. This photo of a Valentino Pre Fall Jacket did that to me a few months back.

Valentino Pre Fall

I couldn’t stop thinking about it. From the delicate dip dye ombre effect to the embroidered pieces it just made me want to create. I wanted texture and colour. Embellishments and dyeing. In short I wanted it all. I collected ideas and images. I made Pinterest folders and mood boards.

moodboard

I consulted a hand embroidery expert for her ideas on how to best to tackle some of the work and got some great information about thread types and some leads on some gorgeous hand dyed silk threads. Then came the idea of how was I going to cut all the pieces to make the flowers and textures that I wanted? I could do it all by hand but that was time prohibitive.

So while all these ideas and plans were swirling about in my head I was contacted by Brother to see if I’d like to test one of their ScanNCut machines. I’d never heard of them, they have been primarily focused at papercrafts and quilting but once I saw what they could do the possibilities came alive. Here was a machine that could cut precise delicate shapes in minutes and then replicate that over and over. I said yes and they sent a ScanNCut machine over.

Sadly things got incredibly busy and I just didn’t get a chance to get to it as quickly as I wanted. I kept sending the team messages saying every time I gave it a try it was brilliant and it was nothing more than my time pressures which prevented me from singing it’s praises all over town.

So here is how it works. You choose an image from it’s pre stored library or create one of your own.

IMG_9692

You set size and placement.

IMG_9694

IMG_9695

Then push go and it cuts away.

IMG_9697

It is truly magical.

I’ve been busy using the machine to create the exact textures I lusted after that can normally only be created by a Couture house. I seriously cannot explain how fun it is and how many design possibilities it opens up. I’ll be back soon with more details on how I’ve used the Brother ScanNCut to create the outfit of my dreams.

Brother sent me the ScanNCut free of charge to try out, all words and opinions are my own.


Posted on 2 Comments

Sewing Adventures – Simplicity 1652 and 1873 mashup

I fell in love with the texture and heft of this fabric from Pitt Trading.

fabric

It’s wonderfully thick and strong, verging on canvas like. However I was completely perplexed as to what to make from it? I knew I wanted a dress but the fabric isn’t flowing or likely to gather well?

After some time, I decided to use the bodice from Simplicity 1652

1652

mixed with skirt from Simplicity 1873.

1873

Construction wise it was really straight forward. I didn’t use any lining as it would make the dress too hot.  Here it is at work in the Pitt Trading store.

simplicity 1652 plus 1873

The internal neckline and back cut out are all finished with bias binding. I didn’t have enough of the one colour so it’s a bit of a mish mash of patterns which I really like!

IMG_8250

IMG_8252

The invisible zip went in like a dream. Am so glad I have my technique figured out for those now it makes everything easier when it comes to finishing up a dress.

invisible zip

I was hoping to get a back shot of the dress today but it is all grey and rainy. So I popped it on my mannequin so you could see the back cut out. I’m bigger than my mannequin so the dress doesn’t fit her but I suspect that  gape at the zip occurs on me too and that’s one of the sections I’d pinch out next time I make this one.

IMG_8248

Fabric: pink and black cotton from Pitt Trading

Dress Pattern: Simplicity Amazing Fit 1652 and Cynthia Rowley by Simplicity 1873

Alterations:  mixed the 2 patterns together. Next time reduce the back width at the top of the zip by 1cm total and the top of the cut outs by 2cm total.

Posted on 2 Comments

Sewing Adventures – Mens Jinbei jacket and shorts

Recently I ended up with some unexpected free time so I cut out 3 pairs of shorts for The Englishman and finished the Jinbei jacket that has been cut for ages but needed a band and ties before being finished. These are all just casual around the house pieces. After long cycling rides it’s nice for him to have something comfortable to potter about the house.

jinbei shorts

I used the same pattern I did here. It’s one I picked up from Nomura Tailor in Kyoto for a men’s Jinbei consisting of jacket and shorts/pants.

fabric close up

Shorts 1 – Japanese cotton Lawn from Spotlight. These ended up shorter than expected as the cutting on the fabric piece was so bad by the time I straightened out the grain I was more than 5 cm either end shorter than expected. Still they will be fine for your very hot days in the summer.

Shorts 2 – Navy blue stripe. I picked this up as a remnant at Pitt Trading and I’m fairly sure it’s a Japanese milled fabric. It looks beautiful quality but may need a wash or two to soften up a bit more?

Shorts 3 – blue and white stripe denim. Lightweight fabric I picked up forever ago in Cabramatta. I seem to have miles of it so it must’ve been cheap but it’s super quality and am slightly kicking myself for not making a dress from it as well.

jinbei jacket

Jinbei jacket –  I finally seem to have got the sizing right for The Englishman. I need it to be boxy but not swamp him so I cut it slightly narrower through the body but maintained the wider shoulders and boxy arms.

Fabric: various sources – see above

Pattern: Men’s Jinbei from Nomura Tailor

Alterations:  Cut size small width, size Large length in shorts, slight narrowing of hem of jacket.

Posted on 6 Comments

Sewing Adventures – Embroidered Coral and Cream dress

One of my goals this year is to reduce my stash, by sewing more of it. I have some gorgeous fabrics that I have bought, been given or picked up along the way and they sit in boxes. No more I say, it’s all the good fabrics everyday around here.

IMG_7815
This is one such fabric. Bought ages ago in Cabramatta for the princely sum of $10 a metre.

At the time I must’ve been planning a skirt as there wasn’t a whole lot of it. Maybe 1.5m? I also wanted to take advantage of the beautiful edging so some careful planning was required. I measure out a long rectangle that went the length of the fabric panel. That was to become the skirt with only a centre back panel. This left a long narrow top section with the scallop edge still intact.

IMG_7837

I’ve been working on perfecting a bodice pattern for myself. It still needs some work but it’s getting closer. I used this pattern and laid it onto the panel to create a wrap over front and V back. I’d like to say it was all carefully planned and calculated but I totally winged it.

IMG_7980

The bodice was a simple construction of darts, shoulder and side seams, while the skirt was simply gathered onto the bodice and a seam put into the centre back.

IMG_7991

The whole thing is lined in coral cotton silk and there is an invisible zip at centre back. The zip insertion is fantastic but the embroidery means it’s a little tough to raise up and down. In hindsight I should have totally put in a lapped zip. The linking is hands itched around the neckline to keep it in place and there are a few sneaky stitches at centre front keeping the crossover in place. I had a fuzzy supervisor for my hand sewing.

IMG_7974

I wore it out yesterday to catch up with my niece and nephew. Their tiny cousin was with them and she loved my dress and wanted to be my friend because I had a “pretty dress”. Kid compliments are awesome.

Fabric: Embroidered cotton from Cabramatta.

Dress Pattern: winged it, bodice based on my own block.

Alterations:  next time I’d raise the centre front cross over a little.

Posted on 4 Comments

Stylish Remakes – Japanese Sewing book giveaway

Some time ago I was given a copy of Stylish Remakes to review, when I was asked to do it I said sure, I’m not normally an up cycling type of sewer but am always interested to have a look at something.

DSCF8710

When the book arrived I was intrigued. It has some really great ideas to take pre existing garments and give them some cool and sometimes quirky twists to create a new garment.

DSCF8712

DSCF8715

I was all inspired and yet the book has been sitting there and I haven’t created any projects. I sat down the other week to choose a project and then it dawned on me, I’m trying to decrease my stash and I rarely if ever buy any clothes (even 2nd hand clothes).

This is a book that is to be utilised and treasured by upcyclers who love to rummage at a charity shop. Who chop and recreate and do all manner of wondrous things with an existing start point…and I’m not one of those people. I struggle to find anything at charity shops, am hopeless at doing alterations because to me it’s faster and easier to just grab fabric from the stash and create from the very beginning.

DSCF8711

Despite all this the book really sparks my imagination, one of the pieces I really like is taking a bunch of bandannas and making outfits from sewing them together. Such a cool idea to use scarves or bandannas or even fat quarters. Now I don’t have any of those things but I do have a collection of lovely swatches from when we did our Shibori workshop.

DSCF8707

I started sewing them together using french seams in the fine fabric. it was this very fineness that made me reconsider the dress as the fabric was virtually sheer and a dress made from it would be unwearable. Creating something only for the photos goes against all the good that upcycling promotes so I needed another way of using the sewn together squares.

During all this sewing and thinking it’s been really hot, when I’m working at home I keep the front door open to promote a cross breeze. This is good except for the flaw that everyone who walks past has a look in, it seems like half the apartments in my building are now some kind of AirBnB and the foot traffic / looking in was getting a little ridiculous for my tastes.

Taking my sewn together squares and inspiration from Japanese doorways which often have fabric coverings called Noren, I created one of my own.

DSCF8705

As you can see it keeps the airflow going but discourages peeping eyes, added benefit of looking really beautiful.

So while it’s not a project from the book it is a project inspired by the book which has certainly made me look more seriously at upcycling and how I can use what is around me to create new things.

The publishers have generously given me a book to giveaway to any Australian upcyclers (sorry overseas readers maybe next time), so if you genuinely think you want to give upcycling a go or are a current upcycling fan then please leave a comment below telling me why you should get the book or linking to one of your own upcycling projects. I’ll choose a winner within a week and post it out.

Posted on 6 Comments

Sewing Adventures – Simplicity 1873 insertion trim edition

Sydney has been hot, like hot hot and it’s unrelenting so even overnight it doesn’t cool down very much so it’s been an endless amount of feeling too warm. Which is kind of nice because yay summer and also kind of over it, would like to not constantly feel hot and sticky.

It was on one of these hot days that I was working at Pitt Trading and by the end of the day I declared it was far too hot to be wearing a skirt and a top. I purchased one of my favourite new fabrics that has only just arrived instore along with some insertion trim with the plan of making a dress. If you want the same fabric you can get it here or come instore.

IMG_7903

Pressed for time and wanting a sure fire sewing win I went with Simplicity 1873 which I have made before with much success. Construction wise it was very much like what I’ve done before. Slight sway back adjustment, invisible zip at centre back, no linings or facings I’ve just used bias binding around the neck and armholes. I was pretty happy with my invisible zip.

IMG_7862

The only big departure from previous editions was the addition of the insertion trim. I cut the skirt panels 5cm longer than I normally do, constructed the entire dress and then proceeded to measure 10cm up from the raw edge of the skirt. I cut along this line and overlocked the new hem of the skirt.

insertion 1

To place the insertion trim in, I stitched the edge of the trim just above the finished line of overlocking, turned it under and topstitched it down. Then taking the 10 cm circle I cut off, pressed it half with the iron reducing the height to 5cm, overlocked the top edge and pinned it to the lower edge of the trim.

insertion 2

Some slight fiddling with the seams helped it line up correctly as it was slightly larger in circumference than the insertion trim due to the nature of the flared panels of the skirt. Repeated the stitching, then topstitching and hey presto insertion trim and pretty hem.

IMG_7905

I’m so happy with it as the insertion trim really lifts it out of the homemade arena and into a more fashion item. It’s certainly the type of garment that I’m aiming towards with my makes this year, more fashion less plain sewing.

Fabric: Polished cotton from Pitt Trading, insertion trim also from Pitt Trading who have one if not the biggest number of trims instore anywhere in Australia.

Dress Pattern: Cynthia Rowley by Simplicity 1873

Alterations:  Added the insertion trim as explained, other alterations as per previous editions of this pattern, I cut the skirt width as per the pattern this time and didn’t add extra volume.

Posted on 1 Comment

Sewing Adventures: Tsurah Designs Straight Skirt Sparkly edition

Silver-Skirt_header

In my head I refer to this skirt as “The Lizzy Made me do it skirt”. After Lizzy had been down for the Shibori Workshop last year (actually the year before last as I’m more than slightly behind in blogging all my makes) we had talked about shapes, proportions and trying new things just to see where they go. On Pinterest I had admired images of sequin skirts worn casually and I always wanted to give it a go.

Spurred on by Lizzy I grabbed some sequins and got to making. I’ve made the Tsurah Designs straight skirt before here and here. So I knew it would be fast to make and I could alter it to fit in the sequins.

The sequin has slightly less stretch than the Ponti and isn’t quite as strong so I wanted the back of the skirt to hold more of the weight of the garment. So I cut it fractionally bigger from hem all the way to just above the hip but kept the waist the same width. Then cut the sequin panel the same.

silver skirt front

This gives it more room which is nice and it doesn’t pull the sequins at the front. I kept the wide waistband as I thought it could add to the look by being worn up for a very long silhouette or folded down which is lovely and comfortable. The hem is twin needled but apart from that the rest was entirely sewn on the overlocker. I did wear my clear lens running glasses while sewing to prevent flying sequins into eyes but honestly it sewed like a dream with no problems at all.

silver skirt back

I find it a surprisingly comfortable piece. I have to be slightly careful as the sequins do like to snag themselves on things and it gets handwashed too. Apart from that it’s very easy wear and always gets compliments! I’ve been wearing this to work for over a year and it’s still going strong, made for a whim it’s certainly become a mainstay of my wardrobe.

silver skirt side

Thanks Lizzy for spurring me on to try something I thought was out of my comfort zone and yet became one of my most worn items!

Oh and I look slightly pinker than usual it’s because I’m sunburnt, I got roasted on Australia day despite wearing a hat, keeping to the shade and  doing all the usual things to avoid the sun. It was a beautiful day out, despite the resulting burn. Here’s the Russian Roulette’s as they came across the Bridge.

Russian Roulettes in Sydney


Pattern: Tsurah Designs straight skirt made many times before.

Alterations: Shortened skirt, added width over hips and down side seams to allow for sequins.

Fabric: Stretch Silver purchased at Pitt Trading, Grey Marle Ponti purchased at Cabramatta.

Posted on 13 Comments

Sewing Adventures – Simplicity 1873 cotton sateen edition

1873_header

For the month of November I’m trying to follow along with #BPSewvember on instagram. The idea of the beautiful Amanda from Bimble and Pimble was lots of fun last year, so I’m in for another round. Today’s theme is Like a BOSS. I thought it appropriate to talk about this dress which has THE BEST invisible zipper insertion of my entire sewing life (seriously it’s got to be all downhill from here this one is so perfect).

Pushed for time after procrastinating for too long I ended up cutting the dress Wednesday night, making most of it Thursday night, freaking out that it didn’t fit late Thursday night, brainstorming ideas on how to get it to fit Friday at work, trying it on with a different bra Friday night, rejoicing that it now fitted and then finishing up almost everything Friday night including the zipper of perfection that went in at about 10.30pm, flying out early on Saturday morning and finishing the hand stitching while sitting at our accommodation drinking tea about 2 hours before the wedding. Hectic, oh yeah! But totally worth it.

Here’s some photos on how it all went down.

Cutting out using the top floor stairwell (which does not have an overhead light just a window and the light was fading) as the fabric didn’t fit in our apartment and I needed to see flowers to avoid potential flower boob disaster.

top of stairs Trying to not think about accidentally bumping my scissors off the fourth floor to land on the tiles below.

stairwellAdding in some pre made satin bias binding as I ran out of time for fully lining and I hate facings.

IMG_6730The zipper of perfection which I put in LIKE A BOSS. I use a regular zip foot not an invisible zip foot to insert. This was the first go no hand basting in place and very minimal pinning.

zip of perfectionHand stitching view.

handsewingviewSneaking a photo with the Groom’s car before heading off to the wedding.

the dress

Laughing with the Englishman after the ceremony before the food.

with the Englishman

The Cheese cake which made my dress feel too tight by the end of the night. But wow delicious!

cheesecake

Fabric: Digitally printed cotton sateen from Pitt Trading

Dress Pattern: Cynthia Rowley by Simplicity 1873

Alterations:  Based on the last time I made this pattern I did a sway back adjustment. I had no time to test it though. So I took the risk and cut straight into my good fabric. The risk paid off and it worked. Despite zipper perfection and good back fitting I don’t have a single photo from the day of the back of my dress.

The fabric is so beautiful I decided to add some fullness to the skirt. Now this is already a VERY big skirt but I thought the weight of the sateen could hold it. The front and back panels were extended to the full width of the fabric but I kept the angled seams so it wasn’t just adding in a straight piece of fabric. The side panels had an additional 12cm per side added in. I sewed all panels of the skirt together and then on the larger pleats made them deeper. On this pattern as with many of the Cynthia Rowley styles, the pleats go one direction and then swap to the other direction. It makes for a very swishy feeling skirt and with the added width it made for a really beautiful feeling skirt.

Posted on 6 Comments

Sewing Adventures: Vogue 8766 – The Bridesmaid Dress

When I design ranges for big companies part of the job is presenting the range at an initial ideas stage. You come in with a bunch of drawings and fabric swatches and proceed to be grilled about every decision. Every idea needs to be backed up with why it should be done, how much money it’s projected to make and why time and money should be invested into making that particular idea come to fruition. Depending on the size of the range you need to be prepared to do that for over 100 pieces. It’s utterly nervewracking and stressful but it’s also a necessary part of the job. It’s one of the ways you weed out the good from the bad, learn to take on others perspectives and realise that not everything you design is going to be amazing or the correct fit for the time and place.

I find this somewhat clinical approach is super helpful to my sewing as I enjoy the process so much more than focusing on the end result.

Recently I had great fun in pushing myself recently to make a bridesmaid dress for a friends wedding. When I got a late night text the day before the wedding from the beautiful bride explaining that they decided to change the bridesmaid dresses and weren’t going to use the one I made I said to her, as long as you are happy that’s all that matters.

When I saw the Bridesmaids the next day at the ceremony it was 100% the right decision to change the dresses. With a natural linen back drop, wild roses and Australian natives in pale creams and pinks the bridesmaids looked picture perfect in their blush coloured dresses. Totally the right choice for the occasion. Sadly I don’t have any photos as it was an “unplugged” wedding with no phones or cameras and everyone told to just enjoy and have a great time. It was utterly fabulous night filled with friends, fun and laughter even if we don’t have the pics to prove it.

The original bridesmaid dress was a deep wine coloured French lace over silk. The lace was from Studio Fabrics who have a store in the city and another at Cabramatta, highly recommended for gorgeous lace, silks and lovely staff. The silk was from Pitt Trading and had the softest handfeel to it.

The lace was 170cm wide with a double scallop edge so it was quite economical to cut the dress from as you could utilise so much of the scallop. The style was a boat neck fitted dress with a knee length skirt and tiny cap sleeves. I used Vogue 8766 as my base block.

V8766

I really wanted to achieve a skirt hem with no seams, the lace had a little scallop, big scallop design to it, adding seams would interrupt the flow of the design.

hem

So I eliminated the side seams of the pattern. I placed the front and back patterns together, overlapped at the side seams where the seam allowance would normally be and traced off one continuous pattern from that. The top of the side seam was turned into a long curving dart so you still got the hip shaping despite the lack of side seam.

I made a toile from calico and used that to do the fitting. I transferred all the fitting marks to the calico and then cut a new calico version which I then used as the final pattern.

At the centre back I joined the hem by overlapping the lace and using a small zig zag all the way up to the base of the invisible zip. Creating an amlost invisible centre back seam.

centre back seam

The silk underneath was fully bagged out with a matching silk lining which joined at certain points to ensure it would sit flat and not cause any movement while being worn.

The sleeves were small with just an inverted pleat at the top of the sleeve head to allow for movement.

sleeve

Now there is no denying I was super stressed making this dress, I felt the need to make it perfect and be so beautiful for my friends, but the fact that it wasn’t worn doesn’t even worry me. I got to use some techniques I don’t use in my regular sewing, had fun working with utterly divine French Lace, conquered my fear of lace overlay plus silk plus invisible zip (which honestly I have been avoiding for like forever in case I made a mistake). It was good to push myself and I’m glad they found the perfect dresses at the last moment.

Fabric: French Lace from Studio Fabrics, Silk from Pitt Trading

Dress Pattern: Vogue 8766

Alterations: eliminated side seams of skirt, cropped sleeve length, fitted to a size 10, 5 foot 11 bridesmaid