Posted on Leave a comment

Sewing Adventures – Bento carry bags

Never one to miss an opportunity I thought while my machine is all set up to sew the waterproof fabric why not make some more things while I’m there? Top of the list were some carriers for my lunch Bento boxes. They almost never leak but occasionally if you get an overly juicy tomato then you find some wet patches in the bottom of your bag.

Due to not wanting too many seams nor too big and bulky an item to carry in my work bag I went with a really simple gusseted envelope style. I quickly cut one in the same non iron on interfacing I’d used to make the pattern for the bike saddle cover and stitched it together to make sure it worked and to get it as small as I possibly could and still fit my bento. As it was I could scale down about 2cm on each side and went with a curved flap to finish the opening.

Using my rotary cutter I cut the whole thing out and then stitched the sides before adding a vertical stitch to create the box style sides.

Simple and effective. I think I’ll make an elastic loop to go around it to double down on keeping it secure but I tested it as is and it caught the leaks and went through the wash easily as well, winning!

Pattern: self drafted

Fabric: Waterproof fabric from Nomura Tailor Kyoto Japan

Alterations: next time make it the other way round so the waterproof fabric is on the inside to help increase it effectiveness…also means you can just wipe it clean and not have to put it through the machine so often.


Posted on 1 Comment

Sewing Adventures – Black Beauty bra in black mesh

I’ve been on a roll with the bra making and absolutely enjoying it! When Erin from Emerald Erin released the Black Beauty bra I put it on my “to make” list, I just didn’t expect me to take so long to getting around to trying it out.

One of the frustrating and wonderful things about bra making is that you kind of need to make an almost finished bra in order to see if it actually fits? Sometimes I make up a toile in fabric I don’t care about and other times I dive straight in.

This is one of the times when I dove straight in.

The bra itself went together really well, everything lines up and the instructions (when I used them) are easy to follow.

Sewing a see through bra is a challenge, you really have to be careful as all the flaws show up. If you look closely along where the channelling is applied at the front you can see where some of my cutting was less than stellar. Still it’s nice to be challenged to level up and keep getting better. It’s one of the things I genuinely love about sewing, you can always get better.

But how did it fit? hmm not good. The band is good and quite comfortable but the cups are enormous. I felt like I was sitting on a shelf that was supported from underneath and just nothing above. Getting past the initial disappointment I decided to put it aside for a bit and try it on again and analyse what’s wrong.

When I did that I found the upper cup is too long, leaving the entire cup sagging and not holding anything. If I add in a dart I might be able to fix this one and then next time I think I want to try this band size with a smaller cup size? I do know I’m not defeated I just need to work out a solution to getting it to fit me.

Fabric: Black mesh, patterned fold over elastic from Pitt Trading, other bits from my stash, back hook and eyes from Booby Traps.

Pattern: The Black Beauty by Emerald Erin

Changes: work out how/why it doesn’t fit and try again

Posted on Leave a comment

Sewing Adventures – Teal Lace Harriet Bra

By now I’ve made so many Harriet bras that I’m mostly including them here to help document all my makes as I don’t have any more insight into the pattern or construction. Each time I make one I challenge myself to be neater, to cover internal seams and generally just get better at sewing.

This teal and lilac one is super comfortable and I really like the fact I took the time to allow the lace to have a scalloped edge on the lower part of the cradle, it just adds another level to the bra and helps improve my skills.

Pattern: Harriet Bra from Cloth Habit

Fabric: lace and trims from Pitt Trading

Alterations: same as previous versions of this bra

Posted on Leave a comment

Sewing Adventures – Linen Produce bags

Thinking we were going to be locked down for awhile back in Match I placed an order with Spotlight for some bamboo batting and a piece of linen that I wanted to use as a backing for a project I was working on. The batting turned up 2 weeks later and the linen another fortnight after that. The linen quite frankly was crap quality. I’m actually glad I hadn’t earmarked it for a garment as it would have been terrible.


As it was it’s very lightweight to the point of sheerness, the weave feels loose like if you pulled really hard it would weaken and just all round it’s a bit shite.

Not suitable for the project I had planned for it and not suitable for garments I was in a dilemma, what did I use it for?


Researching for something else entirely I was reminded that I had wanted to make some produce bags and that linen is very breathable so I could even use them inside the fridge if I wanted to. Cutting out as many bags as I could fit I made some big ones to fit sourdough in, some mid sized and some little ones.

In an aim to improve their lasting quality I used French seams and double turned the casings so that all the raw edges were enclosed adding some strength and ease of washing to the bags. With the spirit of reduce very much in mind I uses some ribbon and tapes I had in the stash to create the drawcords.

All in all a good save for some crappy quality fabric.

Pattern: none just winged it

Fabric: linen from Spotlight, drawcords from the stash

Alterations: be even more sceptical of fabric from Spotlight

Posted on Leave a comment

Sewing Adventures – mint and lilac Mara bralet

I love the finished version of my white Mara bralet so much that I dove right in and cut another one straight away, like straight away straight away…did I learn from my mistake of not sewing after receiving distressing news? no of course not. Stupid me.

Ironically I even made some of the exact same mistakes again. Like putting the cup elastic on upside down. So silly.

Despite the fact there are a few mistakes and some of the sewing is a little crooked it did make me feel better to have achieved something on what was a pretty crappy day. I also think that maybe we beat ourselves up a bit about everything being perfect all the time. I know I want to be better every single time I sew but that’s not always the case.

As it is, 2 beautiful bralets, some distraction in the form of sewing, its not all bad.

Pattern: Mara bralet by Studio Costura

Fabric: Lace and trims from Pitt Trading, hook and eye closure from Booby Traps

Alterations: none

Posted on Leave a comment

Sewing Adventures – Mara bralet in white

This bralet has been on my sewing list since I saw the beautiful versions that Birdy_sew_obsessed on Instagram has made of it. I had printed out the pattern and had it sitting by for ages before I finally grabbed some lace and made a toile. Sometimes I make a toile in something I don’t care about and other times I just jump right in, this is a case of jumping right in using some white lace and thinking I can always dye it to a colour later.

Side note: does anyone else struggle endlessly with keeping white clothing white without using a tonne of chemicals? as soon as I wash this I feel like it will go the same dirty grey colour all my whites go unless I soak in some heavily chemical laden product which makes me feel icky because I don’t want that many chemicals near my skin and I certainly don’t want to put it down the drain into the water supply.

Between sewing the panels together and adding the elastic I got some stressful news. In a bid to distract myself I thought I’ll keep sewing…not my best decision. The picot along the upper cups is actually sewn in upside down, I couldn’t find my white strapping so used khaki but forgot to change the thread colour and then when I went to unpick it left marks in the elastic so I left it white. Then for my final mistake I’ve sewn the back hook and eye on the incorrect sides…yep totally distracted and stressed. Thank goodness I had only basted in the back hook and eye to test the fit so at least it will be easy to unpick.

Stupid mistakes aside I really like the shape and the fit is really good. Like really good. I should stop being surprised that well fitting wireless bras give a good shape but each time it feels like a wonderment of surprise that the myth that wires are the only option is broken.

Due to some accidental pattern matching I got a perfect flower at centre front which was 100% not planned and quite a lovely surprise.

Pattern : Mara bralet by Studio Costura

Fabric: Lace and trims from Pitt Trading, back hook and eye from Booby Traps

Alterations: none

Posted on Leave a comment

Sewing Adventures – Dressing Gown

Dressing gowns are big news around here. I’ve made several in cotton or silk for myself and to give as presents. The luxury of having a really lovely piece to wear every day cannot be underestimated. My go to everyday one has been a printed cotton with a tiny stretch of spandex in it that I think I’ve been wearing for like 18 years? I got the fabric in China Town in Sydney before meeting  friend for lunch, we caught the ferry to Manly. It was so cold we wrapped the fabric over us like a blanket as we ate hot chips on the boardwalk in front of the beach.

Since being used as a blanket I did that thing they always tell us not to do in fashion college. I lay down on the fabric, chalked a line around me, measured out from the line and cut into the fabric. No real pattern, no proper measurements. Despite BREAKING ALL THE RULES it was quite simply perfect. It fit it was comfortable, kept me covered, kept me warm, was perfect for wearing before I left the house so my dresses didn’t get covered in cat fur. Perfect..until last year when after dinner one night I had the cat on my lap, drinking tea and the front ripped. Years of wear (and sharp cat claws) meant it was at the end.

Taking a look in the stash I found some floral fabric, lay the old one on top of it and cut around it to make a new one (hey it worked once surely it’s going to work again?). I did fix a few things

  • added extra internal ties so it doesn’t gape at the top
  • made the hem and turn back slightly bigger then pinned and pressed it all in place before using my coverstitch to hem the entire thing
  • reinforce the ties where they joined to the garment as I did have to reattach them at various points previously

It’s wonderful, I love it and I’m hoping it lasts another 20 years!

Pattern – made from old dressing gown

Fabric – from stash, originally from Cabramatta and I want to say was about $12 a metre?

Alterations –  just the added extras from last time

Posted on 2 Comments

Sewing Adventures – Queen of Suburbia Adrian bra in yellow lace

Ever make anything that you absolutely love not only in terms of fabrics, colours and look but also be so proud of the quality of your sewing? that’s me on this project. I love the lightness and colour of the lace, the electric pop of colours with the pink and the blue and I am super proud of the sewing. It’s all absolutely gorgeous.

The pattern is a new one from Queen of Suburbia or QofSpatterns, a Canadian based lingerie brand that is starting to make patterns for the home sewers. I’ve long loved their style so I was super excited at this pattern and snapped it up. It’s a half cup, not full coverage and I like that more styles of bras are being offered because while full coverage is lovely it’s a bit old fashioned feeling some times when you can’t get the patterns to match the styles you want to buy from the shops.

It went together super well, I was trialling some bra tulle from my stash for the cradle but discovered it was too stretchy. Using some white tricot I had on hand I cut another cradle and added it to the back of the existing one to help stabilise up the whole area. Apart from that slip up of my own the whole thing went together super easily and the instructions were good.

So all in all a complete WIN of a sewing project….except for one small thing. The cups don’t fit me.

The band is a great fit but the half cups are a little too low and on one side it cuts me in half a little (that side is bigger so I normally have that issue to deal with anyway). My idea is to make another one one or two cup sizes up and try again.

How did I get the wrong size? well I measured as per the instructions and then compared the pattern pieces to the Harriet bra I use a lot to check the sizing. Where I went wrong was I forgot it was a half cup and wouldn’t have the upper band along the top of the cup as the Harriet does…seriously don’t make pattern decisions when you are tired people because this is what happens. Now I’m the first to say when patterns don’t work but in the case it really was user error and no fault of the pattern.

So for now I’ll start again and maybe I’ll pin this one up near my sewing machine as an example of something I love and am proud of….even if it doesn’t fit

Pattern: QofSpatterns/ Queen of Suburbia Adrian bra.

Fabric: Lace and elastics from Pitt Trading, tricot from Greenfields

Alterations: get sizing right – I made the 34D (am including that here in case I forget and go to make the wrong size again)

Posted on Leave a comment

Sewing Adventures – Waterproof Bicycle Saddle Cover

Long time readers will know I was once a keen cyclist. Surgery on my back to remove a tumor followed by a house fire that destroyed my road bike has meant that for the past 3 and a bit years I haven’t been on a bike. Post surgery my torso has had issues rotating (I knew this would be a result of the surgery and the specialists said not to worry it would come back in time) this meant looking over my shoulder for oncoming traffic was an issue and then I lost my bike so I kind of just let things be.

Now with more time at home due to the COVID lockdown and then after just trying to stay away from people, I thought it would be a good time to get my shopper bike out of the garage. It was in the apartment when the fire happened and pretty much just got shoved into the garage of the building where it has been ever since. I wasn’t sure if the brake cables etc had safely survived the fire so I dropped it in to our local bike shop for a service. Apart from the guys being amazed that it survived a fire and how filthy it was, the bike itself was in good condition. It got a good clean and service before coming home again.

Long term it’s going to live in the garage of the building which is dark, dusty and not the cleanest of places. My idea is that I’ll be able to go down unlock it, pop the basket or panniers on then go for a ride or tp the shops etc. Which means either cleaning or dusting it each time I want to ride or coming up with a better solution.

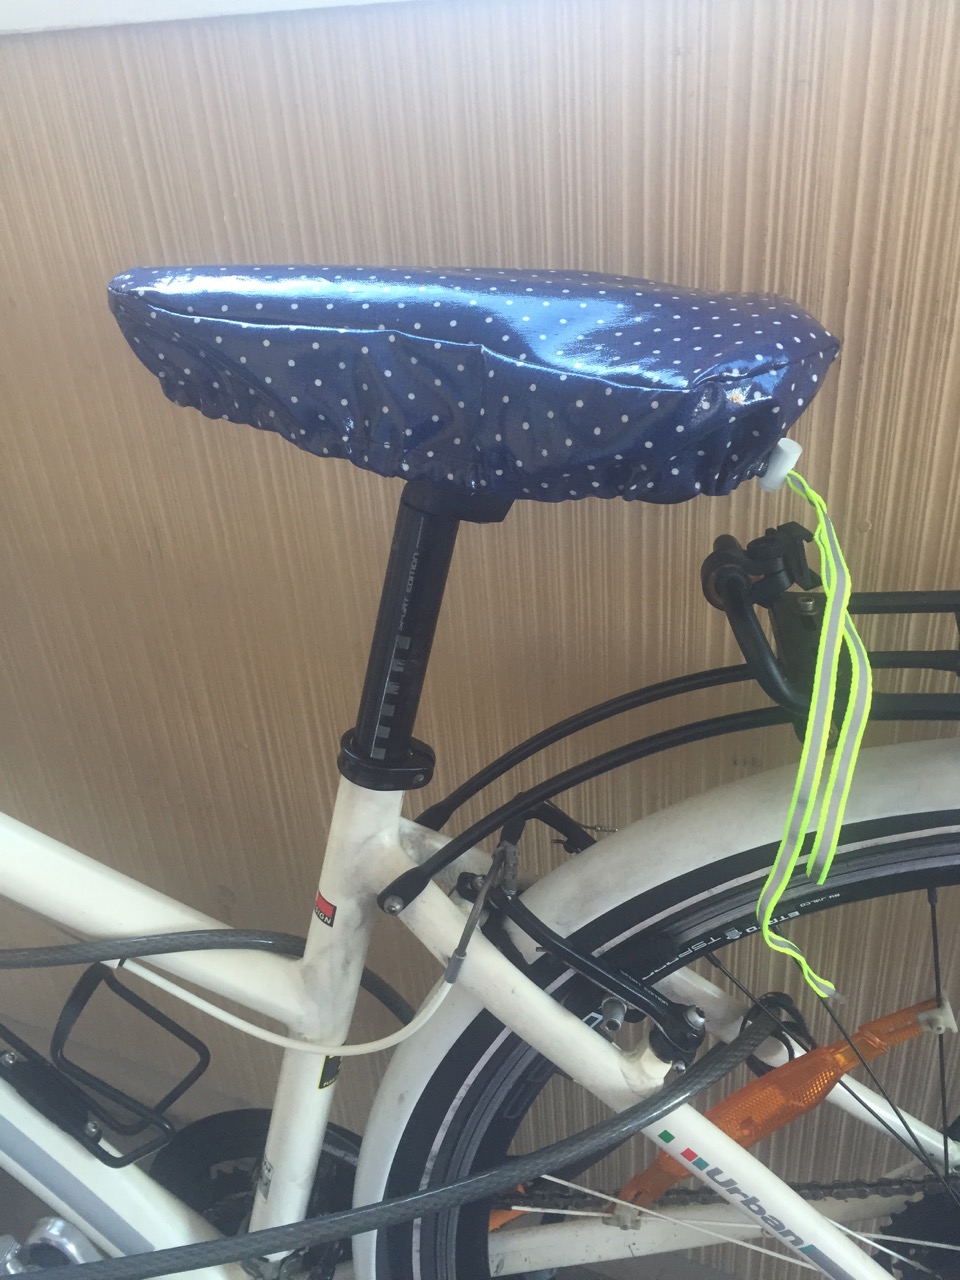
Part 1 of a better solution is a saddle cover. I decided to use a waterproof fabric I picked up from Nomura Tailor last time we were in Japan because then I can pop it in my bag and use it to cover the leather saddle should I ever get caught in the rain or have to leave it outside in the rain.

Using some non iron on interfacing I traced around the basic shape of the saddle. Adding seam allowance I measured the circumference and then drew a 7cm rectangle the same length. quickly cut it out of some poplin, sewed it together and checked the fit. Adjusting the length a touch to make sure the seam didn’t interfere with the nose of the saddle I then cut it from the waterproof fabric using a rotary cutter with a slightly older blade. I knew the cutting would totally dull a new blade so took the risk on using an older one with more pressure and it worked.

The nature of waterproof fabric means as soon as you puncture it with needles or pins that is a point water can get through, that meant no pins being used and fingers crossed no unpicking. The checked underside of the fabric is a slightly brushed cotton that glides through the machine with no problems, to ease around the curved areas I bumped up the stitch length to just over 3 and changed my needle to a leather needle. it made a bit of a thunking sound going through the fabric but there was minimal needle penetration and the stitches formed smoothly with no tension issues.

Fitting the rectangle to the upper curved panel went really well, stitching the channel for the drawcord was where the issues started. Basically my machine didn’t want to feed the laminated fabric through under the pressor foot. I swapped feet, lowered the feed dogs (seriously only the second ever time in my life I’ve had to do that on this machine) all to no avail.

Then I remembered a trick Laura from Bobbin and Ink once showed me. Grabbing some matte sticky tape I covered the bottom of my regular machine foot piercing through where the needle would go. Hey Presto! it worked! glided though and made stitching the channel easy.

Using a reflective shoelace from Prym (you can never have too much reflective stuff when it comes to bikes) I threaded it through the channel and into a drawcord. Fitting the now finished cover over the saddle I pulled the drawcord to secure it.

I’m super happy with how cute it looks and how practical it will be for keeping the bike clean in the garage and dry if I ever get stuck out in the rain.

Pattern: self drafted

Fabric: waterproof fabric from Nomura Tailor Kyoto Japan, reflective shoelace from Prym, drawcord puller from stash

Alterations: none, just remember the sticky tape trick for next time you sew this fabric!

Posted on Leave a comment

Sewing Adventures – Liberty insertion Dress

Regular readers are no strangers to seeing my go to dress, my own bodice block mixed with either a gathered or pleated skirt. It is by far the garment I have made the most as its not only a fast easy make it’s easy so easy to wear.

Rewind to late November 2019, I’m working 7 days a week, it’s hot the air is heavy with bushfire smoke and we are preparing to fly to England for Christmas. To say I was busy would be a vast understatement of the facts. In my bid to speed things up I grabbed some Liberty fabric from the stash that was pre washed, my bodice pattern and headed to Bobbin and Ink to teach for the day. Good Luck with the buses meant I arrived early lay out my fabric, cut my bodice and thought yep no problems tonnes left for my skirt.

Only not so much, my skirt was too short, like much too short. In a panic and under time pressure I basically threw it back into my to do pile where it has been floundering ever since.

The fabric was way too pretty to lose so I needed to find a solution.

Cue some insertion lace and leftovers from one of my Liberty fabric Myosotis dresses. Using 2 lines of insertion makes the whole look more deliberate and less like I made a big mistake.

Showing that a little bit of a break and some creative thinking means that everything can be salvaged just sometimes we need to slow down and take a step back to find our solutions.It was also approved by the cat (an important part of the process that I’m sure all cat owners will agree with me).

Pattern: my own bodice block with a modified skirt

Fabric: Liberty lawn from Liberty of London, insertion lace from Pitt Trading

Alterations: next time just slow down and think some more