Posted on Leave a comment

Sewing Adventures – Cycling Kit bags

Cycling is a serious business around here. I don’t get out near as much as I used to nor indeed want to but The Englishman is out as often as he can.

On weekends they meet early so it’s often a pre dawn wake up call. The night before the bikes are prepped and all the kit is set out. All of which is awesome except for one little or should I say big and fuzzy member of the family.

IMG_7467

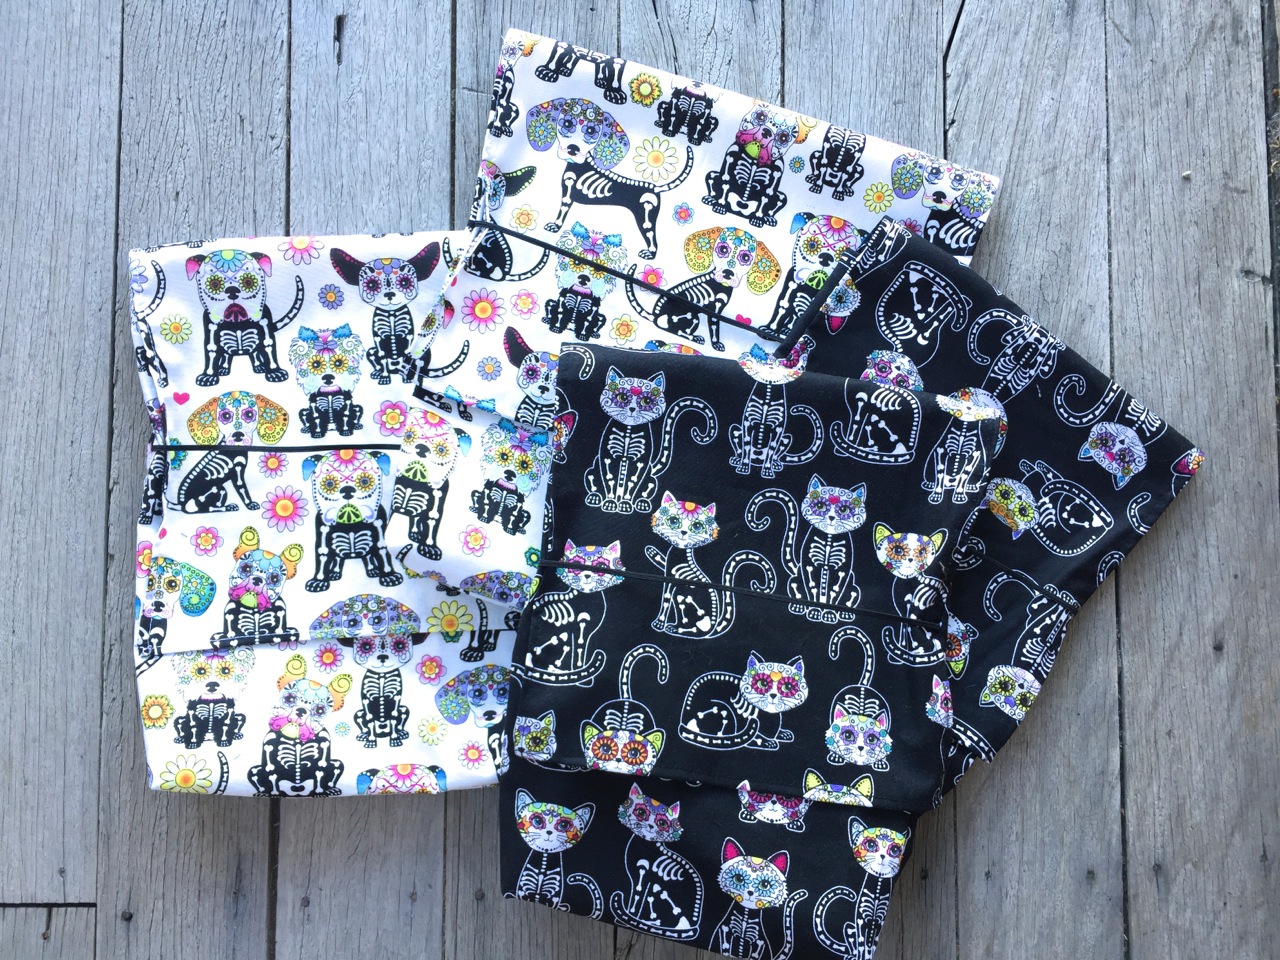
If she decides to be a brat there is always the worry that she will claw the kit or even worse be sick on it (hey, she’s furry she gets hairballs). For his birthday last year I got The Englishman a particularly gorgeous set of kit by chpt3 it came individually packaged in linen bags. Such beautiful presentation and perfect solution for a situation like ours. Fast forward a year and I’ve finally got round to making more cloth bags to house more kit. In contrast to the lovely understated chpt3 ones I went with Day of the Dead inspired cats and dogs.


day of the dead cycling bags - 1

day of the dead cycling bags - 5

IMG_0477

It’s a simple fold over construction and I added a bit of elastic in order to keep the lid closed. I made a pattern out of some A4 paper sheets, cut out the fabric and overlocked it all together then turned under and topstitched around the front flap. Super simple, super speedy.

day of the dead cycling bags - 3

day of the dead cycling bags - 4

Cue one very happy cyclist and one cat plotting revenge.

Fabric: Quilting cotton from Spotlight from the Calavera range (not sure if that is available in other countries or not?).

Trims: narrow black elastic from stash

Pattern: made my own

Alterations for next time: black ones are a little on the snug side, white ones a better size. Make a bigger version for winter kit.

Posted on 6 Comments

Fun with Fashion Illustration

img_0008

Birthday gifts are always fun and sometimes the most surprising gifts keep on giving. My birthday was in July and The Englishman surprised me with an IPadPro and Apple Pencil. I was blown away as I had no idea he was even considering such a gift (for the record his gift giving is always amazing, past gifts include a Cambridge Satchel and Ernest Wright and Sons scissors to name but a few).

img_0017

The IpadPro is different to the regular iPad in that the screen is pressure sensitive. So when you draw using the pencil it feels like actual drawing. I use a wacom tablet for Illustrator work and have tried many other types of digital drawing products but none of them ever felt right. This exceeded all my expectations.

img_0026

In order to practice and play I did a 30 day drawing challenge on Instagram. A new drawing each day. Sometimes focusing on line work, sometimes volume and other times movement or fabric quality.

img_0018

These are the results of my 30 days challenge (in no particular order).

Posted on 2 Comments

Sewing Adventures – Boho Baby Romper

As many of you know I work a few days a week at Pitt Trading. The selection of fabrics and trims there are some of the very best in Australia. To show these off we often make shop samples to show customers new ways of using what the store offers.

I’d seen lots of boho baby inspiration around and wanted to how this new style could easily be attained using some cool trims like pom poms and bodice inserts.

rompertrim

A lightweight 100% cotton poplin was chosen as the base, it’s so pretty yet light and breathe able so great for summer wear. I added some tiny pom pom trim and a crochet motif as well.

rompertrimpattern

Using Simplicity 1594 which I’d used once before,

screen-shot-2016-09-19-at-4-36-59-pm

I made up the romper without any of the ruffles included in the pattern. All construction was fairly straightforward except I added the pom pom trim around the leg opening and omitted the straps.

bohoromper

The end result is super cute and has been a big hit with customers so it’s a great shop sample.

Fabric: Cotton poplin from Pitt Trading

Trims: pom poms (available in more colours and sizes) and crochet motif (just one of many available) all from Pitt Trading

Pattern: Simplicity 1594

Alterations: added pom pom trim to leg and omitted straps


Posted on 6 Comments

Sewing Adventures – floral insertion dress

So I’m a little bit in love with this dress, it’s so cool with all the amazing trim detail.

The fabric is a lightweight cotton Sateen with a small amount of spandex which adds a nice bit of “give” to the fabric.

Inspired by my last dress with insertion trim I wanted to see how I could use it more? Then Pitt Trading got in even more amazing trims and so I got to planning.

image

This wide trim I loved but it felt too wide to use it as is, so I cut it in half.

image

Using the width of the fabric I sewed the trim along creating the hem, then measured up a small section, cut and overlocked the edges, inserted a trim and repeated that all over again for the third row of trim. Super easy.

image

If you do this just be sure to measure where you are in relation to the length of your skirt or your trim may be inadvertently flashing your knickers!

image

The bodice is my own block, I wanted to be able to wear a bra so I slashed the panels to allow for that and inserted the trim.

image

While I really like the fit and flare silhouette I find it can get a little repetitive? Adding a ruffle sleeve seemed like a good idea to break up the “sameness” of the shape and take advantage of how fashion forward I wanted to the dress to look. I added the ruffle, I wasn’t sure so I did an Instagram poll.

image

It was evenly split down the middle on the yes/no count. Right up till the very end I was going to keep the ruffle and then I tried it on and went nope. So off they came.

The back of the dress is finished with an invisible zip, neck and armholes are bound with bias binding. I had the zip in and tried it on again, I decided I wanted to take a little more out of the back neck and increase the sway back adjustment. I unpicked the zip, made the changes and put the zip back in again.

image

All in all a fairly easy make but really taken to the next level with the addition of such fashionable trims.

Here it is in action while working at Pitt Trading. I’ve paired it with my Brightside Shrug from MiY collection by Wendy Ward.

image

Fabric: lightweight cotton sateen from Pitt Trading
Trims: all from Pitt Trading (they come in colours other than black too).

Dress Pattern: My own bodice block and gathered rectangle skirt.

Alterations: look at increasing the sway back adjustment on the block, take 1cm wedge out of each side of CB neckline where zip is inserted.

Posted on 6 Comments

Sewing Adventures – Boro repair

This week has been the pits, I’ve caught a cold from The Englishman and we’ve both been ill since Sunday. The only brightside being at least we are both sick and gross together and it’s not just one of us having to put up with the other being sick.
Naturally all my sewing plans have gone utterly out the window as I’ve been sleeping most days.
Yesterday I wanted to do something so I thought I would tackle a repair job that has been a long time waiting.

image

This is the top half of a Jin-bei set we bought on our last trip to Japan. Made from a yarn dyed Shijira fabric it is lightweight with a slight crinkle to the hand feel. The Englishman loves it as it’s so lightweight perfect for wearing about the house in hot weather.
Sadly the back ripped and it got put aside to be fixed, then adopted by the cat as a sleeping mat and there it has been for way too long.

Using some scrap pieces of Japanese fabrics and a piece of Shibori scrap I had leftover from another project, I cut swatches to cover the holes.

image

Using a crochet thread I started stitching the swatches into place using a Sashiko style stitch.

image

I even did some horizontally just to see how it would look? And naturally the cat needed to come and inspect my work.

image

The finished repair.

image

Now how it looks as part of the overall garment.

image

Am so glad it could be salvaged and I’m slightly hoping it will tear somewhere else so I can add some more Boro repair to it.

Posted on 11 Comments

Sewing Adventures – African Wax Print and Simplicity 8048

IMG_9569

African wax print is not a common sight in Australia. Occasionally you may see someone wearing it but I’d never seen it for sale anywhere. That is until I missed the train at Cabramatta and had 15 minutes to use up before the next train. Rather than wait in the rain, I dashed up the street to the closest fabric stores for a quick look.

IMG_9427

They had some nice pieces but this one caught my eye. I asked the price and was sure she said $14, I was about to say no when I asked again and she said $4. 2.5m later I was running back to the train.
It’s a lightweight cotton lawn so a dense weave but very light. So I don’t think it’s real wax print as my impression is that is a much denser slightly heavier fabric?

The print repeat is huge so I wanted a style that didn’t cut into it too much. Simplicity 8048 was a contender as I really liked the dipped angle of the front skirt.

Screen Shot 2016-08-11 at 2.57.27 pm

The angle is a separate piece that is inserted into a circle skirt. Pinning the panel straight onto the skirt pattern I eliminated the seams and made it one continuous pattern piece across the front.

Once again I used my own bodice block. I raised the neckline slightly to help balance out the oversize print but made no other alterations to the basic bodice. It’s not fitting perfect right now but I think a bit of winter pudginess has crept on and I’m hoping once that drops the fit will be ideal again.

IMG_9487
Once the pattern matching was done (seriously that was the hardest part of the entire make). It went together in no time. Neck and armholes are finished with bias binding.

DSCF8741

DSCF8744
Because I cut the front skirt as one panel the side seam had some crazy grain line action happening. To help compensate for this I let it drop for a few days before hemming. It didn’t move at all which was very encouraging. I had planned to shorted the entire skirt length after letting it drop but I ended up liking the longer length so I kept it. The invisible zip went in with ease once gain.

IMG_9508

I love this dress, the longer length feels swishy and the big bold print is so striking and fun.

Fabric: cotton lawn from Cabramatta. It comes in a cream/blue and khaki/pink combination also in case anyone else likes the print.

Dress Pattern: My own bodice block and skirt from Simplicity 8048

Alterations for next time: look at increasing the sway back adjustment on the block, and take 1cm wedge out of each side of CB neckline where zip is inserted.

Special thanks to my fellow Sydney Spoolettes for helping with the photos. We met up in Hyde Park and helped each other take blog photos.

Posted on 3 Comments

The Jacket project with Brother ScanNCut

Sometimes you see a garment that stops you in your tracks. Just stopped, your breath quickens and it lights a fire of ideas and imagination within you. This photo of a Valentino Pre Fall Jacket did that to me a few months back.

Valentino Pre Fall

I couldn’t stop thinking about it. From the delicate dip dye ombre effect to the embroidered pieces it just made me want to create. I wanted texture and colour. Embellishments and dyeing. In short I wanted it all. I collected ideas and images. I made Pinterest folders and mood boards.

moodboard

I consulted a hand embroidery expert for her ideas on how to best to tackle some of the work and got some great information about thread types and some leads on some gorgeous hand dyed silk threads. Then came the idea of how was I going to cut all the pieces to make the flowers and textures that I wanted? I could do it all by hand but that was time prohibitive.

So while all these ideas and plans were swirling about in my head I was contacted by Brother to see if I’d like to test one of their ScanNCut machines. I’d never heard of them, they have been primarily focused at papercrafts and quilting but once I saw what they could do the possibilities came alive. Here was a machine that could cut precise delicate shapes in minutes and then replicate that over and over. I said yes and they sent a ScanNCut machine over.

Sadly things got incredibly busy and I just didn’t get a chance to get to it as quickly as I wanted. I kept sending the team messages saying every time I gave it a try it was brilliant and it was nothing more than my time pressures which prevented me from singing it’s praises all over town.

So here is how it works. You choose an image from it’s pre stored library or create one of your own.

IMG_9692

You set size and placement.

IMG_9694

IMG_9695

Then push go and it cuts away.

IMG_9697

It is truly magical.

I’ve been busy using the machine to create the exact textures I lusted after that can normally only be created by a Couture house. I seriously cannot explain how fun it is and how many design possibilities it opens up. I’ll be back soon with more details on how I’ve used the Brother ScanNCut to create the outfit of my dreams.

Brother sent me the ScanNCut free of charge to try out, all words and opinions are my own.


Posted on 6 Comments

New Pattern: Active Beanie

Exciting day with a new pattern!

It’s a close fitting beanie perfect for activewear as it is lightweight and small so can be shoved in a pocket or a pack and brought out when needed. It’s even small enough to fit under a bike helmet so those early morning starts are a whole lot warmer.

active beanie 1

active beanie 2

With an interior pocket you can carry your house key or some notes to grab a coffee or go to the supermarket on your way home from your run.

IMG_9635

IMG_9636

Suitable for stretch knits with good stretch recovery. Ideal for knits, jersey, interlocks, ribs and lycra blends. An elastane/lycra/spandex content is highly recommended for a better fit. Merino knits, polyester lycra blends and performance fabrics highly recommended. Cotton and other absorbent fibres not recommended if being used for Activewear purposes.

active beanie 3

This is a one size fits most, the instructions take you through step by step including how to add the internal pocket. A quick simple make it’s perfect for using up scraps and as presents for the active people in your life.

IMG_9638

From now till the 8th of August it’s on sale for $2.50 (plus taxes where applicable) before going up to it’s regular price of $4.00


Posted on Leave a comment

New Bralet workshop dates and other classes

I hope everyone is having a fabulous week? We’ve been indulging a mini break with some time off to enjoy Sydney. So far we have walked through the city, Barrangaroo, Rose and Rushcutters Bay, been to the zoo, I went paddleboarding in a new spot in the harbour and just generally enjoyed having a bit of a relax.

However I interrupt all this relatxation to bring you exciting news of a new bralet workshop date and some details on other places you can find me teaching classes and workshops. IMG_8814

New Bralet workshop will be on the 18th of September. You can find out all the specifics here. I will cover the techniques you need to get started with stretch, lingerie elastic and how to get the best results. The last one was lots of fun with some really beautiful bralets being made and much new found confidence for sewing lingerie.

IMG_8828

If you are a beginner sewer you can now come learn from me at Bobbin and Ink where I will be taking their Clothes Making for Beginners Class. The course schedule is a great way to learn your way around your machine and proceed into making garments. It should be lots of fun and I’m looking forward to working in their great space. (image courtesy of Bobbin and Ink). We are talking about doing more classes and workshops together too covering lots of sewing skills.

Screen Shot 2016-07-21 at 11.18.04 am

If you fancy a whole weekend of sewing you can participate in the Make, Sew & Gather retreat being held in Sydney on the 28th to 30th of October. I’ll be there on the Sunday to take you through an entire day of Lingerie sewing. Lots of classes covering, sewing, knitting and other skills are on offer throughout the event. More details can be found here.

retreat

As always if there is anything in particular you would like to learn you can book a private lesson with me or if you have an idea for a workshop just email me (link in sidebar) and I’ll try and make that happen.

Posted on Leave a comment

Everyone deserves Pretty Lingerie – roundup

What an absolutely wonderful fortnight of all things Lingerie, it’s been fascinating seeing everyone’s makes and my wishlist of styles is getting ever bigger.

The Thrifty Stitcher aka Claire-Louise used lace and trims from our shopping trip in Sydney to create this beautiful black and red number

http://thethriftystitcher.co.uk/wp-content/uploads/2016/06/IMG_5023.jpg

Carolyn made this stunner of a set

petrol blue and pink set

Jodie from Scared Stitchless shared a beautiful satin piece on Instagram, Jodie recently attended one of my bra making workshops so it was great to see new found skills put to use.

Screen Shot 2016-06-14 at 5.09.19 pm

This stunning set from Karen made my jaw drop

Screen Shot 2016-06-14 at 5.12.46 pm

Plus so many more plans, kits, fabrics and patterns were ordered and tested. All in a fabulously inspiring week, be sure to check the hashtag for more #everyonedeservesprettylingerie See you all for the next Everyone deserves Pretty Lingerie week!