Posted on Leave a comment

Sewing Adventures – The Georgiana Knickers

To say that 2017 has started with a heatwave seems to undersell just how hot it has been in Sydney. I don’t mind hot weather as mostly I can escape it by staying in during the hottest parts of the days, going swimming and walking on the shady side of the street. Heat at night is a whole other thing. I honestly don’t think I’ve slept properly in weeks it’s been so hot overnight.


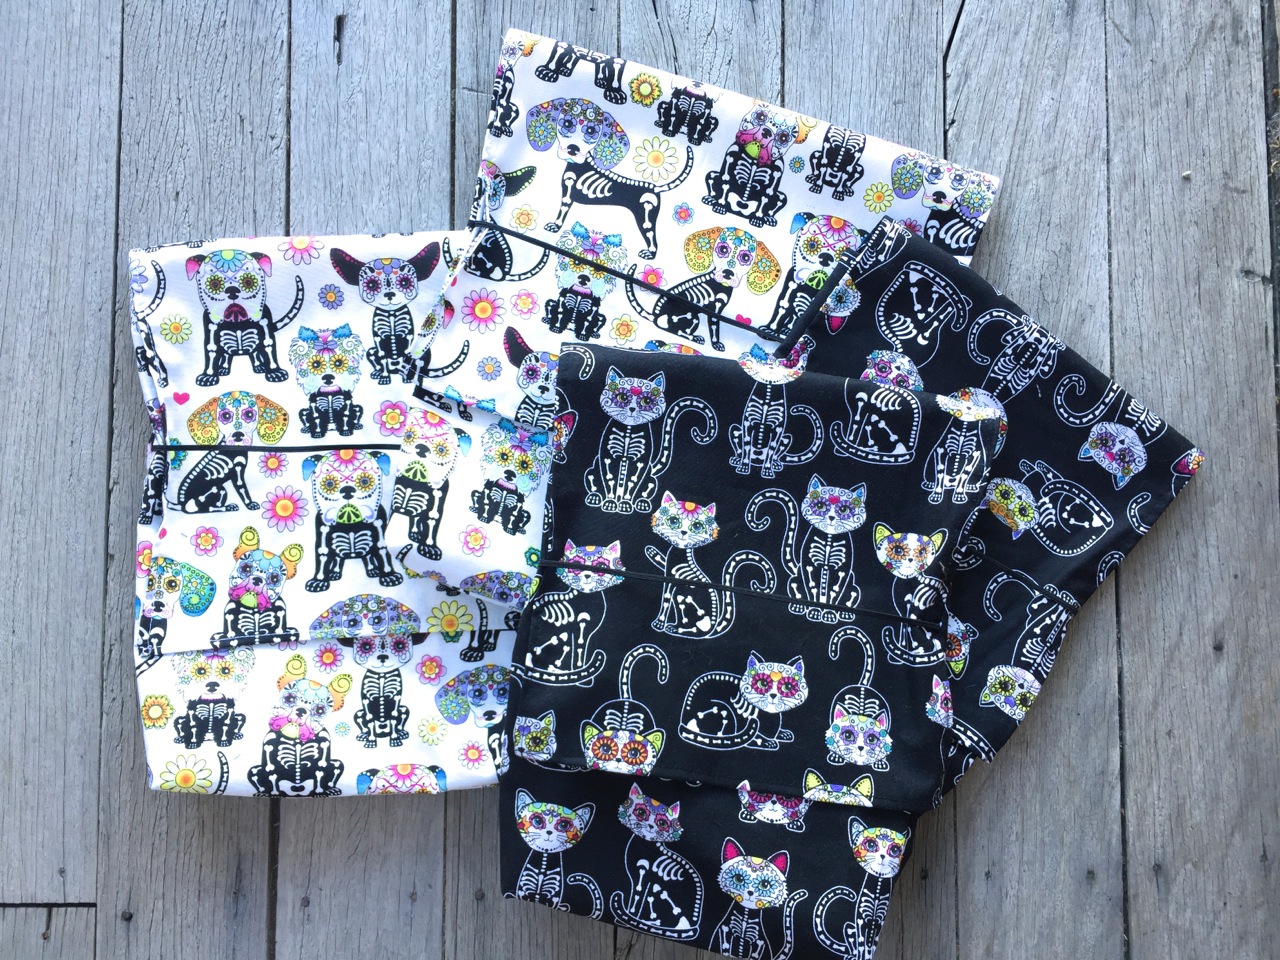
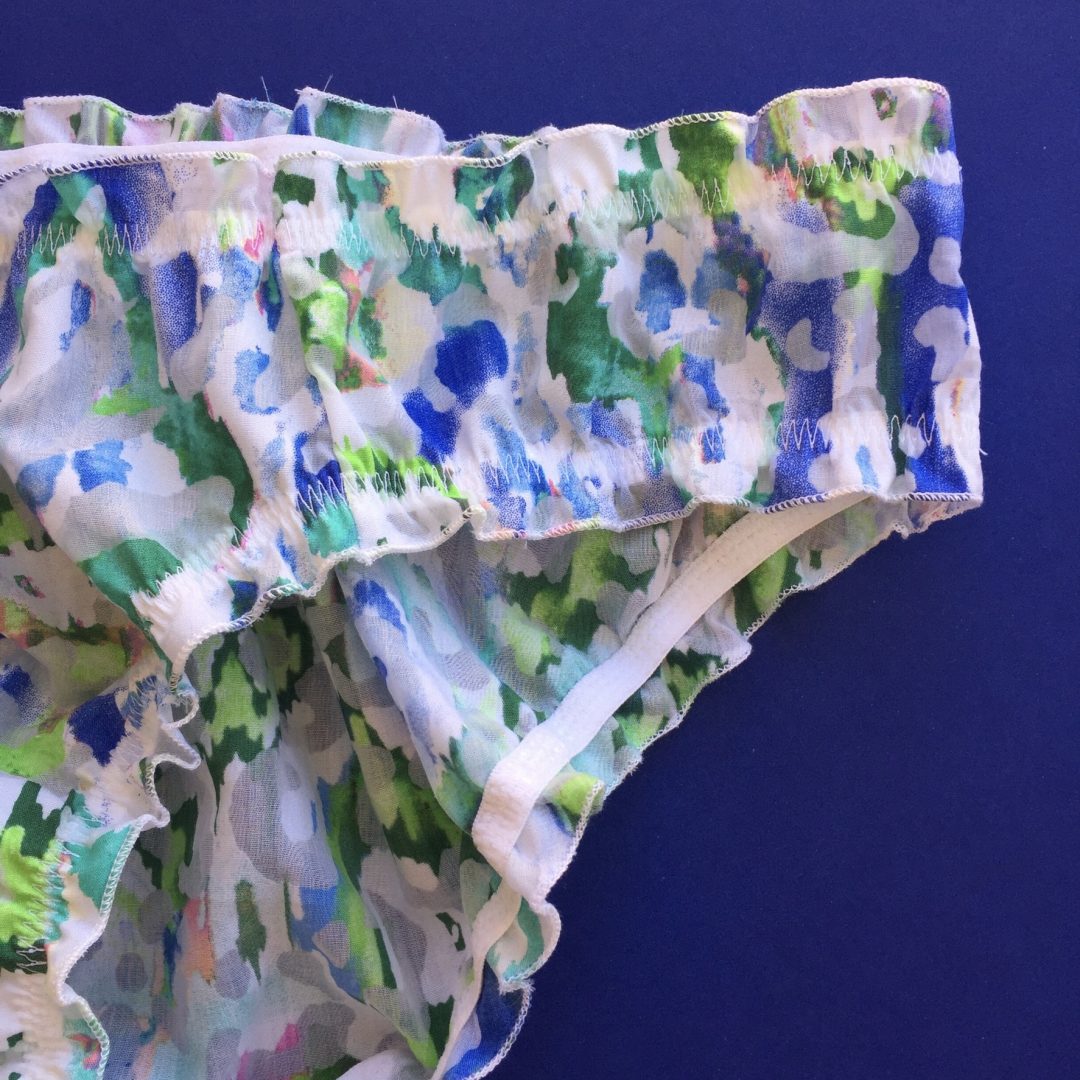
So I’m looking for every ounce of coolness that I can get. With an hour or so spare today I whipped up 2 pairs of woven cotton knickers using my Georgiana knicker pattern. They are quite fast as all the edges are done using the roll hem function on my overlocker. I love the neat finish my Bernina 800DL gives on roll hems.

They are bikini cut so sit on the hip but have plenty of fullness to the bottom ensuring full coverage. The woven cotton however is delightfully breezy and cool and the perfect thing for this hot weather.


The patterned fabric is part of my stash busting efforts for the year as well. I had this top


Cut out for ages and half made. It was one of the free Peppermint magazine patterns. It just looked weird on me and so I never finished it but I loved the fabric.

Laying it flat I placed the Georgiana knicker pattern over it and cut them out. You can just see some extra seams on the front where I had to add side panels to make it work. A great rescue from a piece that had been condemned to the bottom of the stash.


Fabric: spots from the stash, patterned fabric rescued from a top that went badly. Original fabric from Pitt Trading.
Trims: plush back elastic from my stash
Pattern: The Georgiana Knickers available in the shop
Changes: added extra seams to the front of the patterned pair to be able to fit the pattern onto the top.

Posted on 2 Comments

Sewing Adventures – Return of Simplicity 8048

Sometimes you like a dress so much you just have to make another one, so that’s what I did! You may remember the African Wax print fabric I made into Simplicity 8048?

img_0280

Well I love wearing it, the swishy skirt, the flatness around the waistline and the overall fit is super comfortable and flattering to wear. I had been given some fabric for my birthday from the lovely Dale whom I work with at Pitt Trading. We are there on Fridays together and love coming up with plans for all the fabric. She thought this fabric was perfect for me and so gave it to me as a gift. So sweet!

img_0727

It’s a polished cotton but so lightweight that it’s practically a lawn. Seriously it feels like a cloud it’s so fine. I wanted to be able to wear it to work so I added a cotton voile lining to the bodice and a cotton poplin lining to the skirt. The voile keeps the bodice super lightweight while the poplin gives the skirt just a touch more body and weight. Last time I added pockets, this time I omitted them as the fabric is so lightweight I was worried about draglines if I put anything in my pockets.

img_0279

I did a fully bagged out lining so no edges are showing and did a decent (but not brilliant) effort of putting in the invisible zip. I used a zip I had on hand so it’s actually a pale grey colour.

Now I cut this one out without reading my blog notes from before and so didn’t alter the top neckline. It “puffs” ever so slightly above the bust in the strap area. If I stand very straight and pull the bodice down to my waistline it fixes the puffing. My guess it it’s a touch tight over the bust and is pulling up to find the path of least resistance. It’s vaguely annoying but not annoying enough for me to pull apart the dress and remake the bodice. Hopefully a different bra will fix the issue? If not I’ve noted it for next time.

img_1435

Fabric: Polished cotton from Pitt Trading, given as a gift from Dale

Trims: invisible zip from the stash

Pattern: my own bodice plus Simplicity 8048 skirt

Alterations for next time: see if I can sort out that neckline bubbling issue.

Posted on 2 Comments

Sewing Adventures – Papercut Patterns Pneuma Tank

img_0682

Continuing on my journey of making my own activewear, I’ve tackled the Papercut patterns Pneuma tank.

PneumaTankFront_e6f2191f-4d52-41d6-95ee-f8e0ce6a6dc2.png
It’s a different style to what I normally wear for running and I thought it might make a good top for when I’m doing weights? The looseness of the style lending itself to a bit more airflow? Or so the thinking went anyway.

img_0679

img_0680
I followed the instructions in a loose way (interpret that as blundered in got most of the way done and went huh? And had to read the instructions). Constructionally I understand while some things were instructed to be done in that way but honestly am not happy with the finish at the straps on either the front or back? It’s fine it just feels a little clumsy? If I ever make it again I’ll try and figure out how to enclose the straps and make where the overlay is attached less bulky? It just seems to add bulk to the garment in weird spots? Am really hoping it works better while being worn?

front-detail
The underneath layer is made from the same black moisture wicking Lycra I used for my tights, the overlay is a technical pointelle style mesh that I got from The Fabric Store a few years ago.

front
I’ve shown it on my dummy so you can see the straps. I’ve used both wide and narrow strapping elastic just for a bit of variation. I’ll wear a sports bra under it when I wear it, the underneath not being supportive enough for my needs. The dummy is smaller than I am hence why it looks a little baggy.

back

I’ve tried it out while doing an NTC session and some kettlebells. It’s ok, it stays put, doesn’t ride up and you can’t feel it (all real sportswear shouldn’t be able to be felt while working out, if it can be then something is not working). I quite like the way it performs, the way it looks on me is less than flattering. It’s possible using a softer more drapey fabric for the overlay is key to getting it looking less sack like. The bunching near the front straps is particularly unflattering and makes me feel very big while wearing it.

Overall it’s ok but am certainly not in a rush to make more.

This is what happens when someone decides their yoga mat is all theirs…moments after this she tried to get belly pats while I was doing push ups and when that didn’t work attacked my head while I was doing a plank drill.

cat

Fabric: black Lycra from the stash, pink mesh from The Fabric Store (approx 2 years ago).
Trims: from the stash
Pattern: Papercut Patterns Pneuma tank
Alterations: figure out a better way to attach the straps, reduce bulk of overlay at strap joining point.

Posted on 2 Comments

Sewing Adventures – Sophie Hines Euler Bra

fullsizerender3

I saw this pattern on instagram last week and just had to have it. It’s the first pattern from designer Sophie Hines, while this is her first sewing pattern she has been making and selling lingerie for some time and has this laid back sporty luxe style that’s super sexy without the raunch factor. The colour aesthetic Sophie uses is super minimal and really beautiful in these muted type tones.

Image of Euler Bra - Sewing Pattern

I wanted to whip up a quick wearable toile and so decided to make a swimsuit version using these lush lycras from Pitt Trading. So in keeping with my regular style why pick just one print when you can use ALL THE PRINTS.

fullsizerender5

fullsizerender
The pattern offers 2 versions, a single hook/clasp back or a double hook/clasp back. I chose the double as I thought it would be cute?

fullsizerender4

After measuring myself and comparing it to the sizes I cut a size Large. Sizing is done as per garment sizing not cup sizing which I think is fine for soft cup bras.

fullsizerender1
Sewing was fairly straightforward. I used my overlocker for all seams and then straight stitched on the elastic. The instructions are written more than illustrated so have a read through before you get sewing and just refer back to the original garment photos and you will be fine.

fullsizerender2

I used what hardware I had on hand and took the opportunity to try some metal hardware and a plastic O ring too. I wanted to see how they will go in the water so snuck in a mismatched set so I can compare and contrast how they wear.
Everything went together easily and I like the fact it’s all lined as it makes it super smooth on the inside. I can see myself making more of these for sure. Am already thinking a soft bamboo jersey lined one would be great for summer.

Fabric: printed lycras from Pitt Trading, lightweight jersey lining from Pitt Trading

Trims: Elastic and hardware from the stash

Pattern: Sophie Hines Euler Bra

Alterations: none

Posted on Leave a comment

Custom Fashion Illustration Now Available

Ever wanted your outfits and makes made into your very own fashion illustration? well now you can.

An illustration

sewbusylizzy

Based on your photo

lizzyphoto

Available now in the webstore are a variety of options to choose from, starting at just $5.

Huge thanks to Lizzy from SewBusyLizzy, Sophie from Ada Spragg, Amanda from Bimble and Pimble for use of their photos to use as inspiration for the drawings shown.

Posted on 4 Comments

Sewing Adventures – activewear

Lately we have been spending our Sundays out walking.

img_0976

Taking in the amazing city we live in. It’s great exercise and the views are breathtaking.

img_1179

I seriously never thought the day would come where I would sew activewear. It was not on my radar, I was perfectly happy with what I already had in the wardrobe.

Then one day we were getting ready to head out and I realised my run tights were showing more of my bottom than I am comfortable with. They were wearing out and going see through!

In the stash there was some black lycra. Super special stuff that was firm, moisture wicking, anti microbial, anti bacterial and originally designed for high end cycling kit. It would be perfect for tights for walking and running.

To save time and energy I cut an existing pair of tights up, traced them using a tracing wheel and added seam allowance back in. The only change I made was to eliminate the side seam in the upper panel.

I cut the upper in my sports lycra, the back knee from some mesh and the coloured panels are lycra from Pitt Trading.

img_1080

To construct I overlocked all the seams to the outside and then topstitched them down using a zig zag stitch. This was hugely labour intensive but the closest I could come to replicating a flat lock stitch with my own machines. It looks quite slick on the outside and it’s super nice to be seam free on the inside.

img_1079

The only glitch I had in construction was that in eliminating the side seam I made the upper back panel a nightmare to insert. I got there in the end but it was not easy to get it into that shape.

For the waistband I overlocked a piece of elastic to the outside of the garment, flipped it to the inside and topstitched in place.

Hems I did last by turning up and zig zagging.

img_1084

When I tried them on they felt compressive! Very pulled in feeling but not tight feeling, just incredibly firm.

I wore them out on a walk from Taronga Zoo to Balmoral beach. It’s a mix of boardwalk, bush track, sand stone and some stairs.

img_1173

I was a little worried the thicker fabric would feel hot but it didn’t, also had the added benefit of being such high spec fabric that the moisture wicking component is fabulous and you never feel sweaty despite how hard I had to work in some sections (short legs and tall stairs are not easy!). They held up incredibly well and only need a few minor alterations before I make some more.

img_1174

Safe to say I’ve caught the activewear sewing bug.

Fabric: Black sport lycra from my stash. Black mesh and coloured Lycra from Pitt Trading.

Trims: waist elastic from the stash

Pattern: made my own from RTW tights

Alterations for next time: Add side seams to make putting in rear panel easier, add 1cm extra through hip to allow for slightly less compressive feeling. Waistband tended to fold over a bit while walking. Perhaps use a drawstring but it needs a better solution than just the elastic.


Posted on Leave a comment

Sewing Adventures – Cycling Kit bags

Cycling is a serious business around here. I don’t get out near as much as I used to nor indeed want to but The Englishman is out as often as he can.

On weekends they meet early so it’s often a pre dawn wake up call. The night before the bikes are prepped and all the kit is set out. All of which is awesome except for one little or should I say big and fuzzy member of the family.

IMG_7467

If she decides to be a brat there is always the worry that she will claw the kit or even worse be sick on it (hey, she’s furry she gets hairballs). For his birthday last year I got The Englishman a particularly gorgeous set of kit by chpt3 it came individually packaged in linen bags. Such beautiful presentation and perfect solution for a situation like ours. Fast forward a year and I’ve finally got round to making more cloth bags to house more kit. In contrast to the lovely understated chpt3 ones I went with Day of the Dead inspired cats and dogs.


day of the dead cycling bags - 1

day of the dead cycling bags - 5

IMG_0477

It’s a simple fold over construction and I added a bit of elastic in order to keep the lid closed. I made a pattern out of some A4 paper sheets, cut out the fabric and overlocked it all together then turned under and topstitched around the front flap. Super simple, super speedy.

day of the dead cycling bags - 3

day of the dead cycling bags - 4

Cue one very happy cyclist and one cat plotting revenge.

Fabric: Quilting cotton from Spotlight from the Calavera range (not sure if that is available in other countries or not?).

Trims: narrow black elastic from stash

Pattern: made my own

Alterations for next time: black ones are a little on the snug side, white ones a better size. Make a bigger version for winter kit.

Posted on 2 Comments

Sewing Adventures – Boho Baby Romper

As many of you know I work a few days a week at Pitt Trading. The selection of fabrics and trims there are some of the very best in Australia. To show these off we often make shop samples to show customers new ways of using what the store offers.

I’d seen lots of boho baby inspiration around and wanted to how this new style could easily be attained using some cool trims like pom poms and bodice inserts.

rompertrim

A lightweight 100% cotton poplin was chosen as the base, it’s so pretty yet light and breathe able so great for summer wear. I added some tiny pom pom trim and a crochet motif as well.

rompertrimpattern

Using Simplicity 1594 which I’d used once before,

screen-shot-2016-09-19-at-4-36-59-pm

I made up the romper without any of the ruffles included in the pattern. All construction was fairly straightforward except I added the pom pom trim around the leg opening and omitted the straps.

bohoromper

The end result is super cute and has been a big hit with customers so it’s a great shop sample.

Fabric: Cotton poplin from Pitt Trading

Trims: pom poms (available in more colours and sizes) and crochet motif (just one of many available) all from Pitt Trading

Pattern: Simplicity 1594

Alterations: added pom pom trim to leg and omitted straps


Posted on 6 Comments

Sewing Adventures – floral insertion dress

So I’m a little bit in love with this dress, it’s so cool with all the amazing trim detail.

The fabric is a lightweight cotton Sateen with a small amount of spandex which adds a nice bit of “give” to the fabric.

Inspired by my last dress with insertion trim I wanted to see how I could use it more? Then Pitt Trading got in even more amazing trims and so I got to planning.

image

This wide trim I loved but it felt too wide to use it as is, so I cut it in half.

image

Using the width of the fabric I sewed the trim along creating the hem, then measured up a small section, cut and overlocked the edges, inserted a trim and repeated that all over again for the third row of trim. Super easy.

image

If you do this just be sure to measure where you are in relation to the length of your skirt or your trim may be inadvertently flashing your knickers!

image

The bodice is my own block, I wanted to be able to wear a bra so I slashed the panels to allow for that and inserted the trim.

image

While I really like the fit and flare silhouette I find it can get a little repetitive? Adding a ruffle sleeve seemed like a good idea to break up the “sameness” of the shape and take advantage of how fashion forward I wanted to the dress to look. I added the ruffle, I wasn’t sure so I did an Instagram poll.

image

It was evenly split down the middle on the yes/no count. Right up till the very end I was going to keep the ruffle and then I tried it on and went nope. So off they came.

The back of the dress is finished with an invisible zip, neck and armholes are bound with bias binding. I had the zip in and tried it on again, I decided I wanted to take a little more out of the back neck and increase the sway back adjustment. I unpicked the zip, made the changes and put the zip back in again.

image

All in all a fairly easy make but really taken to the next level with the addition of such fashionable trims.

Here it is in action while working at Pitt Trading. I’ve paired it with my Brightside Shrug from MiY collection by Wendy Ward.

image

Fabric: lightweight cotton sateen from Pitt Trading
Trims: all from Pitt Trading (they come in colours other than black too).

Dress Pattern: My own bodice block and gathered rectangle skirt.

Alterations: look at increasing the sway back adjustment on the block, take 1cm wedge out of each side of CB neckline where zip is inserted.

Posted on 6 Comments

Sewing Adventures – Boro repair

This week has been the pits, I’ve caught a cold from The Englishman and we’ve both been ill since Sunday. The only brightside being at least we are both sick and gross together and it’s not just one of us having to put up with the other being sick.
Naturally all my sewing plans have gone utterly out the window as I’ve been sleeping most days.
Yesterday I wanted to do something so I thought I would tackle a repair job that has been a long time waiting.

image

This is the top half of a Jin-bei set we bought on our last trip to Japan. Made from a yarn dyed Shijira fabric it is lightweight with a slight crinkle to the hand feel. The Englishman loves it as it’s so lightweight perfect for wearing about the house in hot weather.
Sadly the back ripped and it got put aside to be fixed, then adopted by the cat as a sleeping mat and there it has been for way too long.

Using some scrap pieces of Japanese fabrics and a piece of Shibori scrap I had leftover from another project, I cut swatches to cover the holes.

image

Using a crochet thread I started stitching the swatches into place using a Sashiko style stitch.

image

I even did some horizontally just to see how it would look? And naturally the cat needed to come and inspect my work.

image

The finished repair.

image

Now how it looks as part of the overall garment.

image

Am so glad it could be salvaged and I’m slightly hoping it will tear somewhere else so I can add some more Boro repair to it.