Posted on Leave a comment

Sewing Adventures: Papercut Patterns Sway dress in Cranes

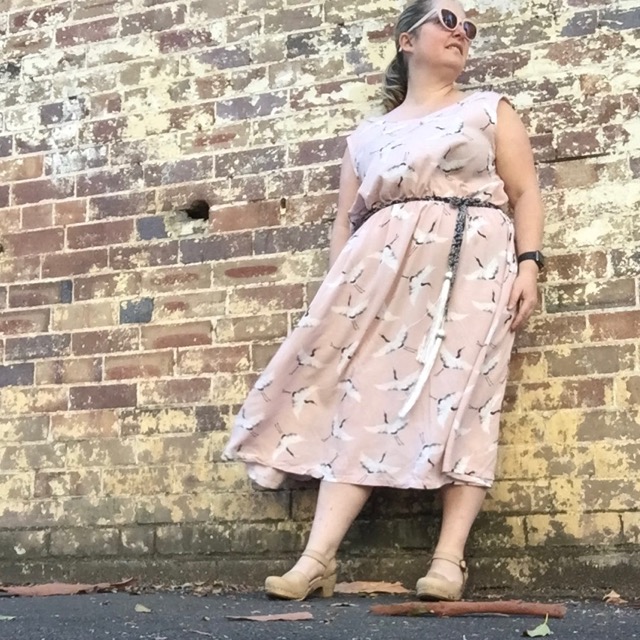
Remember this Crane Fabric? Purchased towards the end of 2017 I had grand plans to make it into a floaty maxi dress, then we had a fire and while the fabric survived it ended up with marks all over it.

With my hopes of a pretty floaty dress dashed I had an instagram poll to see if it should be a dress or a kimono. Overwhelmingly the vote was kimono, so naturally I made a dress.

When I laid it out to cut I realised it was just too marked and if I made a kimono I’d never wear it outside the house. So I thought the better use was a soft flowing style dress I can wear around the house in the hot summer months where no one will care if it’s all marked.

I used the Papercut Patterns sway dress earlier in the year to make a navy rayon dress, which I really like wearing. I feel pulled together but not constricted. I’ve done the same mods here making it longer, but I’ve ditched the facings in favour of bias binding around the neck and armholes and instead of a waist tie I’ve zig zagged lingerie elastic into a low waist to create a blouson effect.

It’s comfy and perfect for hot days and after all those dreams of a floaty maxi dress I’ve come to the conclusion that while I adore the colour and print, it really is too pale for my skin tone. Also as evidenced by my face in this photo, I don’t love it. I feel blobby in it and it adds extra bulk where bulk is not needed. Fine for an around the house dress on hot days but otherwise a bit meh

Pattern: PapercutPatterns Sway Dress

Fabric: Rayon from Spotlight

Changes: added length, didn’t add pockets, no facings used bias binding instead. Didn’t use belt. Added lingerie elastic to low waist.

Posted on Leave a comment

Sewing Adventures – Pink Floral Adrift Dress

You all saw my gorgeous silk version of this a few weeks ago but this cotton lawn version is my very wearable toile.

After measuring up the pattern I decided to go with the longest skirt and ruffle lengths and add a bit of width into the back skirt panel. I also did a super sneaky change and swapped the skirt ruffle to finish on my right hand side and not my left hand side. My right is where my surgery was and I’m lopsided there and the ruffle adds a little bit more visual camo.

For the back skirt I added 4 cm at the fold line (so 8cm in total) and the same amount to the ruffle. It gave me a bit more space over my bottom and ensured the dress wouldn’t be tight as I wanted to maintain the loose silhouette.

I also eliminated the drawstring as I have to be slightly careful around my scar tissue. I sewed lingerie elastic onto the seam allowance of the waist join stretching it as I went to create the gathering. It worked well and provided a nice soft finish.

This dress takes a surprising amount of fabric but comes together so incredibly quickly that I feel like it would be a perfect summer dress and stash buster if you’ve got some lightweight lawns/cottons/silks in your stash that you’d like to actually wear and not just look at.

As this was my toile my neckline is the original neckline. It’s a fraction on the wide side but perfect for summer and who doesn’t love a dress you can pull on straight over your head?

I really like it and I can see it making many a trip to the beach and pool!

Pattern: Adrift dress by Papercut Patterns. Generously provided to Pitt Trading.

Fabric: Printed cotton lawn from the stash originally rom Lincraft.

Alterations: cut longest length skirt and ruffle, added 4cm on the fold to back skirt width and ruffle.

Posted on Leave a comment

Sewing Adventures: Silk Floral Adrift Dress

There are days when working in a fabric store is every part the dream job most sewers envision it to be. When silk like this comes in from a top end designer its one of those days.

When the owners of Pitt Trading decide they want to team up with Papercut Patterns to use their patterns to showcase said amazing silk when then that’s a really good day.

I immediately put my hand up to make up the Adrift dress as I’ve always thought it so pretty and it looks like an easy to wear pattern. I read some reviews online and mostly everything was positive except a few people mentioned it’s a bit on the short side. Being a bit on the short side myself I didn’t think that would be a big problem but as always I started with measuring the pattern to choose my size.

After measuring up the pattern I decided to go with the longest skirt and ruffle lengths and add a bit of width into the back skirt panel. I also did a super sneaky change and swapped the skirt ruffle to finish on my right hand side and not my left hand side. My right is where my surgery was and I’m lopsided there and the ruffle adds a little bit more visual camo.

For the back skirt I added 4 cm at the fold line (so 8cm in total) and the same amount to the ruffle. It gave me a bit more space over my bottom and ensured the dress wouldn’t be tight as I wanted to maintain the loose silhouette.

I also eliminated the drawstring as I have to be slightly careful around my scar area. I sewed lingerie elastic onto the seam allowance of the waist join stretching it as I went to create the gathering. It worked well and provided a nice soft finish.

The final addition was to block the neckline in a little. The original neckline is more boatneck width and that’s fine in a cotton on me but in the silk I wanted it a little closer. Instead of using the facings provided the neckline was finished with a fine satin bias binding.

The silk is a dream to sew, not too shifty took a nice Sharps needle well and even cutting out it didn’t move about so that was good. The print is so beautiful and oversize that I didn’t bother with any pattern matching apart from placing the front bodice panel to get the maximum amount of pink on it.

My new Bernina overlocker does a really nice roll hem so I finished the ruffles on the skirt and sleeves with that. It looks nice and neat and not like it was “just” overlooked. It’s a good way of finishing a hem that may have proven tricky using other methods.

Wearing wise I’m loving the change of silhouette, it’s soft yet feminine, it feels a little short to me but I’m getting used to that and I don’t feel like I’m flashing people or anything like that. Silk is dreamy against the skin (it’s not lined) and I wore it out for my birthday to have a degustation menu and the elastic waist was in it’s element!

Pattern: Adrift dress by Papercut Patterns. Generously provided by them in order to make the samples.

Fabric: Printed silk from Pitt Trading. Generously provided by them in order to make the samples.

Alterations: added 4cm to CB skirt fold, swapped skirt ruffle closure to other side, blocked in neckline, elastic waist

Posted on 2 Comments

Sewing Adventures – Papercut Patterns Sway dress

I had thought I’d set myself an extra challenge this year and make all my patterns myself, so no shop bought patterns no Indies all my own…..then I realised sometimes you just need clothes and you need to get on with things and just to go for it.

Enter the Papercut Patterns Sway dress. This pattern was given to me by a friend after the fire, they thought having a loose swingy dress would be an easy make after all our dramas. They were right it, was a quick make.

I think the longest part was cutting out and making sure the rayon fabric didn’t slip and slide around. I cut on the wooden floor and it was a surprisingly stable rayon which made for a nice change.

I cut the size medium but increased the length as I’m hoping it might be a good trans seasonal piece and I’ve been liking the look of longer dresses lately so I can see how I look and feel wearing one.

Having read reviews of the pattern I should have been more cautious and checked the armholes but I didn’t. They are really big, like show about an inch of the side of my bra big. I don’t care about showing my bra but I do care about ugly armholes and the size of these is not good. Am not going to hassle with this make now but in future would be adding to the armholes to bring them up by at least 4 to 5 cm.

Becasue I wanted to keep the rayon to be nice and flowing I chose to go with the provided facings, despite my hatred of facings. They go in easily and make the insides look clean but this bit here where you can see the facing from the lower v neck is visually repugnant to me. Next time I’ll use bias binding to finish the neck and armholes and avoid this.

The waist ties are not too long, I choose to make my longer so the ends would fall down the dress more. Mostly because my middle section needs a bit of visual camouflage. I added the tassels to the end to stop a fairly plain dress (for me) be not too boring. Because the waist ties are not attached to the dress it means they won’t be going through the wash which is handy as I’m fairly sure those are ceramic beads of some kind?

Pattern: Sway Dress by Papercut Patterns cut in a size Medium

Fabric: Printed rayon from the stash but originally from Pitt Trading, cream tassels purchased from Pitt Trading

Alterations: Added 10cm length to the dress, cut waist tie twice as long, added tassels. Next time use Bias binding instead of facings, add 4 to 5cm height to underarms to bring them up.


Posted on 2 Comments

Sewing Adventures – Papercut Patterns Pneuma Tank

img_0682

Continuing on my journey of making my own activewear, I’ve tackled the Papercut patterns Pneuma tank.

PneumaTankFront_e6f2191f-4d52-41d6-95ee-f8e0ce6a6dc2.png
It’s a different style to what I normally wear for running and I thought it might make a good top for when I’m doing weights? The looseness of the style lending itself to a bit more airflow? Or so the thinking went anyway.

img_0679

img_0680
I followed the instructions in a loose way (interpret that as blundered in got most of the way done and went huh? And had to read the instructions). Constructionally I understand while some things were instructed to be done in that way but honestly am not happy with the finish at the straps on either the front or back? It’s fine it just feels a little clumsy? If I ever make it again I’ll try and figure out how to enclose the straps and make where the overlay is attached less bulky? It just seems to add bulk to the garment in weird spots? Am really hoping it works better while being worn?

front-detail
The underneath layer is made from the same black moisture wicking Lycra I used for my tights, the overlay is a technical pointelle style mesh that I got from The Fabric Store a few years ago.

front
I’ve shown it on my dummy so you can see the straps. I’ve used both wide and narrow strapping elastic just for a bit of variation. I’ll wear a sports bra under it when I wear it, the underneath not being supportive enough for my needs. The dummy is smaller than I am hence why it looks a little baggy.

back

I’ve tried it out while doing an NTC session and some kettlebells. It’s ok, it stays put, doesn’t ride up and you can’t feel it (all real sportswear shouldn’t be able to be felt while working out, if it can be then something is not working). I quite like the way it performs, the way it looks on me is less than flattering. It’s possible using a softer more drapey fabric for the overlay is key to getting it looking less sack like. The bunching near the front straps is particularly unflattering and makes me feel very big while wearing it.

Overall it’s ok but am certainly not in a rush to make more.

This is what happens when someone decides their yoga mat is all theirs…moments after this she tried to get belly pats while I was doing push ups and when that didn’t work attacked my head while I was doing a plank drill.

cat

Fabric: black Lycra from the stash, pink mesh from The Fabric Store (approx 2 years ago).
Trims: from the stash
Pattern: Papercut Patterns Pneuma tank
Alterations: figure out a better way to attach the straps, reduce bulk of overlay at strap joining point.

Posted on 5 Comments

Sewing Adventures – Soma Swimsuit and Bikini

Over this summer I’ve been making plenty of swimsuits. I’ve taken up paddleboarding which I find it wonderfully relaxing and enjoyable. With views like this it would be hard not to. It also means new outfits were needed.

Sydney Harbour

I enjoy making swimmers and it’s so nice to use the gorgeous prints from Pitt Trading.

lycras from Pitt Trading
One of the styles I tried was the Soma pattern from Papercut patterns. I measured myself, I measured the patterns, I went by the guide and I cut myself the one piece.

papercut patterns Soma swimsuit
It’s huge. Like 2 or 3 sizes too big. It uses none of the lycras stretch at all. When I try it on it feels slack and if I added water it would most certainly fall down. The back gapes open as the cross over straps are not tight enough to sit flat. It’s clearly way too big.

IMG_6791

IMG_6792

soma back

Not too discouraged I cut out the bikini. I went down a few sizes and tried them on part way through the process and took them in some more. This worked much better, the stretch of the fabric was now being used and they sat firmly. I’d say I ended up cutting an XS which is a bit shocking as I’m not an extra small size.

soma bikiniThis photos is before I added the straps.

Now for the true test, in the water. The bottoms were quite good. I have a slight issue at the lower leg at the back, the elastic tends to fold back when I walk, swim or paddleboard. Not a huge problem but I like my swimmers to stay in place during activities. The bottoms come up nice and high and give good waist coverage.

DCIM119GOPRO
This is a GoPro photo from when I’m out paddleboarding. I like the fish eye effect but it makes for terrible selfies, hence the no photos of me in the bikini shots.

The top was ok, if I make it again I’d potentially do a Full Bust adjustment as I felt less than secure and covered while swimming and moving around. Not badly but just felt like I wanted to keep hiking the top up as I didn’t feel support/covered enough?
Overall the patterns went together well and the instructions were clear. However the sizing doesn’t seem to take into account the stretch of the fabric adequately? I’d certainly recommend trying on your swimwear mid way through your sewing process and adjust as necessary.

The fold over elastic for the one piece makes getting a neat edge super easy and is a great technique.

soma swimsuit foldover edge

Fabric: Lycra from Pitt Trading

Pattern: Papercut Patterns Soma swimsuit as one piece and bikini.

Alterations:  One Piece – size down a few sizes, fill in back panel and not have the thin cross over straps. More support there would be helpful in not having the swimsuit move around so much during activities.

Bikini – full bust adjustment on top and potentially add to the cups to give more of a full coverage? Reshape lower back leg so it doesn’t fold over.