Posted on 12 Comments

Sewing Adventures – Japanese top and Tsurah Designs skirt

gtop_header-4

This past weekend there was a Sydney Spoolettes meet up with everyone invited to come to Pitt Trading for some Spring Fabric Shopping and indulge in some Cupcake Dolly cakes (just up the street from Pitt Trading).

square top - 2

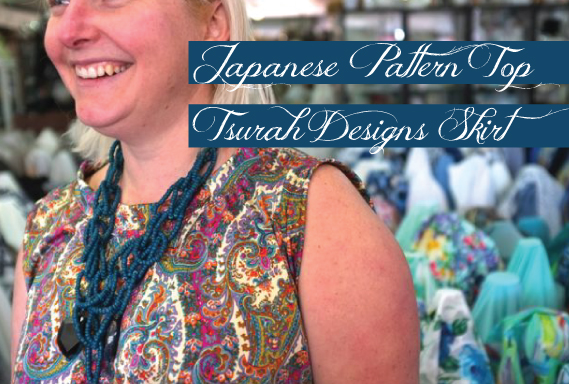
I work Saturdays at Pitt Trading so it was fun to see the Spoolettes on work time and I grabbed the opportunity to get some photos taken of my new work top while at work. Huge thank you for Maria for taking the photos for me.

This is Top G from the Japanese pattern book Kristy nicknamed rectangles and circles with head holes.

41o0APylYHL._SX370_BO1,204,203,200_

This is one of the first times I’ve had problems understanding a Japanese pattern. Mostly because there was no way my neck or arms were ever going to work with the tiny pieces allowed for the neck and arm bands. So I calculated out my own bands and used them instead. I also cut the front neckline down a little lower as I don’t like things pressing against the bottom of my neck it makes me feel gaggy. I also twin needled down the neck and armbands. Fist Pump for twin needle stitching like an absolute dream and making the finish look so pro. I love my twin needle.

square top - 5

My fabric is a poly/lycra I bought from Pitt Trading. I like to wear their fabrics when I work there as I find it can be a good icebreaker with customers to talk about the fabrics and sometimes you see a fabric made up and it sparks a whole bunch of ideas you may not have thought about earlier? This is the same quality I’ve used for the Burda Swimsuit and the Nookie Bikini. It’s soft handfeel yet super stable to sew with and has a lovely drape. It really does work for so many patterns and styles.

square top - 1Talking always talking..

square top - 4

Overall I like the top it feels lovely and swishy on and is a great loose fit through the torso which I so like to wear as it’s so comfortable. Some people find the boxiness of some of the Japanese styles a bit overwhelming. I like the odd shapes as it gives me a chance to experiment with drape and proportion. At times like now when I’m feeling less than svelte I find it nice to still be able to wear an interesting piece that isn’t super fitted or super clingy. It gives me a chance to approach dressing on a different level than just trying to cover up what isn’t currently working for me.

square top - 3

The skirt I’m wearing is the Tsurah Designs straight skirt, which I pretty much live in at work (I now have 4 of them, you can see another one here) for me it’s the perfect ponte skirt. It takes about 30 minutes from cutting to hemming and BAM! new skirt. Love it.

Top Pattern: View G from rectangles and circles with head holes.

Alterations: dropped front neck, increased length of neck and arm bands, bands were attached and then twin needled down. Also no hem, the lycra doesn’t fray so I just cut super straight and left it raw.

Fabric: Printed Polyester/lycra purchased at Pitt Trading.

Skirt Pattern: Tsurah Designs straight skirt, made many times before.

Alterations: Shortened skirt to suit my height.

Fabric: Grey Marle Ponte purchased at Cabramatta.

Posted on 2 Comments

Sewing Adventures: Nookie bikini


nookie_bikini_header

When you wake up to a cold, grey and wet day with a to do list that is a mile long, well naturally you shove all that aside and make a swimsuit sample don’t you?

Nookie bikini - 09

Years ago one of the very first issues of Frankie magazine came with a free swimsuit pattern. This pattern has been languishing in my stash since then.

Nookie bikini - 01

The pattern was based on a bikini by Nookie an Australian based swimsuit brand. The construction is remarkably straight forward. Cut out matching panels, stretch stitch them together and turn them out to create a reversible bikini.

Nookie bikini - 07

Nookie bikini - 12Made with more of the lush lycra from Pitt Trading I opted for a pink bandana style print on one side and a tropical floral for the other side. I’d actually be super tempted to make either of these into a one piece as well because I like the prints so much.

The top worked really well and fits me fairly well (though I was way too cold to photograph myself in it. Later in the summer will be sure to get some poolside pics).

Nookie bikini - 10Nookie bikini - 02 The bow in the centre is slightly smaller on me and I didn’t gather the sides as much to give myself a bit more coverage. But it’s as good as any ready to wear bikini I already own.

The pants are ok. A little lower at the front than I would prefer.

Nookie bikini - 11Nookie bikini - 03Nookie bikini - 14Nookie bikini - 05

They are held up with the side bows as there is no elastic in the waist.

Nookie bikini - 04

This feels a little flimsy. Possibly ok if you were just dunking yourself under water and then sitting on the beach but if you actually wanted to swim or dive or move around then there could be some problems? I’m also not keen on the roll top look you get with reversible bottoms.

Nookie bikini - 06

It just seems really sloppy and like bad DIY. Certainly not a finish I would aspire to. I might see how unpicking the top and inserting some clear elastic into the seam goes?

Pattern: Nookie bikini free from Frankie magazine

Alterations: didn’t make self fabric straps but used a matte elastic instead.

Fabric: Printed polyester Lycra provided by Pitt Trading Thanks for letting me have some of your lovely fabric to play with. It’s so soft and lush feeling but goes through the machine like a super stable knit.

Am really enjoying making swimsuits, will have to find some more patterns to try out!


Posted on 3 Comments

Sewing Adventures – Alison Swimsuit

burdaswimmers_header

Wow just wow, I almost don’t have words for how bad the instructions and pattern for these BurdaStyle Alison swimmers are. I expect Burda instructions to be brief and I’m fine with that as I rarely read pattern instructions to begin with. But when the pattern pieces themselves are mislabeled, missing information, have spelling mistakes and in some cases have no label at all. Well I was skeptical.

That skepticism was warranted. So I threw out the instructions, labelled the pattern pieces correctly and got cutting. These swimmers are going to be an instore sample for Pitt Trading. I work there a few days a week and they just took delivery of the most amazing collection of designer lycra.

front view

This floral is beautiful, has a beautiful thick handfeel but with good drape and stretch. The print is on the oversize side so grab a little extra to ensure you can centre your print for maximum impact. I matched it with a contrast colour to emphasise the bust gathers and wide straps.

front gathers

My lovely model here is a few sizes smaller than what I made so she isn’t filling out the bust or bottom quite right. I’m not happy at all with the wide band at the lower back gaping. I think I perhaps I need to stretch it some more or possibly it flattens out on someone with more curves?

back view

back gape

The way I’ve added the band to the swimsuit and then up into the neck ties is not great. It looks clean but it just felt overly complex to sew. It’s one of the areas I’ll take a look at to improve construction of the next time.

side gathersI overlocked the leg opening with elastic then turned it under and added a 3 step zig zag topstitch. It was so neat and easy that I’m using it as my go to swimwear finish.

leg finishing

Despite the pattern dramas I think it’s a really cute swimsuit. I’m hoping I get some time to write down my method of assembly so I can remember what I did when I make another pair.

Posted on 2 Comments

Everyone Deserves Pretty Knickers week – round up

2015-knickersweek_header

So Everyone Deserves Pretty Knickers week has been and gone and I didn’t get to even a fraction of the things I had planned. Life stuff got in the way and ever since I’ve been so busy I haven’t had a chance to get back to the blog.

Thanks so much to everyone who joined in, I sincerely hope you’ve added a few more pretty knickers to your lingerie drawer.

Despite all the life dramas of the week I did manage to squeeze in a tiny amount of sewing time and got 3 new pairs finished. These were all part of my stash busting efforts so I was using fabrics and trims I had on hand.

apple knickers

fluro knickers

stripe knickers

Next year I’ll be looking forward to lots of fun stuff when we have our next Everyone Deserves Pretty Knickers Week!

Posted on 12 Comments

2nd Annual Everyone Deserves Pretty Knickers Week

2015-knickersweek_header

The first Everyone Deserves Pretty Knickers week was a resounding success and so we are having a 2nd one! Running from May 31st through to the 6th of June. So grab a badge and be ready to make yourself some pretty knickers because #everyonedeservesprettyknickers

During the week long event I’ll be showcasing a number of tutorials on the blog so you can add some variations to your patterns and never have to spend money on designer lingerie again because you can make your own.

2015-knickers-website-button

<img src=”http://www.measuretwicecutonce.com.au/wp-content/uploads/2015/05/2015-knickers-website-button-190.jpg”/>

Posted on 10 Comments

Sewing Adventures: Traffic Cone Top and Tsurah Designs Straight Skirt Purple edition

trafficconetop_header

I made a traffic cone! or at least a top that makes a pretty good impersonation of one.

front

The top is Sleeveless Flare Blouse (view O) from I Love Tops (Japanese pattern book by Yuko Takada) and made without any modifications with the exception of eliminating the back neck slit (the scuba has a slight stretch so I didn’t need the slit to get it on over my head. Yoke fabric is a laser cut Scuba Knit and lower is a cotton burnout and lined with cotton voile. Only the lower portion is lined, the scuba knit is unlined and features raw cut edges on neck and armhole.

The sizing is great around the neckline and armholes and I’m hoping the fabrics all soften down after a few washes as it’s currently very voluminous feeling and looking.

side

It’s kind of big and I’m still not sure if it’s in the kind of big this is awesome type way or in the wow this top gets in the way it’s got so much fabric type of way?

back

So far we’ve decided it would be a good traffic cone, smuggling space to carry the cat on cold days so she could act like a hot water bottle or perfect should I ever want to eat my bodyweight in Mexican food and still be comfy.

Only time will tell if it becomes a favourite or a dud, the skirt however is already a firm favourite and possibly one of my go to TNT or Tried N True patterns.

front full

I’ve made the Tsurah Designs straight skirt a few times all of which are currently not yet blogged, so while this is only the 2nd one I made in terms of timeline it’s the first up in the blogging queue.

When cutting I added the smallest extra bit extra over the hips as I felt my first one was a little too tight over my bottom and had the tendency to work it’s way up my body. I also cut the foldover waistband down in size as in the heat of summer I found the extra height or weight a bit hot.

While I love the colour of this skirt I don’t think I should’ve added the extra over the hips as this is a much softer double knit. Am leaving it as is for the moment but am interested to see how it goes after a few wears. I might take it in a fraction if it does stretch out. Good news is it hasn’t stretched out but I have lost a fraction of weight and now it’s a tad too big. So I may well run it back in over the hip only.

Top Pattern: Sleeveless Flare Blouse (view O) from I Love Tops.

Alterations: eliminated back neck slit

Fabric: Laser cut scuba, burn out cotton both purchased at Pitt Trading.

Skirt Pattern: Tsurah Designs straight skirt, made once before.

Alterations: Shortened skirt, added width over hips, made waistband half the height of the pattern.

Fabric: Purple Double Knit purchased at Pitt Trading.


Posted on 16 Comments

Sewing Adventures: Patchwork Malvarosa

patchworkmalvarosa_header

Sometimes you have an idea and you know it’s either going to be brilliant or an epic fail. This is one of those times.

I picked up this fabric at a Garage sale, along with a bunch of other, I really liked this piece but it just wasn’t big enough to make a dress. So taking this Gorman skirt as inspiration, I thought I’d try an experiment?

Gorman patchwork skirt

I used the Pauline Alice Malvarosa dress. Cutting the floral on the top and the band for the skirt. Using the scraps of the floral, some blue and black from the stash to create the other panels.

patchwork_Malvarosa_front

The panels were calculated out by dividing the rectangle that creates the skirt up and cutting the number of triangles needed. I didn’t quite have enough of the floral so there is an uneven pattern happening but I don’t think it matters that much.
Attaching it all together using my overlocker, I used  bias binding for the neck and armholes.

patchwork_Malvarosa_back

So after all that maths and cutting and drawing the dress is well, ugly. It’s really a bit weird and not in the good quirky sense. Oh well you live and learn and it’s only fabric.

Pattern: Pauline Alice Malvarosa, made before.

Alterations: Eliminated pockets, eliminated facings, added centre back seam, turned skirt into patchwork panels.

Fabric: Garage sale purchase and from the stash.

Posted on 5 Comments

Bra making – how to DIY your own pattern part 4

diy_bra_header-4

I’ve had my pattern and supplies ready to go for weeks and have been so busy it’s had to just sit there taunting me to hurry up and make it. So today I set aside some time to sew up my bra.
Before I got started I

  • made sure I had all my pattern pieces
  • got out all my supplies
  • looked at the photos I took before unpicking my bra
  • looked at another bra that is virtually identical to the one I unpicked
  • placed a notebook and a pen by my machine

Then I started cutting and assembling the bra. Along the way I made sure to note when seams didn’t quite match up. Seam allowance sizes and could I make adjustments. I took copious amounts of notes on how I sewed it together and what I needed to change.

All this note taking and referencing is really important if you want to make multiple bras and it helps when it comes to fitting. If you’ve adjusted a seam allowance and then it’s tight you can figure out where the issue occurred.

Overall I felt I was going really well. Then my machine which is normally an absolute angel decided it was not going to sew any mesh fabric without skipping all over the place. Cue 4 hours of me cleaning and testing the machine over and over to try and get a decent result. Nope it looks like a dogs breakfast. It’s quite possibly the worst stitching I have ever done (and now there are photos of it on the internet).

half done bra

A half done bra, only the right side (when wearing) of the bra has an underwire in it, no straps, no closures but plenty of dodgy stitching. Want a close up of the stitching? Sure why not?

bad stitching

So very very bad. It’s skipping, puckering and just horrible.

underwire v non wire

On this style the shape of the cup looks very very odd until the underwire casing and then the underwire is inserted. It then magically pops up to the correct shape. It really shows just how much of the shape of a bra is down to every individual component working together.

inside cup with underwire

The inside of the cup with the underwire. Next time I’m going to cover the inside of the foam. It’s nice and soft as is I just think the extra finishing detail might be nice?

inside cup without underwire

Here you can see the odd shape the cup is before the casing and underwire is put into place. It’s also pretty cool in that the casing actually hides all those raw edges. Over in the side of the photo you can see where I need to adjust the pattern as it was too wide on the back mesh. Looking back on my notes I had added a double lot of seam allowance by accident. It really is so handy to take notes when you are attempting a DIY of this sort.

trim

On the outside I used a floral bias binding to cover a dart on the cup and across the tops of each cup. On the original bra instead of bias it was lace. I did try a lace but felt that it got lost on the floral so tried the bias and I really like the look of it. Would love to try it with a high contrast like navy blue satin bias on a cream satin base.

For this stage it’s going well. The only thing holding me back is not wanting to utterly break my machine when it’s clearly having problems. The one big fit problem with bras is that you have to finish one to try it on and see if it fits. Obviously this isn’t at that stage yet but I already have a list of things to improve the construction and look of future bras

  • cover internal of cups
  • use of alternative trims like Bias works
  • back mesh panels need to be adjusted to correct height
  • foam cup panels are slightly too large for fabric pattern size. Re check measurements and adjust
  • add more notches to help line things up more accuraetly
  • regular woven cotton works well as a foam cup covering with no wrinkles or tension

For me this sample looks pretty but has bad stitching. It is just a toile and I’m going to have to make some dodgy ones in order to get the pattern perfect and I’m not defeated yet.

So if you are working away on your own DIY bra pattern, keep at it. Take your notes and keep trying.

Posted on 20 Comments

A day with Simplicty by Brother and Spotlight

simplicitybybrother_header

I’m endlessly fascinated with how stuff gets made, clothes, food, cars, electronics. Those educational type programs on factories are brilliant. I just like seeing the process of how things come into being. So a few weeks ago when I was asked to attend the launch of some new sewing machines I thought it would be a great insight into learning about how the machines came about.

The event was to launch the new collaboration between Brother and Simplicity. Three new machines are going to be co branded and exclusive to Spotlight. Christy has done a fabulous wrap up of the actual machines at Little Betty Sews. They will be called Simplicity by Brother and each machine is aimed at beginner, intermediate or advanced sewers, come with a Simplicity pattern that matches the skill set of each machine.

simplicity by brother sl500

Essentially it’s a good, better, best type program which I’ve dealt with all the time in clothing. It’s all about hitting the correct price points and features to match the price points. Every retailer from supermarkets to hardware has a version of it. Homebrand, known brand, designer brand is what it equates to. In this case it means that the “good” machine is to entice newcomers to sewing. That can only be a good thing, I like that more and more people are learning to sew. What impressed me is that it wasn’t all about the beginner. They have thought about the natural progression of sewing and that there are more than just beginners out that. That showed some smarts as too often things only get aimed at beginners.

button hole demonstration

Overall the entire project has taken over 3 years to come to market. That seems like such a long time to be working on the one project! I was sitting in the audience mentally calculating how many ranges I would’ve designed or worked on during those 3 years. Even for companies where I only design 2 ranges a year that was still 6 seasons ago, that seems forever in my experience. It was insights like that which can make a launch day like this one so interesting. It’s all about learning new things.

launch team

The team from Spotlight were there and they were super knowledgeable not only about their products, but also about different bloggers and what plans they had for the stores. They certainly have some exciting fabrics on the way and I’m so glad. I grew up in a country town where for years Spotlight was the only fabric choice. Sometimes it felt limiting but with a bit of digging around you could turn up some gems.

These days I like plenty of their lines, a notable highlight being the Japanese Lawn which I’ve used here, here, here, here, here, here and a bunch of not yet blogged makes. I genuinely like the fabric and find it a great wash and wear basic that suits my lifestyle. In fact I was wearing this dress on the day, it’s my current favourite dress for when I need to look semi dressed up but not too dressed up and for when I don’t want something that will distract me. It was a little weird to have people patting my fabric and talking about how well it sold and citing facts and figures on it. My dress also received one of the oddest compliments. I was told “but it looks as good as store bought and no one would know you made it”. Such a weird compliment to say at a launch of sewing machines? What exactly did they think a sewn dress would look like?

Simplicity by Brother me

If you took a selfie with a sewing machine you went into a competition to win one, this one has 5 kinds of buttonholes so I grabbed a photo on the off chance I may win.

I had a great time hanging out with Christy who was a bit nervous to begin with and was quite the celebrity as so many people recognised her from her excellent blog. The team from Spotlight are certainly reading blogs and seeing what people have to say about their stores/fabric lines and taking it on board. They rattled off a bunch of facts and figures around their customers and honestly I had no idea they were such a powerhouse. There wouldn’t be many bigger brands in retail in Australia that have a following that large.

Overall I found it a really interesting day. I hesitated to write this as a post because I didn’t want it to seem like an advertisement but I also wanted to offer insight into what is happening in the sewing industry and how that translates to my own experiences. It was an interesting day and I hope the whole promotion works to bring more people to the joy that is sewing.

Posted on 16 Comments

Shibori Workshop Wrap Up

shibori_header

Shibori has long fascinated me and now I think I’m even more enthralled after a thoroughly wonderful day learning about it.

Who knew from a vat of gunky black looking sludge that frankly smelt a little gross.

Shibori_workshop - 27

This could happen.

Shibori_workshop - 26

and this

Shibori_workshop - 20and so many more shades and patterns of wonderful inky hues.

Pepa and Karen from Shibori were great in breaking down the system. How to pleat and bind and most importantly how to embrace the unpredictability, that the most beautiful results often came when least expected.

It was so fun and just what I was hoping for. I wanted a day where I could learn the techniques, experiment, end  up with some useable fabric pieces and then go away with a head exploding with ideas of what to do next. It truly was inspiring.

Being able to share all that with the Sydney Spoolettes was a blast. As a group we are brought together by our love of sewing but even in the few short months we have been a group real friendships have formed and the camaraderie is empowering as we all make our way in the world.

For anyone considering doing the workshop I saw GO FOR IT! you will not regret it. My top tips would be

– take extra fabric of varying lengths, widths and textures

– pre wash all your fabric

– pre iron all of your fabric

– have an idea of what you want to achieve, the enthusiasm is infectious and a little overwhelming. Being able to keep yourself on track will mean you get out what you want from it

– embrace the unpredictable and go outside your own boundries

For more images you can pop over to my flickr page (I’ve been trying all afternoon to get my flickr to work, it won’t, so I added the photos here as a gallery instead), Maria from Veloswer has some stunning images on her flickr and I am sure there will be more images coming up soon.

I have quite a bit of fabric that I dyed during class, am sifting through it all and planning what to make so expect more Shibori goodness soon.
Lastly thank you to the Spoolettes who attended it was wonderful to see you all, huge welcome to the newcomers too. Thanks to Mel for organising lunch at the pub and huge huge thank you to Pepa and Karen for sharing your knowledge with us.