Posted on Leave a comment

Sewing Adventures – Outback Wife barkcloth dress

I had seen the Outback Wife barkcloth fabric on Instagram and it was so beautiful but the original price was a little out of my budget so I kind of forgot about it and moved on to other projects. When a Melbourne store was advertising they had the whole collection for $9 a metre my recollection came hurtling back and I was on the phone the first thing next morning.

There had been a merino wool version that I was really wanting but it had already sold out. In the end I said the wonderful sales girl over the phone give me 2 metres of whatever you have left in pinks or purples. She asked if I wanted photos and I said no let’s just go for it.
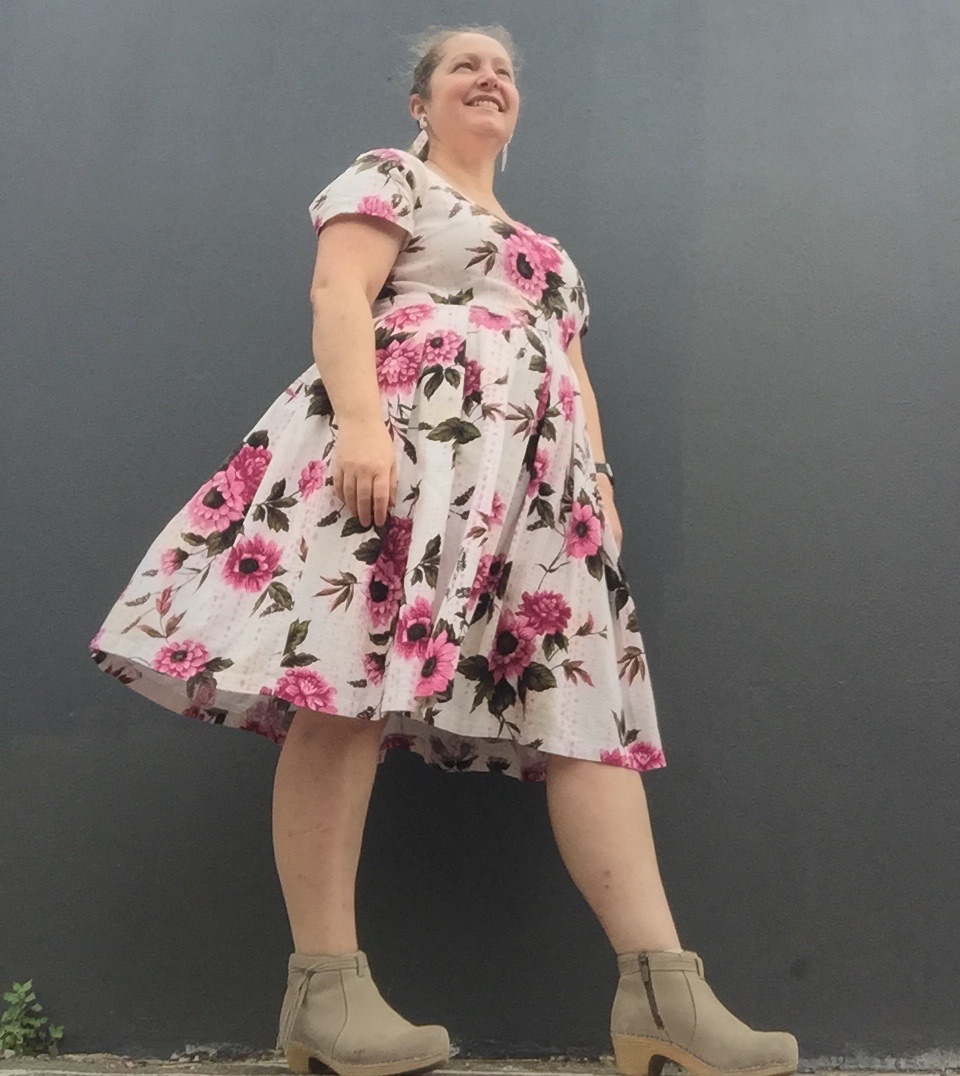
When my parcel arrived I got this white with big pink flowers and a lovely lilac based floral too. They were perfect. Now I just had to figure out the perfect dress.
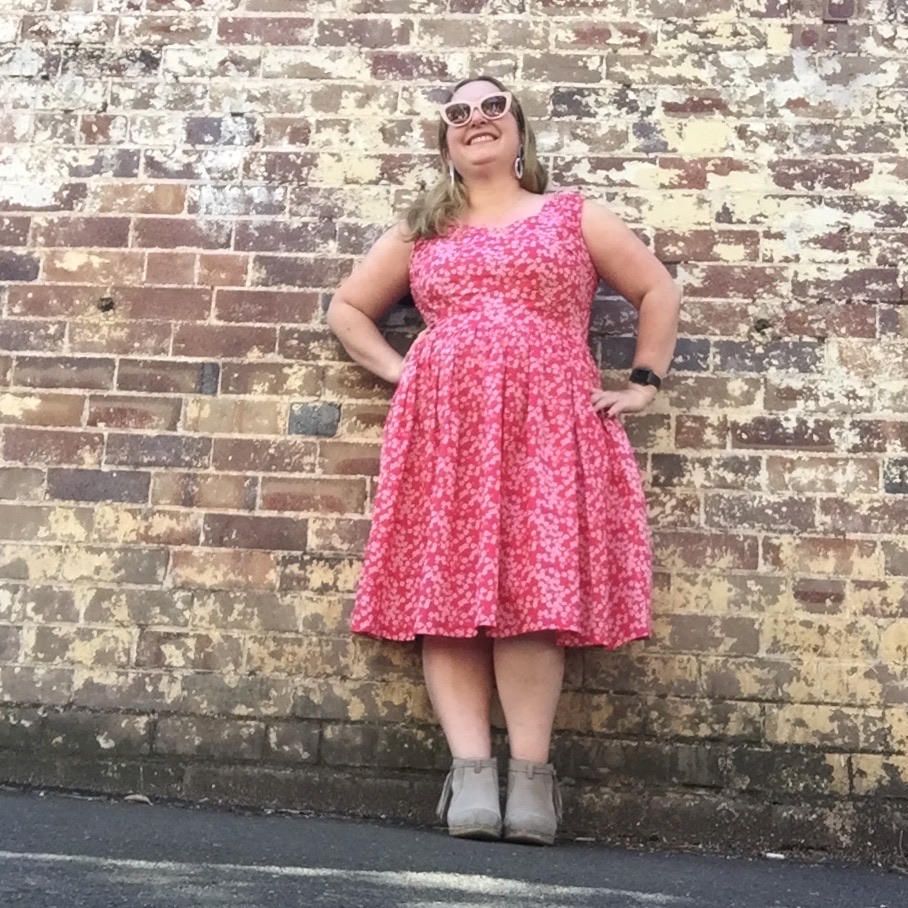
I knew I didn’t want to do gathers as the fabric is too stiff but big pleats were definitely a contender. After much deliberation I did something I tell people not to do. I pinned the Deer and Doe Myosotis pattern to my own bodice block pattern, then placed that on to the fabric. Using parts from one pattern and parts from the other I ended up with a round neck bodice with short sleeves.
For the skirt I wanted maximum amount of useage so I cut the length I wear across the width of the fabric twice. Then pleated them up to fit the bodice. I didn’t really even measure them just went in by eye and adjust as needed. The centre front is an inverted box pleat and then all the other pleats are just knife pleats. This allows for good amount of swish while still sitting relatively flat around the waist. With a fabric this stiff you were always going to get some bulk. Plus the skirt has pockets!
The bodice has underbust and side bust darts but no back darts (I find for myself I don’t need them enough to be bothered about them).
Despite my rather haphazard approach to the pattern it does work. The bodice fits with being too tight, there is room in the waist seam for it to move freely without pulling, the pleats mostly disguise my lopsided torso (the weight of the fabric helps with this too) and the little sleeves are cute.
Now for the parts that don’t work as well. The neckline is a fraction too wide and I do have to be careful about what bra I wear or you can see the straps. Ideally I’d like to block it in by about 1 to 1.5cm at the shoulder seam then sort out the neckline shape a little more.
The neckline ripples above the bust when I move about. Yes a certain amount of rippling occurs in order to be able to you know breathe and move but this is just a little over that. A small pinch dart on either side of the neckline would ensure it would sit that little bit flatter. Similarly with the back neck I could take a small amount out of the centre back where the invisible zip is.
They aren’t big changes but sometimes it irks me that I know exactly what needs to be done in order to get a really good fit. The other side to that is the whole thing took me about 2 hours to make and I’ve had a tonne of wear out of it. It hangs nicely and looks good so it is my go to dress for teaching in as I just don’t have to worry about it. I just get dressed and go. It’s comfortable as long as I remember not to wear it on really really hot days when I feel the heaviness of the fabric a bit. Plus I get a tonne of compliments while wearing it, which honestly it never gets old hearing someone say lovely things about a dress you’ve made.
The good outweighs the bad and I would always rather have something finished than a UFO that never got around to be finished for fear of it not being perfect.
Also it should be said that laying one pattern on top of another and borrowing from both is NOT an ideal way to do things, so if you are going to follow my lead expect there to be some issues and maybe try it on a fabric that isn’t precious first?
Pattern: blend of my bodice with Deer and Doe Myosotis with full width pleated for skirt
Fabric: Outback Wife barkcloth from a Melbourne store originally with a short stay in the stash
Alterations: sort out neckline/shoulder area to cover bra and not have neckline gale so much while moving
Posted on 1 Comment

Sewing Adventures – Noren

Ever make anything that in reality seems so very simple but then when you use it becomes this really big difference to your life?


Our studio apartment is very small, the front door opens onto a hallway. A not very much used hallway but people pass us as they use the laundry and then hang their washing on the roof top. Which means it can go all day without a person on it but come post work time and it’s always busy. On hot days one of the easiest ways to vent the heat from the apartment is to have the door open.

So everyone walking past can see right in to all of our apartment. Most of our neighbours are lovely and look away but a few apartments are rented out to air bnb type places so packed with all kinds of people who aren’t always discreet in their curiosity in ogling their way past our place.


I decided to make a Noren – a Japanese door covering. It’s a split curtain common in Japan. Grabbing some linen from the stash I cut it to use the greatest amount of length and hemmed it using my coverstitch machine.


To hang it we used a telescopic pole from Ikea. You pull it to the right length then twist and it remains at that length. A spring hidden internal means it pops into place and stays in place. It doesn’t mark the frame and can be easily moved so perfect for renters.


All in all a simple solution that keeps prying eyes from seeing in while we get all the cooling air flow of having the door open.

Pattern – cut to width of door (with hems) and as long as I could given the fabric I had

Fabric -Linen from stash but originally purchased at Pitt Trading

Alterations – after use the hem on the coverstitch is not holding as well as I would like so I may go back and restitch using my regular machine?

Posted on Leave a comment

Sewing Adventures – Liberty Cherry Blossom

It has been an age since I blogged for a few reasons, number one has been the redesign of the site, meaning it was offline and thus no point in blogging and secondly was time. Or more precisely lack of time. I’ve been freelancing more as well as teaching so the hours of the week seem to fly by without leaving me much time to blog. Which is both good and bad, not complaining just explaining.

Sewing time has been reduced and a few weeks ago I just needed a quick sewing win. With warm weather on the horizon I grabbed this cherry blossom Liberty Lawn from the stash and my standard bodice block. Shoving them in my bag I dashed off to class at Bobbin and Ink where due to a particularly nasty bout of the cold going around my usual class of six was reduced to a class of one for the day. I managed to cut out and assemble the bodice alongside my student who was happy to see me sewing and learn some extra techniques like applying bias binding and gathering both of which their project didn’t feature.

The bodice is my standard bodice block which I’m thinking needs some adjustments. The bust darts could come down a fraction and I want to take a wedge out of the upper back. I’ve been reluctant to make changes as my body weight is a little fluctuating right now but I think a few tweaks would get the block a little more correct.

I’ve been loving fuller skirts for summer as they allow for good air flow. This one is just the full width of the fabric cut once for the front and once for the back then gathered to match the bodice. Naturally I added pockets because well pockets.

Overall I’m super happy with how bright it looks and for the fact I managed to use up some more stash fabric! The addition of some spotty bias binding from Pitt Trading to finish the armholes and neckline is fun too.

Pattern – basic bodice block, rectangle gathered skirt, pockets

Fabric – Liberty Lawn – print is Mitsi – from stash originally purchased either Liberty or Shaukat (I can’t remember, I know I ordered it online and had it delivered to The Englishman’s Parents home).

Alterations – next time take a wedge out of upper back, check CB length and do I need to increase the sway back adjustment. Drop front bust darts, drop underarm by 1cm at most


Posted on Leave a comment

New Pattern, the Maree Swimsuit!

There’s a new swimsuit pattern available, the Maree Swimsuit Pattern!

Maree is a classic 70’s style halter swimsuit that offers a full coverage bottom and a gathered top. Perfect for laid back days by secluded bays.

One piece swimsuit featuring gathered halter neck and full coverage bottom. Available sizes 6 to 18.

Suitable for swimwear stretch knits with spandex/elastane/lycra only. Must have a high degree of stretch in at least 2 directions.

All fabrics used in these samples available for purchase at Pitt Trading.

You are purchasing a digital pattern. You will receive a download link for instructions, PDF multipage A4/Letter, PDF Copy Shop format.

Please Note: PDF patterns are given as a zip file and some mobile devices cannot unzip them. If you are having issues use a computer to unzip the file and then save the files individually. Or save directly to a file service such as Dropbox or Google Drive.

Posted on Leave a comment

Sewing Techniques: Lengthen or Shorten a swimsuit pattern

Swimwear especially one pieces really don’t give you much room to finalise the length once you are finished like you would for a dress or a skirt. So here are some tips and tricks to make getting it right for you.

Choosing your size

Swimwear needs to use the negative ease of the pattern/fabric combination in order to fit correctly. 

Measure yourself. Bust, waist and hip. If the style has a lower back then also measure your bust from side seam to side seam over the breasts.

Measure your flat pattern pieces and subtract the seam allowance. Seam Allowance is 1cm (if you are not using a Measure Twice Cut Once pattern be sure to check the individual brands instructions for seam allowances). Add front and back measurements together to get the circumference. Check your stretch % and use that to calculate your size. If you aren’t confident doing that, then subtract 5cm from the total circumference and start with that size.

Lengthening or Shortening

Measure from your crotch to the neckline position of your chosen style. Stand straight, do not lean forward. Look in a full lenth mirror if it helps you see the correct positioning.

On the pattern piece front measure from crotch to neckline and subtract the seam allowances. 

Compare the 2 measurements and determine if you want to lengthen or shorten? You want a small amount of negative ease in this case but no more than 3cm unless your fabric has a very high stretch %.

Use the lengthen/shorten lines indicated on the pattern. Spread the amount you need to lengthen or shorten throughout the pattern in order to preserve proportions.

**Proportions are highly relevant in all pattern making but seeing as how swim is the smallest amount of fabric covering the most curved parts of your body it counts more than ever. Always spread or reduce evenly throughout the pattern taking into account your own body shape. If your bust needs significantly more length than your belly/bottom then add more there. The key is to maintain the desired look of the design while also taking into account your own body shaping.

Once the required amount is added or subtracted, re draw the side seams. Maintain a smooth and even seam line to ensure it fits the contours of your body.

Check other areas before proceeding

Measure side seams to ensure they still match as in front and back are same lengths or back meets to the correct point on the front in the case of swimwear with low backs.

Check that the new body length has not affected other areas of the swimsuit in terms of coverage. Key areas to check are centre front necklines, underarms and bottom coverage. Again measure your body and measure your pattern pieces to determine if any changes need to be made.

I hope this helps you determine your correct length for swimwear, if you have any questions drop them in the comments and I’ll answer them in case anyone else has the same query.

Posted on Leave a comment

Sewing Adventures – Cashmerette Appleton dress

This post is so overdue in being written. One of those things that kept getting put on the backburner and then bumped and well you know how it goes. It’s time to share the Cashmerette Appleton dress I made as part of the Pitt Trading Summer Soiree (held all the way back in October 2018).

First let’s talk about the pattern. I used the copy shop version and ended up making the size 12. Mainly because it was going to be used on display and we had a size 12 dummy to be dressed. All over it went together really well. My only tiny problem was the fact I never read the instructions and spent a good 5 to 10 minutes trying to figure out how the ties actually worked? So aside from my oversight I was really impressed at how fast and easy it was.

I used my overlocker and overstitch machine and the actual sewing took maybe half an hour. Which is really speedy, great if you need a dress in a hurry.

Now for the fabric it’s the Vivid Jungle Knit from Pitt Trading.

I want this fabric in ALL the colours and ALL the prints. Sadly it only came in this print as Pitt Trading got it as part of their amazing way of getting designer fabrics. It’s a soft, stretchy viscose knit and the print is fabulous.

Combined with this pattern this surely has to be the most secret pyjamas outfit I have ever made.

Pattern: Cashmerette Appleton Dress

Fabric: Vivid Jungle Knit from Pitt Trading

Alterations: read the instructions next time

Posted on Leave a comment

Sewing Adventures – pink lace Emma Slip

This seems to have been one of the hottest summers I can remember, endless days where the heat doesn’t go down at night. I like summer I like the sunshine and being able to go swimming all the time, however, I do like sleeping and lately, it’s been so hot overnight that you just can’t get to sleep. Bedtimes keep getting later and later putting off that inevitable moment where you have to lie on a hot mattress.

Naturally I’m looking to help the situation through sewing. My plan? to make a super lightweight version of the Emma Slip and this pretty stretch lace from Pitt Trading is just the kind of thing I was thinking of.

I’ve made this one to the suggested length for the size 12, I often cut them longer because I like the silhouette that way but this time it’s shorter, it’s the 14 skirt width attached to the 12 bodice and I’ve shortened the cup by about 1cm at the centre front where they cross over. I’m quite high busted (short person proportions) and I was getting a little ripple at that point due to excess fabric so the shortening of the cup takes care of that.

One of the things I really strove for when developing the Emma slip was that it would be a pretty fast make and this one certainly was. The most fiddly bit is attaching the O rings and sliders to the straps.

Pattern: The Emma Slip by Measure Twice Cut Once

Fabric: Pink stretch lace from Pitt Trading

Alterations: shortened front cup, 14 skirt width, 12 skirt length

Posted on Leave a comment

Sewing Adventures – My Fabric Place Cotton Sateen Dress

Last year the wonderful team at My Fabric Place approached me about using some of their fabric. I took a look at their selection and fell in love with this stretch cotton sateen, they had so many lovely fabrics it was a bit hard to choose from!

They packed it up and sent it across and while I have taken it out and patted it quite a lot I just never got around to using it. mostly becuase of time and because I didn’t want to make something in it that wasn’t going to be showing the fabric off to its best advantge.

Last week I cut into it, made it up, wore it on the weekend to a lovely ladies lunch with friends, got blog photos and kicked myself for leaving such lovely fabric languishing for a whole year.

It is a delight to wear with a nice solid heaviness to the fabric but not being hot. these photos were taken on a warm day after I’d walked, caught a train, ate lunch and been in a car and it still looks pretty fresh!

Make wise it is my own bodice block which I have altered slightly when I recreated it last year. I’ve added a bit more room to the sides. it helps my dresses hang straighter and doesn’t pull so much over the lopsided section of my torso. Seeing it in photos means I’ve spotted a few other things I can fix so I’ll keep those in mind for next time I use it.

The skirt is the full width of the fabric pleated to make the front and the same for the back. I didn’t measure the pleats just eyeballed it in.

I also added side pockets, the neck and armholes are finished with satin bias binding.

The back has an invisible zip which I inserted using my regular zip foot as I always do. I find the regular foot so much better than the speicifc foot. It also means if you know this technique you cna use any machine and never have to hunt to find the speicific invisible zip foot.

Pattern: my own bodice block and pleated skirt

Fabric: Stretch cotton sateen from My Fabric Place

Alterations: next time don’t wait so long to make up beautiful fabric!

With thanks to My Fabric Place for supplying the fabric for this project.

Posted on 2 Comments

Sewing Adventures – Deer and Doe Magnolia Dress

I fell in love with the Deer and Doe Magnolia dress as soon as it was released, v neck, faux wrap and oddly for me I loved the long version.

When you are short you are always told to never wear floor length dresses because it will make you appear shorter. But you know what no one ever mentions? The fact that they feel awesome to wear! Suddenly you are swishing down the street like some kind of goddess, so hang being short and bring on the long goddess dresses.

I wanted to make a wearable toile and had spotted this rayon challis at Lincraft of all places. This is now my second fabric purchase from Lincraft in 20 years, woo crazy stuff I know. It was originally close to $20 a metre and while cute was not worth that, I kept waiting till it went on sale and finally got it for about $6 a metre which was perfect because this dress is a fabric eater! Even without the sleeves there is a tonne of fabric useage.

Sewing wise it all went really well. In the future I’d re toile the bodice as the princess seam is now where near my bust causing some odd drags at the underarm and I need to shorten the bodice from shoulder to waistband by about 1.5cm. I also found I could get it on without the zip so didn’t put the zip in which was good as I have a sneaking suspicion this fabric would not have liked having a zip put in.

The fabric is a dream to wear, its opaque so no lingerie, cool and breezy on hot days and doesnt crush too much over the length of the day. These photos were taken about 5pm and I’d been wearing it since 9am so that’s pretty good. The bad about the fabric is that it keeps growing. I had hemmed it to wear with my flat summer thongs. It’s now at the point where I have to wear my boot clogs or I trip over it. I think I’ll wash it again this week and then cut off the hem and re hem it back to a non trip hazard length.

While I’m at it I’m also going to sew up the leg split. I’m not sure how I managed it but I have a crotch level split. Which which good for hot weather does rather flash people more than I am comfortable with.

Pattern: Deer and Doe Magnolia

Fabric: Rayon Challis from Lincraft

Alterations: reduce thigh spilt, reduce bodice length, move princess seams to be on bust