Posted on 2 Comments

Sewing Adventures – Jalie Clara Tights Camo edition

It’s winter which means its cold and the temptation to stay on the couch cuddled under a blanket eating biscuits, drinking tea while reading books is big.
Sadly I know I need to move more. I have to get fitter and rebuild strength in my core and back.
So in an effort to motivate myself with new clothes to workout in I purchased the PDF of the Jalie Clara tights.


These are so intriguing as they have no centre front seam and only a back seam and an inside leg seam.
I measured myself and decided to go with the size Z with the 3/4 leg option of size O.


Cutting was easy and I added in the gusset, centre back seam and inside leg. At this stage I tried them on and decided I need to size down. Instead of unpicking and recutting I basically used my overlocker to cut down a size.


Tried them on again and decided on taking a dart like wedge out of the centre back and tightening the inside leg from mid thigh down the leg.
Popped them on again and was satisfied. Added the waistband using my overlocker and then twin needle stitched it in place using my coverstitch and hemmed (also on my coverstitch) and I was done.


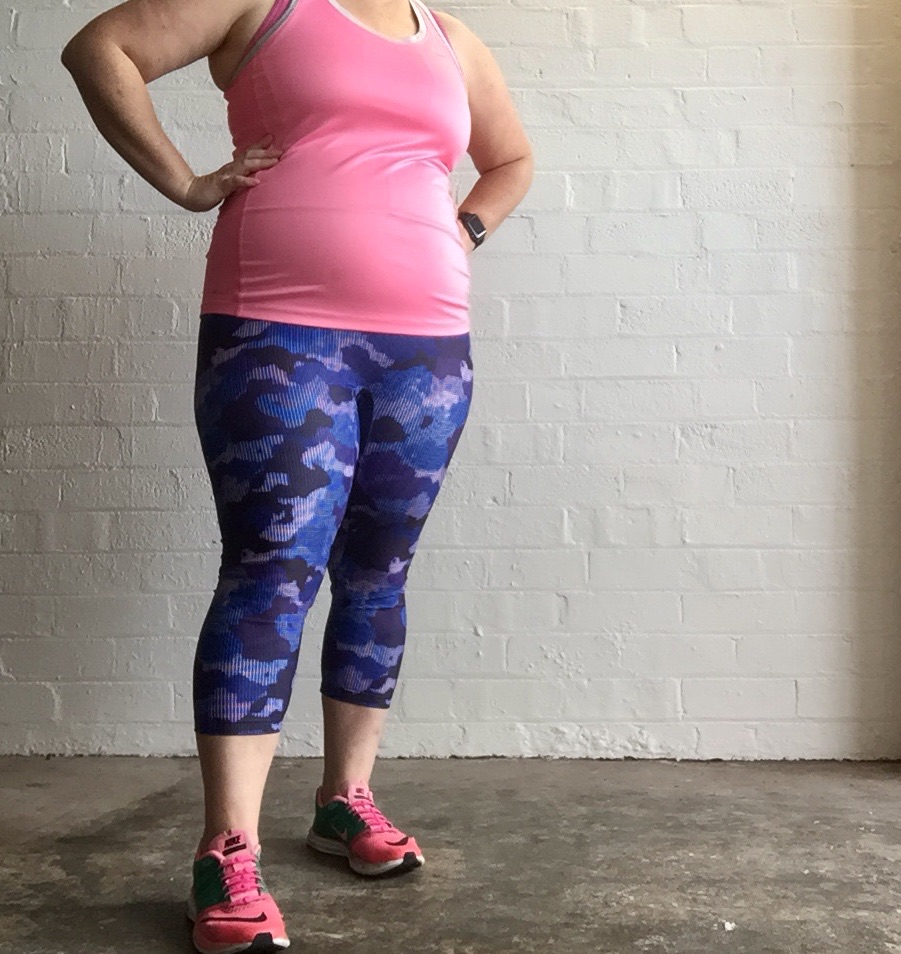
I’m 5 foot tall so the top waistband sits really high on me (like just under my bra high) which is fabulous as it goes well up and above my surgery scar. It also goes above the weird swelling shape and weight gain which means it’s not going to move while I exercise.


There is some wrinkling around the knee that I’m not wild about but am going to wear them for awhile and see if there are any other changes to be made before I set about fixing that.


Great pattern, really impressed at the results and loving this Lycra from Pitt Trading which has no grin through of the white base fabric and isn’t see through even when stretched!

Having worn these a little am definitely going to size down even more, I want the Lycra to work a little harder as right now it feels a bit loose particularly around the crotch and thigh. It just doesn’t have that “firm” feeling yet so am going to do some tweaks. However I feel like the changes would be less if I wasn’t using such a nice quality Lycra.

Pattern – Jalie Clara tights pattern

Fabric – from the stash but originally from Pitt Trading

Changes – go down at least one to two sizes, take an extra dart shape wedge out of the centre back, tighten up knees a bit more

Posted on Leave a comment

Sewing Adventures – Grainline Yates Coat

This fabric in all it’s buttery soft lushness arrived at Pitt Trading last year as one of the amazing pieces they get from Designers. It’s the kind of fabric that you just never see for sale in the sewing sphere unless you go somewhere like Pitt Trading which has access to incredible designers and their fabrics.

A double sided faux suede was always meant to be for a special project. Initially I had intended it for a Deer and Doe Lupin Jacket but I lost the paper pattern in the fire.

So this time round I wanted something that could utilise the double sided nature of the fabric. I’d seen a picture on Pinterest of a colour blocked coat that reminded me of the Grainline Studio Yates and thats when I decided to grab the pattern and go for it.

Once I had the pattern I did some adjustments before I got started. I shortened the coat, I did this above and below the horizontal seam. Because I’m only 5 foot tall I wanted to maintain the proportions of the style but ensure that the coat finished above the hemline of my dresses. This would prevent my dresses being tangled with my coat, and me either flashing my knickers or looking like a flasher.

I didn’t want any topstitching as the coat would not be lined in any way and the edges would be raw cut. So I modified the pocket to have a folded edge instead of a seam.

The arm length was also shortened though truthfully I should have shortened it even more and will no doubt end up cutting the ends of the sleeves shorter.

Cutting the pattern out was interesting as I couldn’t use pins, then I remembered I had a chalk tracing wheel from Prym and once I started using that it was brilliant. Left a chalk mark but no other marks so just perfect for the job.

Altering the pattern didn’t take too long but I felt like I spent about a day doing prep work on the coat. This meant once I was cut and started to sew the whole thing came together in under 2 hours so it was prep time well spent.

Suede is notorious for being a bit shifty to sew, to help me out I used these leather needles from Prym. They were fantastic and I didn’t have a single issue with any of the stitching for the whole coat.

When it came to the actual sewing it was all very straight forward. The other 2 places I had to do some differening techniques was the sleeve. I used a gathering stitch to pre curve the sleeve head like you would if you were easing it in. But I had to roll the sleeve head under in order to get it to curve enough. Am kicking myself for not taking more photos of this step as the sleeve head looked way over manipulated but as it was attached the pressure of the machine foot pushed it down and the sleeve went in with no problems. Some pegs were used to help hold things together on their way to the machine.


The second area of change was the collar, as it was going to be raw cut and only one layer the upper collar is attached upside down so the seam allowance is on the outside of the garment. This means I have a clean finish neckline and as the collar lies flat over the seam you’ll never see it from the outside. The way the collar edges roll bugs me a little so am considering hand stitching them in place with a few tiny invisible stitches?

I finished it off with a large oversize snap from Prym in a grey colour which blends in not too bad, am considering adding another snap further up to help hold in closed in cold weather. Without lining or interfacing it takes on a slouchy more relaxed silhouette which I’m quite enjoying.

Pattern: Yates Coat from Grainline Studios

Fabric: From stash purchased from Pitt Trading 2017, trims and sewing accessories from Prym

Changes: shortened body length and arm length, changed pocket and collar construction. For next time shorten arms further.

Posted on 1 Comment

Sewing Adventures: Spotty grocery bag

My second make of the year! and it’s a super practical bag made fun with spots! I made and wrote this post ages ago and then it’s taken me forever to get photos!

I’ve been making do with only one cloth bag to carry with me in each day to use instead of plastic bags. It works some days but then other days I find myself having to use the dreaded plastic bags and every single time it annoys me.

After the fire I managed to salvage some fabric the spots were amongst the ones rescued. It’s had to be heavily laundered so the once stiff lightweight canvas now feels more like super worn in jeans. Nice and soft handfeel but structurally the fabric and fibres are still ok.


I know I initially got the fabric from Spotlight (part of their cotton duck range) and had planned to make shorts with it at some point. In my new mindset of use all the good fabrics all the time I decided I wouldn’t use it for shorts that quite frankly would look ridiculous and never get worn but instead use it for something practical that will get used every day.

Naturally I researched some bag patterns but decided to just kind of wing it and based some of the measurements loosely on the Purl Soho tutorial which can be found here. Now winging it should always be encouraged but sometimes it bites you in the ass and there are a few sections of this bag which look less than 100%. Most noteably the top turn over. I measured and then folded it but didn’t press it and well it’s not exactly straight. But it works, it’s sturdy and I’m ok with things not always being a beacon of perfection.

I added an oversize pocket on the inside so I can throw my phone in there and not loose it to the bottom depths of my bags like I normally do and it will hold my public transport card for easy access too.

All seams are done as French seams to add a bit of strength and longevity to the bag.

Pattern: Made it up as I went along, some measurements from the Purl Soho tutorial

Fabric: From the stash (originally purchased at Spotlight)

Alterations or Changes for next time: Use the iron a bit more to get it looking a bit more organised on the inside

Posted on Leave a comment

Sewing Adventures – Grainline Linden, sloth edition

Sloths! I love sloths and when I saw this fleece at Spotlight I couldn’t resist. It didn’t get made up straight away but went into the stash and survived the fire.

As soon as the weather started to cool I knew I wanted a comfy house jumper to keep me warm and what better way tos ray comfy and warm than fleece sloths!

I’d never made the Linden before and had always thought the neckline a tad wide for my tastes. A quick chat on instagram with @Daisysewcrazy (and not daisysewlazy that I wrote originally ?) confirmed that you can easily add in more and still not end up with too much of a blocked in neck look I went for it. I cut the largest size and added 2cm to the neckline all the way round. Even with the band it’s still quite an open neckline so definitely think about that when you are planning one.

By sheer co incidence I managed to line up my stripes down the side seams! Sloth magic for the win.

Because it’s a comfy home one I just turned the hems under and used my cover stitch machine to secure them all down. I found the trick to me getting the stitch line and internal hem perfectly aligned is to measure and pin, then use a bit of washi tape to help give me a guide on the plate while sewing. Am sure it will get easier but for the moment it’s making it work for me.

All in all a very simple but very cozy make.

Pattern: Grainline Patterns Linden Sweatshirt

Fabric: Fleece sloths from stash originally from Spotlight

Alterations: no bands, added 2cm to block in the neckline, adjusted neck band length accordingly. For neck time potentially add another 1.5cm to block in? Shorten sleeve length if adding rib bands.

Posted on 2 Comments

Me Made May Sewcial Sketches

What a month! I love Me Made May I find it super inspiring and even this year when I felt my own clothing offering was boring and repetitive I still enjoyed the challenge of going out and finding walls to photograph my outfits in front of.


The drawings though, wow those were a challenge! I normally try and do a few at a time so I don’t have to rush each day, but I just couldn’t seem to get ahead of the days so there were quite a few done late at night or over breakfast in order to keep up.


Despite the pressure I really enjoy drawing and I find I notice differences in how I approach the drawings as the weeks go on.
A few things stood out for me this year
– the sheer breadth of talent in the sewing community. Some days I’d get stuck just trying to decide what to draw because I had too much choice!
– I need more practice at faces, gah they are so hard to try and capture and I’ve spent so long focusing on drawing the clothes I need to keep working on the faces more
– I struggle with skin tones. I’m working on an iPad Pro and using tools that replicate the marker pens I love to illustrate with. You get this kind of translucent quality to the drawing and it makes replicating skin tones difficult. I’m going to work on it and hopefully I’ll see a big improvement in the depth I can bring to the tones?

Just wanted to say an enormous thank you to everyone who left a comment, sent a message, shared my imagery, left a like and allowed me to use their photos to make a drawing of. Thank you all so very much and hopefully I’ll be back with another round of drawings next May!

If you want to see the full range of drawings I’ve done of the sewing community you can search the hashtag #sewcialsketches on instagram

Posted on 2 Comments

Sewing Adventures – Papercut Patterns Sway dress

I had thought I’d set myself an extra challenge this year and make all my patterns myself, so no shop bought patterns no Indies all my own…..then I realised sometimes you just need clothes and you need to get on with things and just to go for it.

Enter the Papercut Patterns Sway dress. This pattern was given to me by a friend after the fire, they thought having a loose swingy dress would be an easy make after all our dramas. They were right it, was a quick make.

I think the longest part was cutting out and making sure the rayon fabric didn’t slip and slide around. I cut on the wooden floor and it was a surprisingly stable rayon which made for a nice change.

I cut the size medium but increased the length as I’m hoping it might be a good trans seasonal piece and I’ve been liking the look of longer dresses lately so I can see how I look and feel wearing one.

Having read reviews of the pattern I should have been more cautious and checked the armholes but I didn’t. They are really big, like show about an inch of the side of my bra big. I don’t care about showing my bra but I do care about ugly armholes and the size of these is not good. Am not going to hassle with this make now but in future would be adding to the armholes to bring them up by at least 4 to 5 cm.

Becasue I wanted to keep the rayon to be nice and flowing I chose to go with the provided facings, despite my hatred of facings. They go in easily and make the insides look clean but this bit here where you can see the facing from the lower v neck is visually repugnant to me. Next time I’ll use bias binding to finish the neck and armholes and avoid this.

The waist ties are not too long, I choose to make my longer so the ends would fall down the dress more. Mostly because my middle section needs a bit of visual camouflage. I added the tassels to the end to stop a fairly plain dress (for me) be not too boring. Because the waist ties are not attached to the dress it means they won’t be going through the wash which is handy as I’m fairly sure those are ceramic beads of some kind?

Pattern: Sway Dress by Papercut Patterns cut in a size Medium

Fabric: Printed rayon from the stash but originally from Pitt Trading, cream tassels purchased from Pitt Trading

Alterations: Added 10cm length to the dress, cut waist tie twice as long, added tassels. Next time use Bias binding instead of facings, add 4 to 5cm height to underarms to bring them up.


Posted on 2 Comments

Emma Bralet versions by Lifewithmycubs

One of the main reasons I do Everyone Deserves Pretty Lingerie week is because I really do think everyone does. They are such a fast make and can be used as stash busters to use up leftovers from other makes or a chance to indulge in some beautiful lace and trims. Because you need so little you can actually make your own lingerie quite cheaply when compared to designer pieces.

This week Julia from @lifewithmycubs has well and truly caught the lingerie making fever. Each style she makes just keeps topping the last for amazing use of lace and trims.

She picked up all her fabrics and trims from Pitt Trading and all weekend long they are giving a free gift to all online purchases. It’s a beautiful selection of vintage lingerie trims from a factory that was opening in the 50’s and 60’s.

I love how she has showcased the versatility of the looks you can achieve from sporty to cute to luxury in lace.

Posted on 2 Comments

Sewing Adventures: Emma Racer Back Slip in lemon and pink

A sweet Emma in lemon and pink! I actually had made this exact version before but lost the garment in the fire and when I discovered I still had some I knew I had to replicate it.

It’s a slinky jersey knit from Pitt Trading with pink lace trim and pink fold over elastic also from Pitt Trading. I love that their range of lace trims is so large you can always find a colour that is going to complement your fabric choices.

Much like my last Emma I’ve gone for a 12 top and graded out to a 14 bottom half. I’ve also been keeping them at the longest length. I’m just liking the silhouette of the longer line.

As you can see from my photos of all my Emma’s I have been trying hard to get better photos. It’s so much easier when you can shoot outside like I did for my Me Made May challenge. Hopefully with some more practice it will get slightly easier. Right now all I can see is the flaws in me and the photo.?

Pattern: The Emma Racer Back slip and bralet from Measure Twice Cut Once

Fabric and trims: slinky jersey, stretch lace and fold over elastic all from Pitt Trading

Alterations: This version made at the longest length on the pattern, see how it goes during sleep before deciding if I should keep it at that length or not?

Posted on 2 Comments

Sewing Adventures: Free Darcy Boxer Shorts Pattern

The Darcy Boxer shorts are one of my all time most downloaded patterns, am sure its 98% because it’s free and about 2% because it’s the pattern the person wanted? regardless it is a fabulous pattern that makes up in no time, takes a minimal amount of fabric and results in awesome shorts for yourself or to use as a gift.

These ones are intended for a gift. We are way behind on birthdays for the entire family this year so I’m trying to get ahead of the curve and get some Christmas sewing/whenever we see them next sewing in. When you don’t live near your family you sometimes find yourself giving and receiving presents at odd times of the year.

This is a lovely dense Japanese woven cotton I got at Pitt Trading. The tiny diamond pattern is perfect for an understated pair of boxers. I’ve gone with French seams throughout because a) I felt like being fancy and b) I currently only own white or black overlocking thread and well that’s not close enough for my colour matching loving heart. So French seams it was.

It’s been a little while since I made a pair with a fly so I had to go back and check my own notes. Apart from a slightly tricky fly/French seam junction point it was a straight forward sew.

For the elastic I jumped at the chance to delve into my Prym box of goodies and use this ultra plush yet firm elastic. It’s so lush and perfect for these boxers. Because I wanted to practice more with my coverstitch I used it to apply the elastic. It was a little finicky but now that I’ve done it once am sure I’ll be good for next time. Plus the stitching looks invisible!

All in all a pretty lovely make and a great example of “Everyone deserves pretty Lingerie”

Pattern: The Darcy Boxers Shorts by Measure Twice Cut Once

Fabric: made by Sevenberry sold at Pitt Trading waist elastic from Prym

Changes: French seams throughout, nice change but am unsure I would do that again?

Posted on 3 Comments

Sewing Adventures – Emma Racer Back Slip with lace

Another Emma! this time with added lace. I really like how this one turned out, I made the variation with the lace and like how the black lace works so well with the darker style print.

The fabric was picked up at the Sydney Spoolettes first fabric swap of 2018 (2nd from the top in this photo. It was smallish but you need so little for this pattern that I knew I could make it work. It’s super soft and the original owner said she got it from Knit Wit in Perth.

It’s slightly firmer across my stomach where I’m lopsidedly swollen after surgery but am not worried as thats something that is unique to me and not the pattern fitting incorrectly.

Since my last version I’ve sized down the bust area to a size 12 but kept the body at a 14 but apart from that no other changes.

One of the reasons I wanted to do a racer back slip is that I am a very wriggly sleeper. Normally slips fall off my shoulders and I get all tangled up in them. This narrow curving back fits perfectly and stops the slip from moving off me as I wriggle in my sleep. A great solution that also looks flattering.

I also got to use my overstitch machine for the hem, was very exciting. Am still in the early stages of knowing all the ins and outs of the machine but so far very impressed.

Pattern: The Emma Slip by Measure Twice Cut Once

Fabric: Sydney Spoolettes fabric swap 2018 and black fold over elastic and lace from Pitt Trading

Alterations or changes for next time: None