Posted on Leave a comment

Named Clothing Beverly Twisted Bikini Sewalong – getting started

NamedBeverlyBikiniSewalong_header

Super exciting that so many of you are going to take the plunge into making your own swimwear. You will not be disappointed.

Before we get to the sewing there is a few things we are going to need

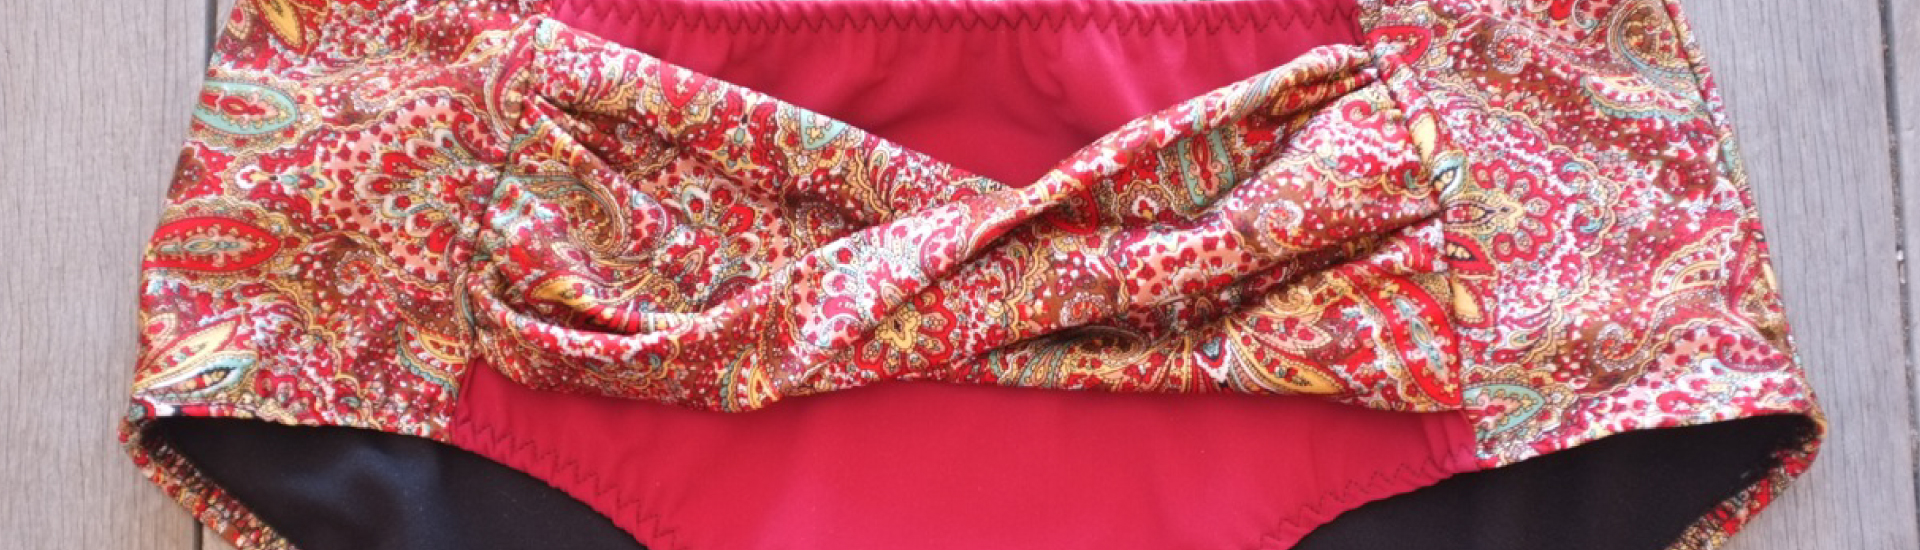
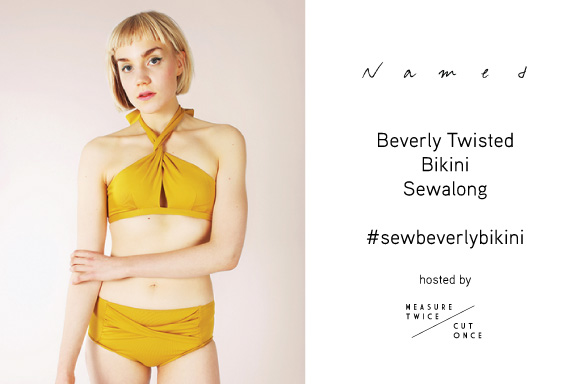
First up the pattern. Named have set up a 20% discount code on PDF and printed patterns of the Beverly Twisted Bikini that can be redeemed until the 10th of February. Just use the code sewbeverlybikini at the checkout.

• Fabric: 95 – 120 cm / 1 – 1½ yd
• Lining: 35 – 40 cm / ½ yd
• Fusible knit interfacing: 10 cm / 4”
• 15 mm / ½” wide elastic band: Your chest measurement (measure under the bust)
• Clear elastic: approximately 300 – 350 cm / 120 – 130”
• 1,5 cm / ½” clip clasp
• 8 mm rigilene boning: 20 cm / 8”

We will be starting with making the bottoms so it gives you a bit of extra time to source some boning and bikini clasp as those are the pieces people have already asked questions on where to source them.

Not on the list but highly recommended is a knit fabric specific sewing machine needle. As many patterned swimwear fabrics are sublimation printed they have a coloured top and a white underneath. Using a new sharp fine needle means any needle penetration marks are small and lessons the chances of having any of that white peep through at the seams or hems.

Fabric choice makes a big difference with swimwear, you want to ensure that you get a quality 2 way stretch knit lycra/elastane/spandex with good recovery. Because the style includes twists choose a fabric that has a nice drape and isn’t too thick. Ideally you are looking for a fabric that is not see through, can be stretched a lot and still spring back into place.

Swimwear lining is soft almost crepe like in feel and often comes in black, white or cream. It’s great as it dries super fast and doesn’t add bulk. If you can’t source this try getting a very lightweight lycra jersey. I’ve used this before in swimsuits and it works quite well. Lastly if you are aiming for a super slick all white bikini consider double lining to add an extra level of opaqueness to your bikini.

The lovely ladies of Pitt Trading offered me my choice of fabrics for the sewalong, so hard to choose from all the beautiful prints they have instore. If you drop in or order on the online store (yes they post internationally) and need all the extras such as elastic, boning and other trims added to your order just let them know and they can arrange that. If you are instore a full list of all the components is behind the counter just in case you forget yours.

Some of the choices on offer

IMG_7726

IMG_7541

IMG_7447

Other places to source swimwear fabrics from include Spandex House (USA) or Funki Fabrics (UK). Check your local fabric store too.

I hope this helps everyone figure out what they need to join in the sewalong, any questions just let me know. Share your fabric choices on social media using the hashtag #sewbeverlybikini so we can see what everyone is making.

Tomorrow we get to sewing!

Posted on Leave a comment

Announcing the Named Clothing Beverly Twisted Bikini Sewalong!

NamedBeverlyBikiniSewalong_header

Here in Sydney the weather is warm and it’s bikini time! Spurred on by Jillian from Sew Unravelled and Kirsty from kbfield we approached the team at Named Clothing to have a sewalong of their Beverly Twisted Bikini.

Named have set up a 20% discount code on PDF and printed patterns of the Beverly Twisted Bikini that can be redeemed until the 10th of February. Just use the code sewbeverlybikini at the checkout.

I’ll be taking you step by step through the construction and will be on hand to answer any questions you may have. You can share your makes on social media using the hashtag #sewbeverlybikini so we can see all the gorgeous bikini’s being created.

Grab a button for your website and later today I’ll be back with some guides on choosing the best fabrics for your bikini and all the notions you will need.

<a href=”http://www.measuretwicecutonce.com.au/2016/02/announcing-the-named-clothing-beverly-twisted-bikini-sewalong/”><img src=”http://www.measuretwicecutonce.com.au/wp-content/uploads/2016/02/named-Beverly-website-button.jpg”/>

named-Beverly-website-button


Posted on Leave a comment

Tsurah Designs patterns now available here!

tsurah_header

Sometimes you love a design so much you wish you’d thought of it yourself. I feel that way about the Tsurah Designs straight skirt. Not only do I own many of my own I use the pattern when I’m teaching sewing too. It’s such a flattering skirt and so easy to make, it just ticks so many boxes on what makes a good design.

The brains behind Tsurah Designs is Rebecca who like myself is a veteran of the Australian Fashion Industry. We got to chatting and I offered to help sell her designs via the Measure Twice Cut Once website and she loved the idea.

All the designs are now available as pdf patterns in the webstore including the maternity patterns.

I hope you enjoy making them all up as much as I do.

Posted on 1 Comment

Sewing Adventures: Tsurah Designs Straight Skirt Sparkly edition

Silver-Skirt_header

In my head I refer to this skirt as “The Lizzy Made me do it skirt”. After Lizzy had been down for the Shibori Workshop last year (actually the year before last as I’m more than slightly behind in blogging all my makes) we had talked about shapes, proportions and trying new things just to see where they go. On Pinterest I had admired images of sequin skirts worn casually and I always wanted to give it a go.

Spurred on by Lizzy I grabbed some sequins and got to making. I’ve made the Tsurah Designs straight skirt before here and here. So I knew it would be fast to make and I could alter it to fit in the sequins.

The sequin has slightly less stretch than the Ponti and isn’t quite as strong so I wanted the back of the skirt to hold more of the weight of the garment. So I cut it fractionally bigger from hem all the way to just above the hip but kept the waist the same width. Then cut the sequin panel the same.

silver skirt front

This gives it more room which is nice and it doesn’t pull the sequins at the front. I kept the wide waistband as I thought it could add to the look by being worn up for a very long silhouette or folded down which is lovely and comfortable. The hem is twin needled but apart from that the rest was entirely sewn on the overlocker. I did wear my clear lens running glasses while sewing to prevent flying sequins into eyes but honestly it sewed like a dream with no problems at all.

silver skirt back

I find it a surprisingly comfortable piece. I have to be slightly careful as the sequins do like to snag themselves on things and it gets handwashed too. Apart from that it’s very easy wear and always gets compliments! I’ve been wearing this to work for over a year and it’s still going strong, made for a whim it’s certainly become a mainstay of my wardrobe.

silver skirt side

Thanks Lizzy for spurring me on to try something I thought was out of my comfort zone and yet became one of my most worn items!

Oh and I look slightly pinker than usual it’s because I’m sunburnt, I got roasted on Australia day despite wearing a hat, keeping to the shade and  doing all the usual things to avoid the sun. It was a beautiful day out, despite the resulting burn. Here’s the Russian Roulette’s as they came across the Bridge.

Russian Roulettes in Sydney


Pattern: Tsurah Designs straight skirt made many times before.

Alterations: Shortened skirt, added width over hips and down side seams to allow for sequins.

Fabric: Stretch Silver purchased at Pitt Trading, Grey Marle Ponti purchased at Cabramatta.

Posted on Leave a comment

Bra Kit Sale and new Dye your own kits

brasale_header

In anticipation of a new year filled with lots of lovely new bra colours, I decided to have a bit of a sale of colours currently in stock. These colours may not come around again for awhile so get in quick while stocks last. Kits remain on sale till sold out or till 1st of December.

Prices have gone from the usual $25.00 per kit to $20.00 per kit. For those not in Australia be sure to check your exchange rate as you can get an even better bargain due to the Australian dollar being so low at the moment. Naturally we post worldwide too.

I’ve also added a new dye your own kit. This kit has all the components as the other kits but you can choose your own type of dyes and create your own colours. The components are all prepare for dye (PFD) so in many cases are not totally white. A variety  of shades of whites and creams exist in each kit. These are the same pieces I use for the dyed kits and all dye to the one colour as long as you follow your dye packet instructions. It does mean they aren’t suitable for an all white bra as you will get shade variations between the varying pieces.

dye your own 3

Posted on 13 Comments

Sewing Adventures – Simplicity 1873 cotton sateen edition

1873_header

For the month of November I’m trying to follow along with #BPSewvember on instagram. The idea of the beautiful Amanda from Bimble and Pimble was lots of fun last year, so I’m in for another round. Today’s theme is Like a BOSS. I thought it appropriate to talk about this dress which has THE BEST invisible zipper insertion of my entire sewing life (seriously it’s got to be all downhill from here this one is so perfect).

Pushed for time after procrastinating for too long I ended up cutting the dress Wednesday night, making most of it Thursday night, freaking out that it didn’t fit late Thursday night, brainstorming ideas on how to get it to fit Friday at work, trying it on with a different bra Friday night, rejoicing that it now fitted and then finishing up almost everything Friday night including the zipper of perfection that went in at about 10.30pm, flying out early on Saturday morning and finishing the hand stitching while sitting at our accommodation drinking tea about 2 hours before the wedding. Hectic, oh yeah! But totally worth it.

Here’s some photos on how it all went down.

Cutting out using the top floor stairwell (which does not have an overhead light just a window and the light was fading) as the fabric didn’t fit in our apartment and I needed to see flowers to avoid potential flower boob disaster.

top of stairs Trying to not think about accidentally bumping my scissors off the fourth floor to land on the tiles below.

stairwellAdding in some pre made satin bias binding as I ran out of time for fully lining and I hate facings.

IMG_6730The zipper of perfection which I put in LIKE A BOSS. I use a regular zip foot not an invisible zip foot to insert. This was the first go no hand basting in place and very minimal pinning.

zip of perfectionHand stitching view.

handsewingviewSneaking a photo with the Groom’s car before heading off to the wedding.

the dress

Laughing with the Englishman after the ceremony before the food.

with the Englishman

The Cheese cake which made my dress feel too tight by the end of the night. But wow delicious!

cheesecake

Fabric: Digitally printed cotton sateen from Pitt Trading

Dress Pattern: Cynthia Rowley by Simplicity 1873

Alterations:  Based on the last time I made this pattern I did a sway back adjustment. I had no time to test it though. So I took the risk and cut straight into my good fabric. The risk paid off and it worked. Despite zipper perfection and good back fitting I don’t have a single photo from the day of the back of my dress.

The fabric is so beautiful I decided to add some fullness to the skirt. Now this is already a VERY big skirt but I thought the weight of the sateen could hold it. The front and back panels were extended to the full width of the fabric but I kept the angled seams so it wasn’t just adding in a straight piece of fabric. The side panels had an additional 12cm per side added in. I sewed all panels of the skirt together and then on the larger pleats made them deeper. On this pattern as with many of the Cynthia Rowley styles, the pleats go one direction and then swap to the other direction. It makes for a very swishy feeling skirt and with the added width it made for a really beautiful feeling skirt.

Posted on 6 Comments

Sewing Adventures: Vogue 8766 – The Bridesmaid Dress

When I design ranges for big companies part of the job is presenting the range at an initial ideas stage. You come in with a bunch of drawings and fabric swatches and proceed to be grilled about every decision. Every idea needs to be backed up with why it should be done, how much money it’s projected to make and why time and money should be invested into making that particular idea come to fruition. Depending on the size of the range you need to be prepared to do that for over 100 pieces. It’s utterly nervewracking and stressful but it’s also a necessary part of the job. It’s one of the ways you weed out the good from the bad, learn to take on others perspectives and realise that not everything you design is going to be amazing or the correct fit for the time and place.

I find this somewhat clinical approach is super helpful to my sewing as I enjoy the process so much more than focusing on the end result.

Recently I had great fun in pushing myself recently to make a bridesmaid dress for a friends wedding. When I got a late night text the day before the wedding from the beautiful bride explaining that they decided to change the bridesmaid dresses and weren’t going to use the one I made I said to her, as long as you are happy that’s all that matters.

When I saw the Bridesmaids the next day at the ceremony it was 100% the right decision to change the dresses. With a natural linen back drop, wild roses and Australian natives in pale creams and pinks the bridesmaids looked picture perfect in their blush coloured dresses. Totally the right choice for the occasion. Sadly I don’t have any photos as it was an “unplugged” wedding with no phones or cameras and everyone told to just enjoy and have a great time. It was utterly fabulous night filled with friends, fun and laughter even if we don’t have the pics to prove it.

The original bridesmaid dress was a deep wine coloured French lace over silk. The lace was from Studio Fabrics who have a store in the city and another at Cabramatta, highly recommended for gorgeous lace, silks and lovely staff. The silk was from Pitt Trading and had the softest handfeel to it.

The lace was 170cm wide with a double scallop edge so it was quite economical to cut the dress from as you could utilise so much of the scallop. The style was a boat neck fitted dress with a knee length skirt and tiny cap sleeves. I used Vogue 8766 as my base block.

V8766

I really wanted to achieve a skirt hem with no seams, the lace had a little scallop, big scallop design to it, adding seams would interrupt the flow of the design.

hem

So I eliminated the side seams of the pattern. I placed the front and back patterns together, overlapped at the side seams where the seam allowance would normally be and traced off one continuous pattern from that. The top of the side seam was turned into a long curving dart so you still got the hip shaping despite the lack of side seam.

I made a toile from calico and used that to do the fitting. I transferred all the fitting marks to the calico and then cut a new calico version which I then used as the final pattern.

At the centre back I joined the hem by overlapping the lace and using a small zig zag all the way up to the base of the invisible zip. Creating an amlost invisible centre back seam.

centre back seam

The silk underneath was fully bagged out with a matching silk lining which joined at certain points to ensure it would sit flat and not cause any movement while being worn.

The sleeves were small with just an inverted pleat at the top of the sleeve head to allow for movement.

sleeve

Now there is no denying I was super stressed making this dress, I felt the need to make it perfect and be so beautiful for my friends, but the fact that it wasn’t worn doesn’t even worry me. I got to use some techniques I don’t use in my regular sewing, had fun working with utterly divine French Lace, conquered my fear of lace overlay plus silk plus invisible zip (which honestly I have been avoiding for like forever in case I made a mistake). It was good to push myself and I’m glad they found the perfect dresses at the last moment.

Fabric: French Lace from Studio Fabrics, Silk from Pitt Trading

Dress Pattern: Vogue 8766

Alterations: eliminated side seams of skirt, cropped sleeve length, fitted to a size 10, 5 foot 11 bridesmaid


Posted on 4 Comments

Sewing Adventures: Simplicity 1873

1873_header

A few weeks ago I was doing some procrastisewing (you know, procrastinating by sewing). I’d decided it was suddenly vital to empty the work in progress box and get some of the half mades into something wearable or decide of they were just terrible and cut them into something else.

IMG_6288

This dress has been sitting there since this post where I detailed how I’d cut the sleeves upside down. Well it got put away in a huff and it’s been pulled out a few times but every time I tried it on I felt huge in it. A high neck and sleeves are not my thing. So I pulled out the sleeves, cut down the neck and tried it on again.

Front view

Good enough. I finished the edges with bias binding and popped an invisible zipper into the back. I’ve not sewn in an invisible in an age and was ever so pleased when it went straight in. I use my regular zip foot not one of the special invisible zip foots as I find them way too much drama. Regular zip foot, nice and slow is the way for me.

So I was all excited I had a pretty new dress to wear. I’ve worn it a few times since and until this morning had no idea that this happens at the back.

back view

What an ugly ugly wrinkle. We took these photos on the way out this morning and since coming back I’ve been trying to figure out how on earth I missed such an obvious and fixable wrinkle (back length needs shortening). Well it appears that when I try on my dresses and look at my back in the mirror I round my shoulders. By doing this I lengthen out the back panels and the wrinkle disappears! So lesson learnt, stand up straight and alter that back panel.

Fabric: Japanese Lawn from Spotlight

Dress Pattern: Cynthia Rowley by Simplicity 1873

Alterations: scooped out neck.

Alterations for next time: take length out of centre back panel, don’t take neck scoop quite so wide as some bra straps show at the current width.

Posted on 11 Comments

Sewing Adventures: Racer Back Singlet – Activewear edition

panda_header

So I’ve made my first piece of activewear. Honestly I never thought I would. I’m more than happy with the kit I already use and I know the high performance fabrics available within the industry are far superior to what is available for home sewing purposes. So why then did I make the leap into making my own?

Pandas.

panda fabric

I love Panda’s and when Spoonflower had free shipping on offer I ordered up some activewear fabric and some of their cotton (not yet made). The pandas are designed by Andrea Lauren. I thought the pandas would look cute and it also references one of my favourite cycling moments when Dan Martin was racing Leige Bastogne Leige 2013 and as he came into the final few hundred meters a fan dressed as a panda was chasing him down. It was hilarious to watch and quickly spawned the tag of #pandapower. It also had the incredibly cool effect of the team then partnering with the WWF to help bring the plight of endangered species to a bigger audience.

2013, Liege - Bastogne - Liege, Katusha 2013, Garmin - Sharp 2013, Rodriguez Oliver Joaquin, Martin Daniel, Ans
2013, Liege – Bastogne – Liege, Dan Martin from Garmin Sharp, chased by the panda before going on to win the race

Overall I was super excited to be getting activewear fabric with pandas, it seemed to combine many of my favourite things. Then the fabrics arrived and it was well childlike? I was so disappointed. The scale is way too big for adults clothing and just looks juvenile and clunky. Perhaps ok if it was for a top or skirt but not the look I was hoping for with activewear. It was packed up and shoved in the stash and left for more than a year.

Despite the fact I genuinely enjoy exercise I’m neither as fit as I’d like to be, nor look as fit as I want to be. Thus I try, always trying. At the moment I’m trying to be more consistent with my running and want to add in some more things along the way to help be fitter and stronger so general day to day things like walking stairs and carrying groceries are easy (when you don’t own a car you realise how much the ability to carry your groceries home is really important).

I had finished some work, had a bit of time spare and spied the panda fabric. I grabbed it and  my racer back singlet pattern. The original pattern is designed for a fabric with more stretch so I measured my favourite RTW run top and adjusted the pattern. I cut a size 16 bust and out to an 18 at the hip to allow for the lack of stretch. I also added 4cm to the hem length to keep my top long as I didn’t want it riding up while running. Cutting out, proved to be the longest part of the process. Due to the oversize nature of the print I was in massive danger of having panda boob, something I seriously wanted to avoid. The only way I could manage it was to not centre the print. That way the pandas fell on the sides  and not directly over my boobs. Cut, overlocked and lightning bolt stitch down the neck, armholes, hem and I was done before The Englishman was home and it was time to run. Stitching wise it went through the overlocker with ease but the lightning bolt stitch was laboured. It really felt like the needle was having trouble piercing the fabric and it’s nowhere near as neat as I’d like it to be. It really disliked the twin needle too. Perhaps I should’ve cut a band or bind and finished it that way for a really nice finish?

Photos taken pre running (just outside the Art Gallery). I’m hanging onto my running jacket as these were really some quick snaps.

front panda

back panda

I was super curious as to how the fabric was going to perform? It was ok. I didn’t feel any dampness so the moisture wicking was decent but I could feel the heat building up in my lower back (below bra above waist) which suggests the fabric isn’t as able to handle warmer climate performance? It wasn’t super bad but I could feel it and normally I don’t feel that at all. The night was warm feeling but there was a cold wind. Just to be sure I checked the data against some other runs. The time of night was pretty much the same as my regular running time, the temperature was close to what I’ve been running in during the current season, my pace/intervals and heart rate was very close too. The only difference was my top. Obviously one run isn’t enough data to say for sure what is happening but the first impression is that the fabric is good for cold climates and cool weather running but I’m skeptical to how it would work in comparison to my RTW pieces in the heat and humidity of a Sydney Summer. I’m going to chart my runs with the top so I can report back with a more informed result later in the summer.

post run panda

Overall I like the length and size of the singlet, it performed moderately well to good, but it still feels super novelty and while that’s ok I’m not entirely sure it’s the look I want from my activewear?

Fabric: Panda fabric from Spoonflower

Top Pattern: Measure Twice Cut Once Racer Back Singlet

Alterations: Adjusted sizing for stretch difference cut 16 bust to 18 hip, added 4cm to hem length.

I tried to link to information about the actual performance fabric from the Spoonflower site. It’s really difficult to find and after a few minutes of searching I stopped looking. ** It’s too hard to find the exact specifications on their fabrics and then when you do find them they are nowhere near comprehensive enough and merely say “performance”or “active”. I see this way too often in fabric for home sewing and frankly it’s just not good enough. What makes it performance? is it moisture wicking? what are it’s exact fabric components? is the moisture wicking on the construction of the fabric or a finish that has been added? how many washes will it last if it’s an additive? what washing instructions are needed to keep the life of the performance fabric. It’s this lack of information on the specifics of performance fabrics offered by many within the fabric industry for sewers that frustrate me so when it comes to active fabrics. I want the details as one fabric and one set of performance criteria does not suit all sports. Perhaps one day I’ll write a series of blog posts on active fabrics and sportswear from an industry perspective so I can rant away about details and specifics then. Till then, happy running.

** With thanks to Robyn in the comments she found the page I was looking for and here is the link http://www.spoonflower.com/spoonflower_fabrics#view_fabric it does indeed contain the information I was looking for, including things like washing instructions. Very happy that someone was able to find it and point me in the right direction for the information I had thought was lacking but is indeed supplied. Many thanks to Robyn and Spoonflower for providing me with the details.


Posted on 12 Comments

Sewing Adventures – Japanese top and Tsurah Designs skirt

gtop_header-4

This past weekend there was a Sydney Spoolettes meet up with everyone invited to come to Pitt Trading for some Spring Fabric Shopping and indulge in some Cupcake Dolly cakes (just up the street from Pitt Trading).

square top - 2

I work Saturdays at Pitt Trading so it was fun to see the Spoolettes on work time and I grabbed the opportunity to get some photos taken of my new work top while at work. Huge thank you for Maria for taking the photos for me.

This is Top G from the Japanese pattern book Kristy nicknamed rectangles and circles with head holes.

41o0APylYHL._SX370_BO1,204,203,200_

This is one of the first times I’ve had problems understanding a Japanese pattern. Mostly because there was no way my neck or arms were ever going to work with the tiny pieces allowed for the neck and arm bands. So I calculated out my own bands and used them instead. I also cut the front neckline down a little lower as I don’t like things pressing against the bottom of my neck it makes me feel gaggy. I also twin needled down the neck and armbands. Fist Pump for twin needle stitching like an absolute dream and making the finish look so pro. I love my twin needle.

square top - 5

My fabric is a poly/lycra I bought from Pitt Trading. I like to wear their fabrics when I work there as I find it can be a good icebreaker with customers to talk about the fabrics and sometimes you see a fabric made up and it sparks a whole bunch of ideas you may not have thought about earlier? This is the same quality I’ve used for the Burda Swimsuit and the Nookie Bikini. It’s soft handfeel yet super stable to sew with and has a lovely drape. It really does work for so many patterns and styles.

square top - 1Talking always talking..

square top - 4

Overall I like the top it feels lovely and swishy on and is a great loose fit through the torso which I so like to wear as it’s so comfortable. Some people find the boxiness of some of the Japanese styles a bit overwhelming. I like the odd shapes as it gives me a chance to experiment with drape and proportion. At times like now when I’m feeling less than svelte I find it nice to still be able to wear an interesting piece that isn’t super fitted or super clingy. It gives me a chance to approach dressing on a different level than just trying to cover up what isn’t currently working for me.

square top - 3

The skirt I’m wearing is the Tsurah Designs straight skirt, which I pretty much live in at work (I now have 4 of them, you can see another one here) for me it’s the perfect ponte skirt. It takes about 30 minutes from cutting to hemming and BAM! new skirt. Love it.

Top Pattern: View G from rectangles and circles with head holes.

Alterations: dropped front neck, increased length of neck and arm bands, bands were attached and then twin needled down. Also no hem, the lycra doesn’t fray so I just cut super straight and left it raw.

Fabric: Printed Polyester/lycra purchased at Pitt Trading.

Skirt Pattern: Tsurah Designs straight skirt, made many times before.

Alterations: Shortened skirt to suit my height.

Fabric: Grey Marle Ponte purchased at Cabramatta.