Posted on 2 Comments

Sewing Adventures – the weird Simplicity pants of mehness

Some days you make good things. Some days you make bad things and some days you make something that just makes you confused.
These pants confuse me.


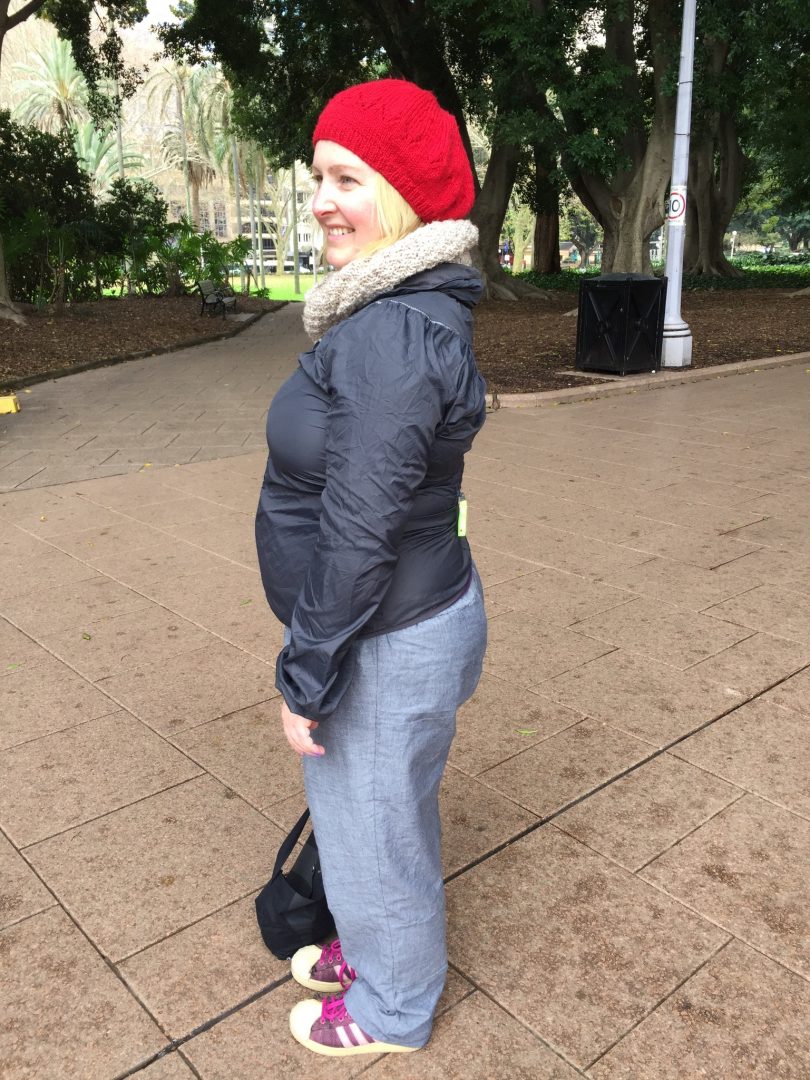
It’s Simplicity 1377 elastic waist pants. Here are some photos of them being worn today in the wet and wind. I’ve got them paired with a RTW spray jacket and mum knitted beret and scarf.

I wanted some long pants to take hospital and to wear afterwards. Not having time for a toile I did what I usually do in those circumstances and measured the pattern pieces. I checked the length. Width at thigh, waist circumference and it was looking fine so I cut out. This is some stash fabric which I’ve used before to make The Englishman a jinbei from. It’s soft and has a decent drape.


The pants themselves were straight forward to put together and before I added the elastic I popped them on. They were short in the crotch like really short. You could see my underpants at the back and it barely covered the front of my underwear. I did some double checking and it has a sewn on waistband. So I cut out the waistband, added the elastic and attached it to the pants.


They still look weird. The back is really short and the front is weirdly long (yes I’ve double checked to make sure I hadn’t put them on the wrong way round). Having the sewn on waistband looks cheap and is bulky too, the legs are a decent width and the ankles don’t flap about while you are wearing them, it’s just the crotch is all wrong.
While wearing them it feels both like they are falling down and as if you are giving yourself a wedgie at the same time.


I haven’t had a chance to properly analyze the pattern but instinct says a grown on waistband would look better and solve some of the height issues. The crotch depth on front and back should be raised, the back crotch should be scooped out (especially for anyone who like me has a rounded bottom) and I’d look at where the crotch join is? It’s possible it’s too far forward which is causing the “falling” feeling? Not sure as some of the other fixes may take care of that before you need to get to that point.
All in all, not so successful but while they look and feel terrible they do the job. Filling the gap in my wardrobe till the post surgery swelling goes down and I can fit back into my regular clothes but I don’t think I would make again.

Pattern: Simplicity 1377

Alterations: too many to justify using the pattern again

Fabric: from the stash

Posted on 2 Comments

Everyone deserves Pretty Lingerie: Named Asaka Robe

I’ve made this pattern once before for a friend and always wanted one of my own and yet just hadn’t got round to it. Then early last year we had our very first Sydney Spoolettes Swap meet (you can read about it here). Where I picked up this lovely Japanese cotton. It has an ombré fade across it and a printed panel edging on one side. I knew it would be perfect for this robe.


I had to be super careful with my pattern placement so the fade would be consistent across all the panels. But I was running just a fraction short on the front panels. A quick bit of cut and slicing later and there are extra seam lines near the shoulder at the front. Honestly am not even sure anyone would notice if I didn’t point them out but it meant everything fitted on correctly.
The neck band was a great way to utilize the printed border, again I had to add some seams to make it work but it looks so good I’m glad I took the time to sort it out.

Wanting an entirely clean finish I stitched on the underside with the idea of turning under the front and top stitching it down. However when I tried to do this I had nowhere near enough fabric and raw edges to deal with!
I took it into Pitt Trading with me and had a fun time matching trims to cover up the raw edge. There was a lovely lace trim that looked so pretty but I wanted to get it done quickly so I went with this lilac petersham ribbon. It’s just stitched over the top of the raw edges to keep everything neat. The excess I used to create the waist tie with.
Despite being incredibly lightweight it’s a lovely gown to wear. Not great on very cold nights but as a lovely cover up for warmer weather it’s just about perfect.

I like that despite the dramatic sleeves you can still use your arms (in fact am typing this while wearing it!). Here I am tucked up with my robe and quilt, it’s very hard to take a downwards photo while sitting.

It even looked good draped across the bottom of a hospital bed.

Highly recommended and perfect for gifts too.

Pattern: Named Asaka Robe

Alterations: changed front band construction to have clean finish, then had to add ribbon to fix the gap.

Fabric: from Sydney Spoolettes swap, thank you whomever dontated it!


Posted on Leave a comment

Everyone deserves Pretty Lingerie: Seamwork Alamda robe

The moment I saw the Seamwork Alamda regrammed by Sophie from Ada Spragg I knew I had to give it a try, I really liked the sleeves and front tie and was smitten.
Cue a few weeks after that and this gorgeous silk came into Pitt Trading. Besides the lilac there is nothing here I normally like, peach, animal print all usually end in a big NO from me. This however I found irresistible. So I grabbed some.
In the meantime I’d read a few reviews and almost all of them complained about how short the gown was. Now not being blessed in the leg department I didn’t think I had much to worry about but when I cut it out I cut to the very longest length possible.
Then like so many great projects it got packed into the “current projects” box and left for a year. Not the best that’s for sure.
Then a few weeks ago knowing I was bound for hospital, I grabbed it from it’s super large zip lock bag, French seamed the sides, shoulders and attached the bands and created the bands. It took like no time at all! Seriously fast make.


I didn’t like the way the neckline was finished by just turning it under and topstitching. It seemed a bit down market for a garment that is a huge fabric eater and due to the fact I used silk I wanted a better finish. So I cut bias strips and created my own binding. Silk bias binding is certainly a thing you cannot rush so I spent an enjoyable afternoon carefully ironing it into place.
The bias finish went on really well except I want to do a better mitre on the corners.
I also cut the front ties longer, in fact I cut them the entire width of the fabric. This allows me to either wrap it around me or tie it in a very huge looping bow at the front. It’s cute but I probably wouldn’t do this next time as if you are just quickly throwing the gown on you can trip over the long ties.


Overall I really like it as a gown, it has good coverage but allows for plenty of movement, the silk is wonderfully lightweight yet keeps you warm and the whole thing packs to practically nothing.
Definite win and would make again.

The weather has been atrocious the last few days and I’ve missed getting some extra photos of this make, am hoping I can add some more in soon!

Pattern: Seamwork Almada very luxurious would make again
Alterations: narrow bias binding to finish neckline and front edges, super long front ties
Fabric: Designer silk from Pitt Trading

Posted on 2 Comments

Everyone deserves Pretty Lingerie: Ohhh Lulu Romper

I’ve long admired Ohhh Lulu patterns and her style. I really like the fabrics and lace combos she comes up with. They seem cute and feminine but with this cool edge to them somehow?


The Evelyn romper is one I’ve been swaying back and forth on since it came out. “Oh it’s cute!” “Perfect to help use up my silk stash” to “is it comfy?” “Are the legs too short?” “Will it look weird on my shape?”. So I finally gave in, bought it and made it up.

I got the .pdf and it went together well, there is a slight mistake on one of the first pages where some of the size lines are marked incorrectly. Just keep an eye out for it and once you have the pages taped together trace your own size using a highlighter so it doesn’t get confusing.

First the sewing. It’s a bit of a fabric eater as it’s all on bias but not overly so. According to the sizing I’m a different bottom to top size so as I cut out the bottoms I angled the side seams to match the same same I was going to cut the top in. I dived into the stash and found a cute vintage cotton seersucker to use.

Once I started sewing it went together with utter ease. Everything lines up, all the sizes match together. Such a nice way to sew when patterns just work.
The self fabric bias is a really nice touch. I like the wider style on this cotton but I think if I did use a silk I might take it narrower just to add to the delicate nature of the style?


Initially the waist is meant to be a casing that elastic is threaded through. Because this is a toile and I have heaps of lingerie elastic I used that instead and topstitched it into place. The triple stitch zig zag made short work of it and looks wise it’s fine on the cotton. Again on a fancier silk set I would do the casing as I think it looks better in the fabric with more sheen.


Comfort wise I’m still testing them out. I’m a super wriggly sleeper so wasn’t sure how they were going to fare or if they were best suited for lounging about at home in the hot weather? They are very cheeky cut on the bottom, like very. Someone asked me if it could be used as a romper for day wear? Well it could but it would expose quite a lot of your bottom?

The front comes quite low exposing cleavage but you don’t feel like you are going to fall out of it? I don’t know how to properly explain it but it kind of covers you up and yet shows a lot of skin at the same time? Cute but certainly puts it in the wear to bed only category.
Pattern: Ohhh Lulu Evelyn Romper very cute would make again
Alterations: narrow bias binding for silk, do waist casing for silk, potentially add some length and even lace to the leg hems?
Fabric: vintage printed cotton seersucker from the stash

Posted on 3 Comments

Sewing Adventures – patchwork quilt


The problem with wanting to make ALL of the things means I can get easily sidetracked. Hence my work in progress box is always overflowing. So I’ve decided to knock it down to size one project at a time.


First off the rank was this quilt top I pieced last year. It’s made entirely from scraps leftover from other makes.


After finishing the piecing I laid 2 layers of bamboo batting underneath and a piece of vintage cotton for the back. Pinned together it’s been folded up and abandoned since then.
So today I took it out and quilted the pieces together. I kept it simple and just did one line of stitching one foot width above each horizontal join line.
The batting and the backing extended past the top panel. Once I was finished with all the quilted stitch lines I cut the batting and backing to the same size as the top. I have no idea if that’s how you are meant to do it or not? It seemed to make sense to do it that way and I’m glad I did as there was a bit of movement from the stitching.


Digging in the stash I came up with this cute striped binding for the edging. I briefly considered trying to attach it in one step but then thought better of it due to the thickness of the pieces. Attaching the binding by stitching it onto the back all the way around and then turning it over to stitch from the front. Am so happy with how neat it looks, I’ve never done any kind of quilt binding before and it’s quite fun.

The mitred corners aren’t great but I’m ok with that for a first go.
All that was left was to trim the spare threads then pop into the top roof for some photos on a rather hazy day.

Pattern: just cut squares and placed them in a pleasing arrangement
Fabric: scraps from other makes
Changes for next time: perhaps full bed size?

Posted on Leave a comment

Working with Prym Products

A few weeks ago I was introduced to the team at Prym Consumer who were interested in getting more sewers using their products. I’d seen some of their products being used online and was impressed at how clever they were.

After some back and forth discussing ideas they decided the best thing was to send me a bunch of products and essentially let me play.

Cue  2 enormous boxes of products turning up just after The Englishman broke his shoulder. I had to unpack straight away as the boxes were too big to stay inside our tiny apartment (though the cat was thrilled with having more boxes to sit in). I had a quick look and my jaw dropped at how fabulous a quality the products were. Due to all that we have had going on I packed them all up and popped them to one side.

Fast forward to this week and it’s been my first time to sit down and go through everything properly and figure out how I’m going to use it all. Seriously it was like Christmas, so much good stuff and my brain kind of exploded on all the ideas I kept coming up with.

As always I’m going to be honest about the products. If I love them I’m going to say so, if I’m impressed I’ll say so, if it’s too fiddly or tricky or just plain doesn’t work then I’ll be telling you that too. While I got the products for free and intend on using them all, I’m going to be upfront about the whole thing and it will be utterly transparent.

Am hoping it will introduce you and me to some great new products.For anyone who is keen on giving some a try? The awesome team at Minerva Crafts is offering you a discount on any Prym products. Just enter SUSAN at the checkout

Posted on Leave a comment

Sewing Adventures- Boxy pouch with pandas!

I rarely indulge in ordering from Miss Matatabi because well let’s face it. I could ship the entire store to my house and still want more? I adore the prints, the quality and the entire Japanese aesthetic.

So last year after a particularly crappy time of it, I made up an order and eagerly awaited my parcel. As suspected it was all amazing.

I knew I wanted to make a boxy style pouch to carry some of my sewing bits and pieces with me to classes that I teach. I tried to make up a pattern and got distracted, I tried searching for a pattern and could never find exactly what I needed. Then I spotted it, the perfect boxy pouch.

The Thrifty Stitcher is Claire Lousie (or CL) is a good friend and I sent her an email asking her about it? She kindly sent me the link to the handouts she uses for class and they are genius! seriously if you want to learn how to sew in London go and see her. Not lucky enough to live in London? Then take her online class she is brilliant and her way of explaining things is spot on. You truly are “learning to sew with a pro”

Following her expert guidance I made my pouch and I added a lining too (that bit I did on my own, it wasn’t in the notes). Super happy with the result too. I’d actually like another one that is bigger, I might add some kind of stabilization to that one to help maintain it’s shape.

Pattern: Boxy pouch from The Thrifty Stitcher
Fabric: pandas (not currently available but here are other awesome Panda fabrics) from Miss Matatabi
Changes for next time: brilliant as is, perhaps do a second bigger size with stabilization just to carry a few more things?

Posted on 1 Comment

Sewing Adventures – sock Giraffe

A good friend recently had her baby shower and I had to make her a gift. I knew I wanted to make a sock toy as that’s my go to gift for all the small people in my life. Naturally I used a Craft Schmaft pattern as Claire’s patterns are the best and the cutest!

The patterns are wonderfully laid out and simple to follow. I didn’t have any grey socks in my sock toy supplies but a quick trip to Uniqlo and a beautiful textured pair was found. I had stuffing on hand and the yellow double satin ribbon I got at Pitt Trading.

Because I used men’s business socks he ended up quite tall which is kind of cool but did make his neck/head combo a little floppy.

I love the horns they are so cute! The ruffle is created by sealing the ends of the ribbon (I used a match), gathering it and stitching it along the head and down the back. It’s looks speculator but I had a little difficulty because the ribbon is such thick amazing quality my handsewing needles didn’t want to go through it! I ended up using my super sharp very fine embroidery needles to get it done.

I hope the soon to be mum liked it and that her soon to be born baby likes it too?

In my pre blogging days I had made another version of the Giraffe for one of my sisters kids. A slightly more colourful version.

Pattern: GRaff from Craft Schmaft
Fabric: grey socks from uniqlo, yellow ribbon from Pitt Trading, stuffing from stash
Changes for next time: none

Posted on 2 Comments

Sewing Adventures – Shibori Dress

This one has been sitting waiting to be posted for oh forever. I’ve never been happy with the photos I get of this dress and well today I decided it doesn’t matter just go with it.

Sometimes it’s just ALL ABOUT THE FABRIC and this is certainly one of those cases. When we attended the Shibori workshop I knew I wanted to create a piece of fabric that I could turn into a garment. With that in mind I found some nice quality 100% cotton, pre washed it and took it with me to the workshop. It dyed fantastically well but it’s a super solid fabric so it has zero give in it, sometimes while wearing the finished dress it feels somewhat restrictive. You can see here how it pulls at the waist and the strain on the invisible zipper.

After learning about the techniques and having a bit of an experiment (the results of those I used here) I decided to go with an Itajme resist, where wooden shapes are used alongside the folding and pleating to create the design. It’s wonderfully effective and I loved the end result. What I really loved those was the pieces where the folds weren’t perfect and you go these cool spiderweb style designs.

In order to show it off I went with my basic bodice that I’ve been trying to perfect and a pleated skirt. The skirt is just 2 rectangles pleated. At the centre back I even had to cut down the centre of the rectangle to get an invisible zipper in. Not wanting to waste a single millimeter of this fabric I’ve used all the way to the selvedges, have tiny seam allowances and just let the fabric do all the work. The entire dress is lined in cotton voile to help make it more opaque.

I love it! It is beautiful to wear and the inky lines are so pretty. I think I can safely say this is not the last time I will be experimenting with creating my own fabric designs using Shibori techniques.

Pattern: my own bodice block, pleated rectangles for skirt
Fabric: 100% cotton shibori dyed
Changes for next time: increase size of bodice to allow for zero give in fabric as the bodice gets too tight.

Posted on 19 Comments

Sewing Adventures – McCalls 7417 rash vest and pants

Sometimes accidents happen and this is one of those happy joyous accidents. Where I’ve made something I really love the fabric combinations.
Earlier this week I posted this image on Instagram.


I was intending to make my niece a rash vest to go with her roarsome swimsuit. Well I’m not sure if I’ve lost a sheet or am reading the pattern wrong but I cannot find the child’s pattern in this? I kept unfolding and rechecking and still nothing? Instead of getting stuck with searching for it it falling down a rabbit hole of internet research on it, I opened up my swimwear fabrics tub and started pulling out likely fabric combinations for myself.
This navy self spot was a The Fabric Store purchase from a few years back. It’s nice and thick but doesn’t have really great stretch as it’s a nylon knit with just a little spandex. It is however super cute.


The pattern fabric was something I spied on Instagram, had a meltdown about and was assisted by the amazing @_littleblackcloud in getting me some from Rathdowne fabrics. It’s super stretchy but quite lightweight.
Much laughter occurred at the idea of a cropped rash vest on Instagram. I mean it’s not exactly practical is it? However if you are not blessed with height the cropped version is actually a decent length. I added 2cm to the hem length of the crop version to make this top (keep in mind I’m only just 5 foot tall so this mod won’t work for taller people). EDIT: I’ve just come back from paddling and I have to say the cropped version doesn’t work, it keeps moving around and exposing my stomach. Unless you are wearing it over a one piece do not cut the cropped version.


To keep the top as lightweight as possible I used the navy spot as the side panels and cut the rest in the pattern. Once it was together I tried it on and ended up slimming down the arms as they were too baggy. I deliberately didn’t make it skin tight as I want to use it for stand up paddling. I paddle for about an hour each time I’m out. For the final few minutes of each session I take off my rash vest and paddle in my bikini. This gives me a huge dose of vitamin D but also ensures my fair skin doesn’t burn. If it’s super tight it’s really hard to get off while standing on the board.

Sleeve hems were overlocked and turned up to be topstitched down. The garment hem I added some clear 6mm elastic into the hem to help keep it in place during the paddling motion.


Now for the bottoms. As mentioned previously the patterned fabric is lightweight so I reversed the top layout by cutting the center of the pants in the navy and the sides in the pattern. As I do with all swimwear, all major seams were sewn then I try it on and adjust the fit. I took evenly off each seam allowance until they reached the desired fit. I also added a full lining and applied the elastic as I usually do and didn’t bother with their instructions on it.
There are some serious issues I have with this pattern.
1.5cm Seam allowance on swimwear, utter craziness. The seams are way too bulky and it makes the crotch way too wide causing odd bunching.
The bottoms only come with a gusset lining. No and no. Once the panels were together and adjusted I laid them flat and used them as a template to create a full front and back lining. The gusset is also far too wide, I found it went across and then down my legs and kept folding back up. So I cut it narrower. Perhaps use an existing swimsuit or even bikini knickers to judge your correct width?


It indicates the patterns are to be cut on the cross grain. To me this suggest cutting on the bias. Why on earth would you cut swim fabric on the bias? It certainly doesn’t need to be. Surely the correct terminology would be tell you to cut with the greatest amount of stretch going around the body?
This combined with some odd styling notions makes me think it was designed by someone who saw a picture and went we need one of those but has no practical knowledge of how swimwear works?
Despite the crazy pattern I am very happy with the set, mostly due to the awesome fabrics. The fit is ok it could be improved but they are functional and that’s always a big plus when it comes to swimwear.

Pattern: McCalls 7417 size Large for top with extra 2cm added to the crop length and narrowed sleeves. Cut size large for the bottoms but probably adjusted down to an M but check stretch % on next fabric before cutting a straight M.
Fabric: navy self spot from The Fabric Store, print from Rathdowne Fabric, lining and elastic from Pitt Trading
Changes for next time: cut down seam allowance before making it up. Cut crotch narrower, make full lining for pants and narrow the arms more.

And now I need to go search for the children’s pattern hidden inside? or I might just head out for another swim